Ids for hot-swap hard disk drives, Installing a simple-swap sata hard disk drive, Hot-swap – Lenovo 6434 User Manual
Page 51: Hard, Disk, Drives, Installing, Simple-swap, Sata, Drive
IDs
for
hot-swap
hard
disk
drives
On
some
models,
the
hot-swap-drive
backplane
controls
the
IDs
of
the
internal
hot-swap
drive
bays.
The
following
table
lists
the
IDs
of
the
hard
disk
drives
and
backplane
that
are
connected
to
one
channel
in
the
hot-swap
models.
In
the
typical
configuration,
the
standard
hard
disk
drives
and
backplane
are
connected
to
channel
A.
This
table
applies
only
to
server
models
that
support
four
hard
disk
drives.
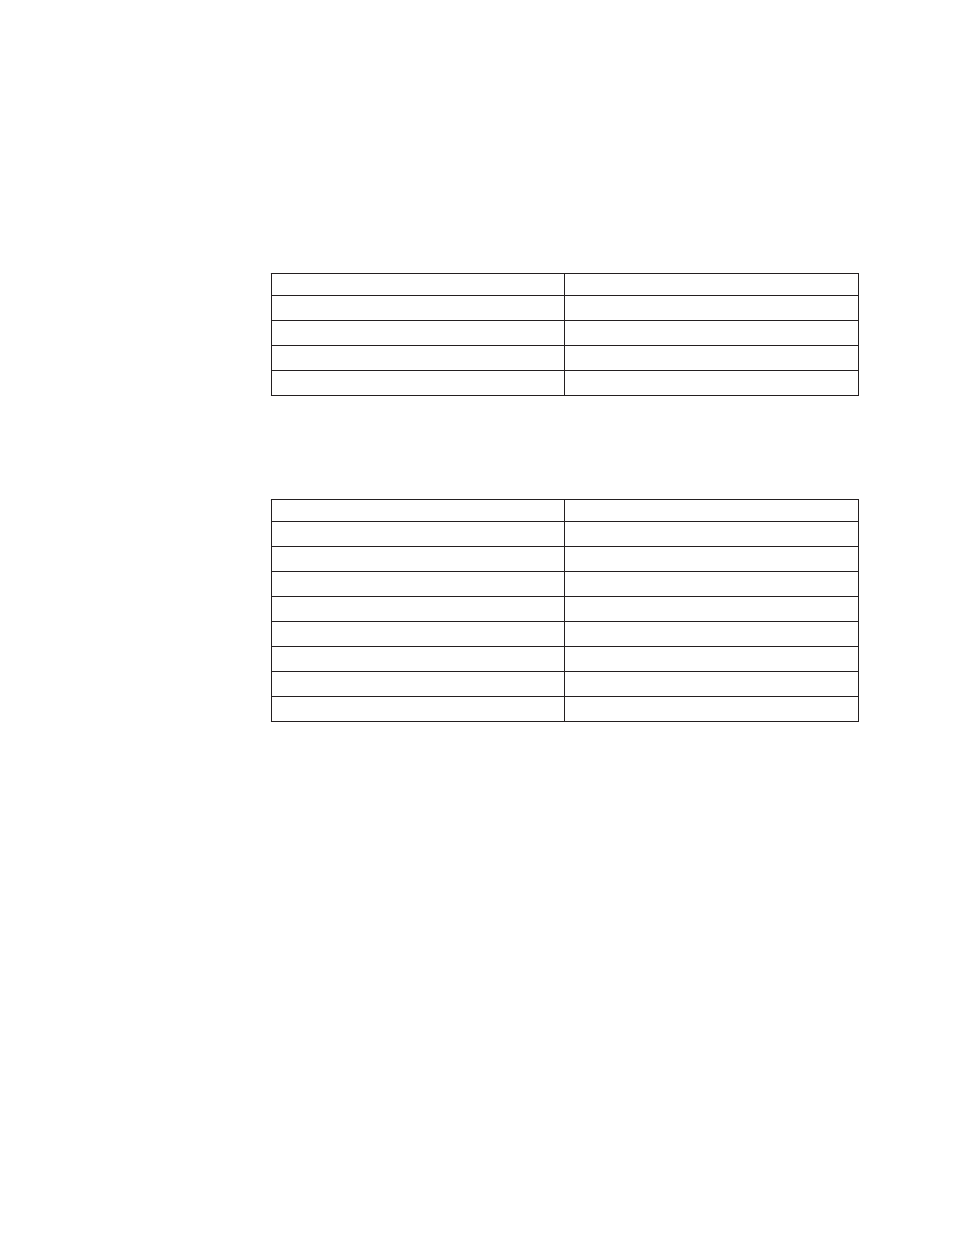
Table
9.
IDs
of
the
hot-swap
drives
(models
with
four
drive
bays)
Drive
bay
ID
4
0
5
1
6
2
7
3
If
your
server
model
is
the
type
that
supports
eight
2.5-inch
hot-swap
SAS
drives,
the
IDs
of
the
hard
disk
drives
are
shown
in
the
following
table.
Table
10.
IDs
of
the
hot-swap
drives
(models
with
eight
drive
bays)
Drive
bay
ID
4
0
5
1
6
2
7
3
8
4
9
5
10
6
11
7
Installing
a
simple-swap
SATA
hard
disk
drive
Some
server
models
support
3.5-inch
simple-swap
SATA
hard
disk
drives,
which
are
accessible
from
the
front
of
the
server.
You
must
disconnect
all
power
from
the
server
before
you
remove
or
install
simple-swap
drives.
Before
you
install
a
simple-swap
SATA
hard
disk
drive,
read
the
following
information:
v
You
can
install
four
simple-swap
SATA
hard
disk
drives
in
the
simple-swap
models
(7-drive-bay
models)
only.
v
Install
the
drives
starting
from
the
top
bay
to
the
bottom
bay
(bay
4,
5,
6,
and
then
7).
v
The
four
simple-swap
SATA
hard
disk
drives
connect
to
the
SATA
0
through
SATA
3
connectors
on
the
system
board
as
follows:
–
The
drive
in
bay
4
connects
to
the
SATA
0
connector
on
the
system
board.
–
The
drive
in
bay
5
connects
to
the
SATA
1
connector
on
the
system
board.
–
The
drive
in
bay
6
connects
to
the
SATA
2
connector
on
the
system
board.
–
The
drive
in
bay
7
connects
to
the
SATA
3
connector
on
the
system
board.
Attention:
Simple-swap
hard
disk
drives
are
not
hot-swappable.
Disconnect
all
power
from
the
server
before
you
remove
or
install
a
simple-swap
hard
disk
drive.
Chapter
2.
Installing
optional
devices
37