Lincoln Impringer Conveyor Oven 1200 User Manual
Page 73
Impinger I -–1000 Series Service Manual - International
73
ALL 1000 & 1200 SERIES OVENS
SWITCH SETTINGS
1 2 3 4 5 6 7 8 9 10
TYPE
I
OFF
OFF*
ON ON ON OFF*
*
TYPE
II
OFF
OFF*
OFF**
ON
ON
ON
TYPE
III
OFF OFF* OFF**
ON
OFF ON ON ON OFF
ON
(Baldor Motor)
TYPE III
OFF
OFF*
OFF**
ON
OFF
OFF
ON
ON
OFF
ON
(Stepper
Motor)
TYPE
IV
OFF OFF **
ON
OFF ON ON ON OFF ON
(Baldor Motor)
TYPE
IV
OFF OFF **
ON OFF OFF ON ON OFF ON
(Stepper
Motor)
*These switches are for Hertz settings (OFF=60HZ) & (ON=50HZ)
**These switches are for temperature read-out (OFF=Degrees F) & (ON=Degrees C)
c)
Turn power on.
d)
Calibrate time:
Place an object on the conveyor belt and time with a stopwatch, the elapsed time for
the object to travel through the oven. (Leading edge in to leading edge out.)
Push in and hold the set button.
Adjust the time calibration pot on the rear of the module until the display numbers
match the measured time. Seal adjustment pot. with Glyptol or nail polish.
e)
Calibrate temperature:
Place a temperature sensor in between top two fingers and set temperature control to
500°F; allow temperature to stabilize.
"Fine Tune" temperature setting to achieve measured temperature swings from
497°F to 503°F. So if actual temperature falls between 497°F and 503°F the display
must show 500°F. Adjust temperature calibration pot to achieve a display reading of
500°F(260°C).
1
2
3
4
5
6
7
8
9
10
1
2
3
4
5
6
7
8
9
10
HI
TEMP
TEMP
CAL
TIME
FROM
TRANSFORMER
TO
THERMISTOR
PROBE
RE
D
RE
D
YELLO
W
BLAC
K
P
URP
L
E
P
URP
L
E
WHITE
RE
D
YELLO
W
YELLO
W
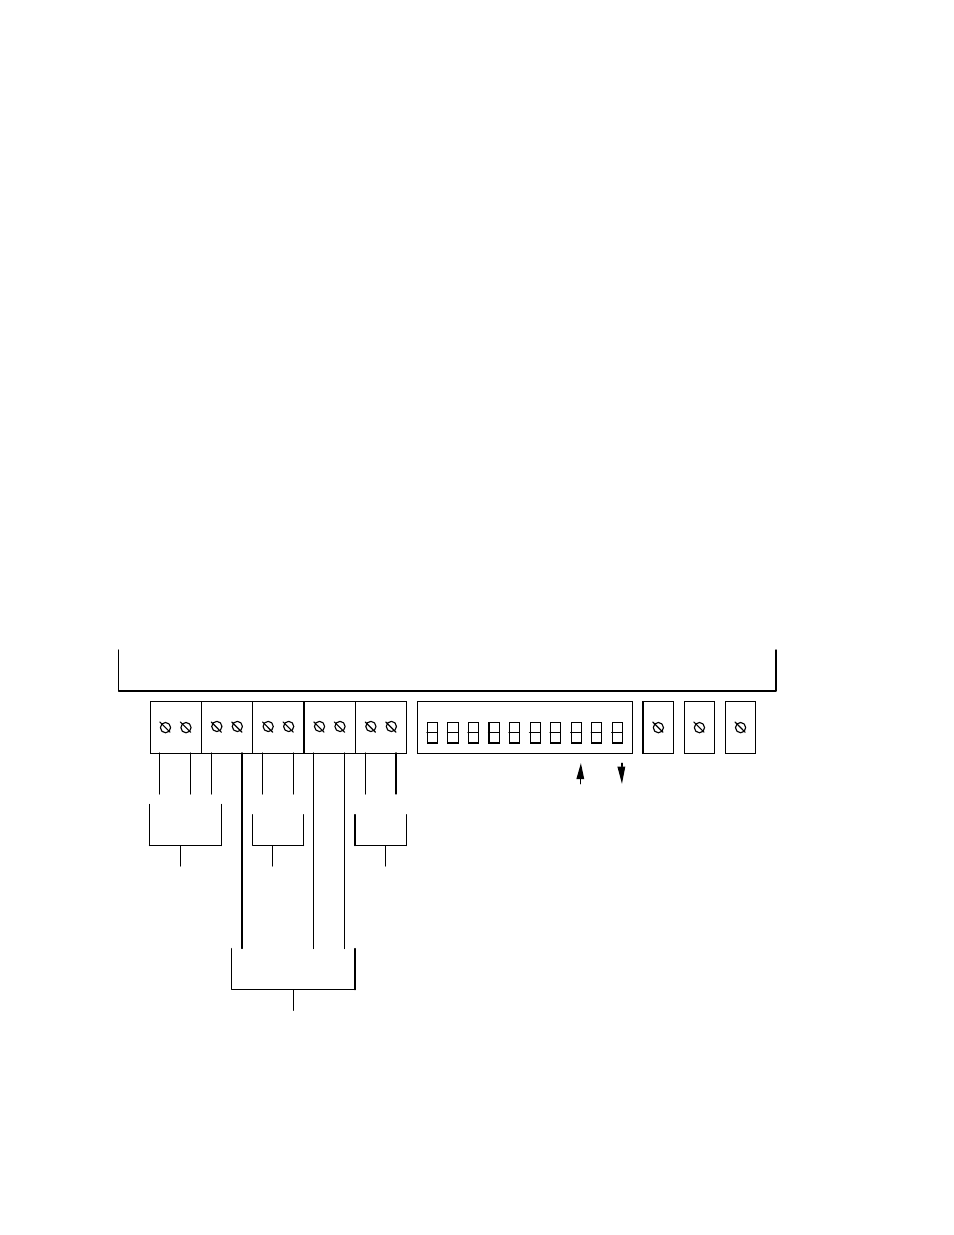
DIP SWITCH MODULE
(TYPE I AND II HAVE ONLY 6 SWITCHES)
SWITCH POSITION
ON
OFF
TO
SET
SWITCH
TO CONVEYOR
MOTOR PICK UP
To identify the module, measure the width of the case.
Type I is 51/8 inches wide
Type II is 5 5/8 inches wide
Type I & II have a 6 position dip switch module.
Type III has a 10 position dip switch module.
Type IV is 5 5/8 inches wide x 3 ¼ inches deep