SkyGolf SkyCaddie SGX User Manual
Page 11
11
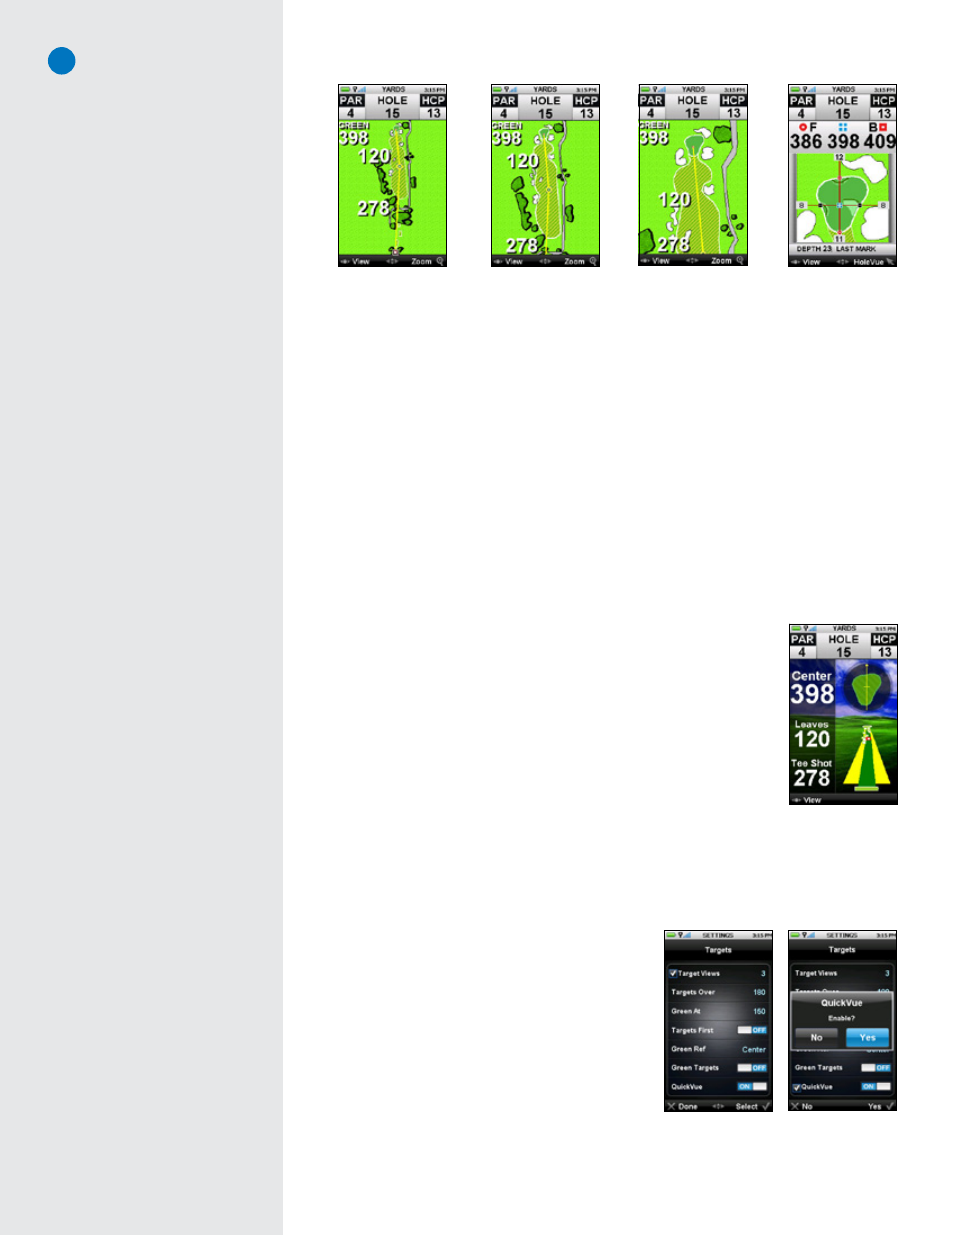
• To Zoom In or Out:
Selecting “Zoom” above the Right Key allows you to zoom three levels of the
HoleVue graphic. The first level of zoom provides a closer look at the fairway, the second level shows
a closer view of the hazards that will affect your approach shot, and the third level zooms directly to
IntelliGreen. Press the Right Key to get back to HoleVue.
• Tracking Shot Distance Within HoleVue:
Using the Mark Ball button, mark your location prior to
taking your tee shot. Once marked, the SkyCaddie will display the total yards of the hole at the top
of the display. Additionally, the distance from your last mark (noted as “Mark” on the display) will
automatically update as you advance down the fairway. (See section “Determining Shot Distance”
for more instructions on marking your shots.)
• Recording Distance Off Tee:
You can use the SGX to store your driving distance. Press the Mark Ball button
before your tee shot and again when you arrive at the location of your tee shot (make sure to press “Mark” in
the confirmation screen). Next time you sync the driving distance will upload automatically to ClubSG
BETA
.
3.3.2 QuickVue:
QuickVue shows the safest path from the tee to green and displays hazards and reliable targets that
will come into play as you move down the course. The hazards and targets update automatically as you
move down the course.
• Identify the Hazards:
QuickVue indicates hazards and targets by the following:
• White squares = hazards
• Bue squares = water
• Tall green rectangles = trees
• Red squares = tee-shot targets
• Knowing the Numbers:
The “Tee Shot” distance plus the “Leaves” distance
provides the total distance from the tee box to the green following the
safe path down the fairway. The “Center” distance is the linear distance
(a straight line) from the tee box to the center of the green. If you add up
the “Tee Shot” distance and the “Leaves” distance, it will not be the same
as “Center” distance because they are displaying the distance to the green
following two different paths to the green.
QuickVue will display on courses where HoleVue is not available. For the SGX, QuickVue is turned “ON”
by default and can be viewed on courses not currently mapped with HoleVue.
To Toggle QuickVue On or Off
1. Go to “Menu” then select “Settings”
2. Under “Settings”, highlight “Targets” and select
3. Highlight “QuickVue” and select to toggle ON/OFF
If a course has both HoleVue and QuickVue, HoleVue will
display instead of QuickVue. To view QuickVue instead of
HoleVue (available only for the SGX):
1. Make sure QuickVue is set to ON (see above)
2. Under “Targets”, highlight “Target Views” and select
3. Highlight “HoleVue” and select. The black dot next to “HoleVue” will disappear and it will be turned off
(see 3.3 for image reference)
Zoomed in 2x
Zoomed in 3x
Zoomed in 1x
Interactive HoleVue
QuickVue
Target preferences
QuickVue setting
Note
On Par 4s and 5s, a yellow line
appears by default from the fairway
target to the green. To see the yellow
line from your location to the fairway
target, press the Mark Ball button.
As you approach the fairway target,
HoleVue will update and the yellow
line from the fairway target to the
green will disappear. To see it again,
you can create a custom target with
XTarget or use the Joystick to drag the
target down from the green.