Schumacher SE-4225 User Manual
Page 12
•
8
•
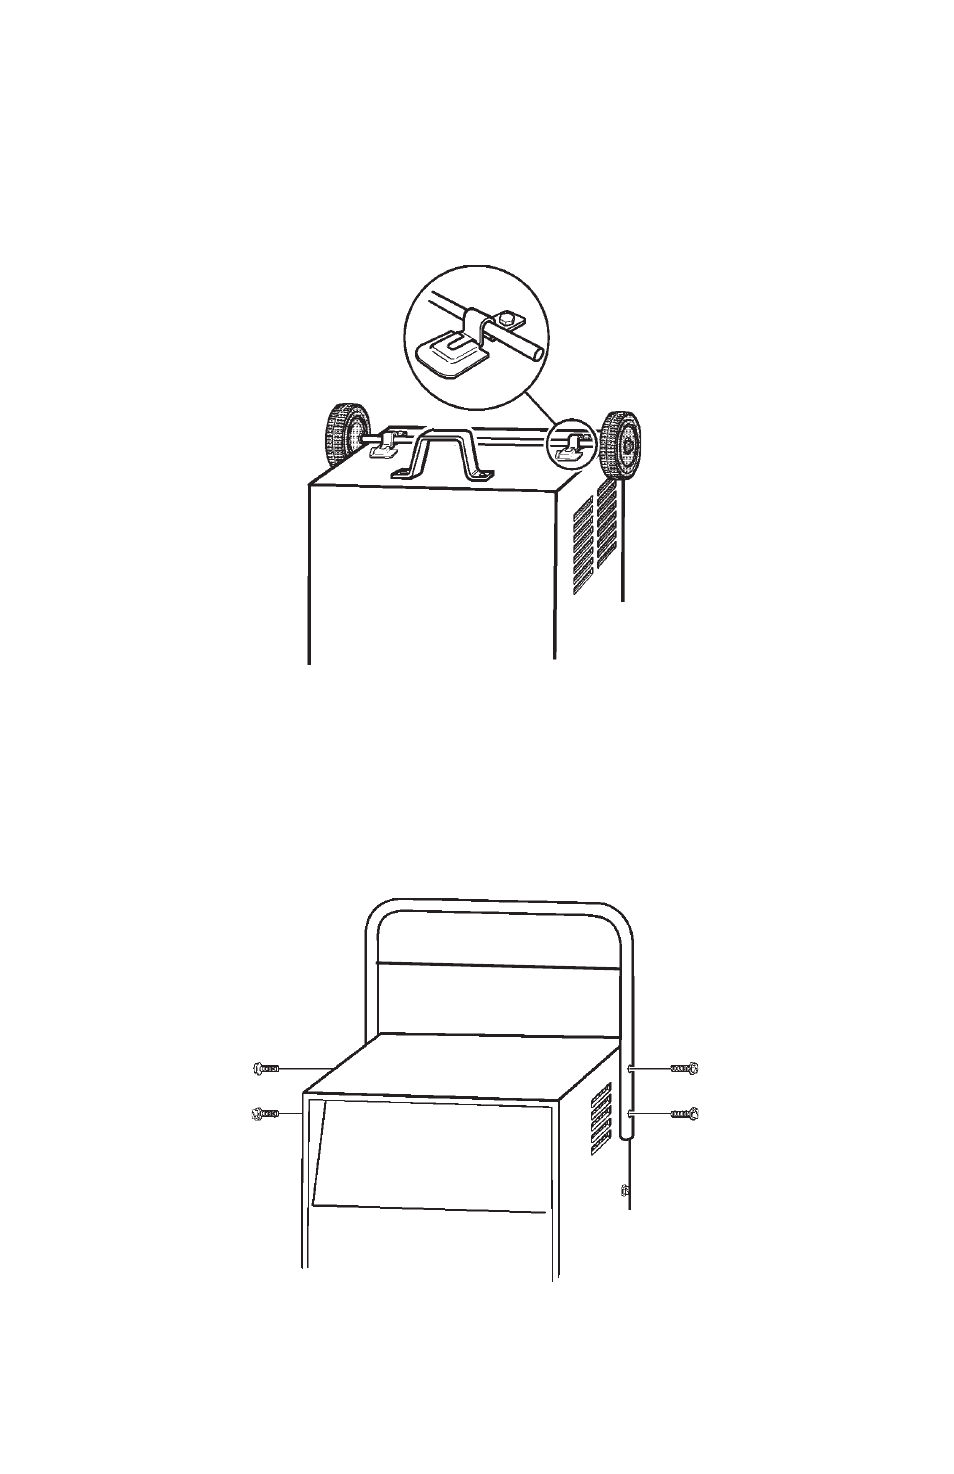
Mount the Axle to the Charger
10.4
: Place one end of each bracket into the
slot on the bottom of the charger. Place the axle assembly under each
bracket. Attach the brackets using the two, 10-32 thread cutting screws
provided.
NOTE: Be careful not to drop the brackets inside of the charger case.
Attach the Handle
10.5
: Turn the charger right side up onto its foot and
wheels. Remove the two top screws from each side of the charger. Insert
the fiberglass clip rod into the pierced holes on the inside of the handle.
Align the handle so the screw holes are aligned with the screw holes on
each side of the charger. Attach the handle using the same screws you
previously removed.
Charger assembly is now complete. Battery clips can be clamped to the
10.6
fiberglass rod for convenient storage.
- SE-210A (4 pages)
- SPEED CAHRGE SC-8000A (32 pages)
- SF-5212A (8 pages)
- SC-8010A (32 pages)
- SE-2001 (8 pages)
- SE-40MAP (34 pages)
- 1010-2-PE (12 pages)
- SC-12000A (32 pages)
- SE-70MA (12 pages)
- 9500A (8 pages)
- SF-6275A-PE (8 pages)
- 9275A-PE (16 pages)
- PS-1562A (8 pages)
- SE-3000 (8 pages)
- 200-30 (8 pages)
- INC-406A (39 pages)
- Proseries Automatic PS-1022M (36 pages)
- Shumacher Automatic/Manual SE-40MAP (6 pages)
- 00-99-000835 (32 pages)
- 85-716 (44 pages)
- SSC-1500A (44 pages)
- XC75 (48 pages)
- Automatic /Maintainer SP2 (35 pages)
- MC-1 (6 pages)
- SS-120A-PE (12 pages)
- Power Converter X141B (27 pages)
- 612A-PE (16 pages)
- PSC-12500A (16 pages)
- Manual Cargador de Batera Manual SE-2254 (31 pages)
- Automatic SEM-1562A (38 pages)
- NIN-800A (40 pages)
- Automatic with Engine Start SCI90 (47 pages)
- SE-2254 (42 pages)
- BT-100 (8 pages)
- BT-100 (2 pages)
- Jump Starter & DC Power Source PSJ-1812 (2 pages)
- WM-2500A (16 pages)
- 94080037 (32 pages)
- SS-15A3-OB (4 pages)
- 85-8100 (56 pages)
- BT-250 (8 pages)
- IP-1875C (40 pages)
- IP-1875C (2 pages)
- 10 Amp (12 pages)