English español – Samsung D365W(I) User Manual
Page 84
ENGLISH
ESPAÑOL
84
84
✤ The Print Mark function works only in
✤ This Camcorder supports the DPOF (Digital Print Order Format) print format.
✤ You can automatically print images recorded on a Memory Card with a printer
supporting DPOF.
✤ There are 2 ways to make a Print Mark.
-
image displayed on the LCD Screen. It can be set up to
999.
-
images.
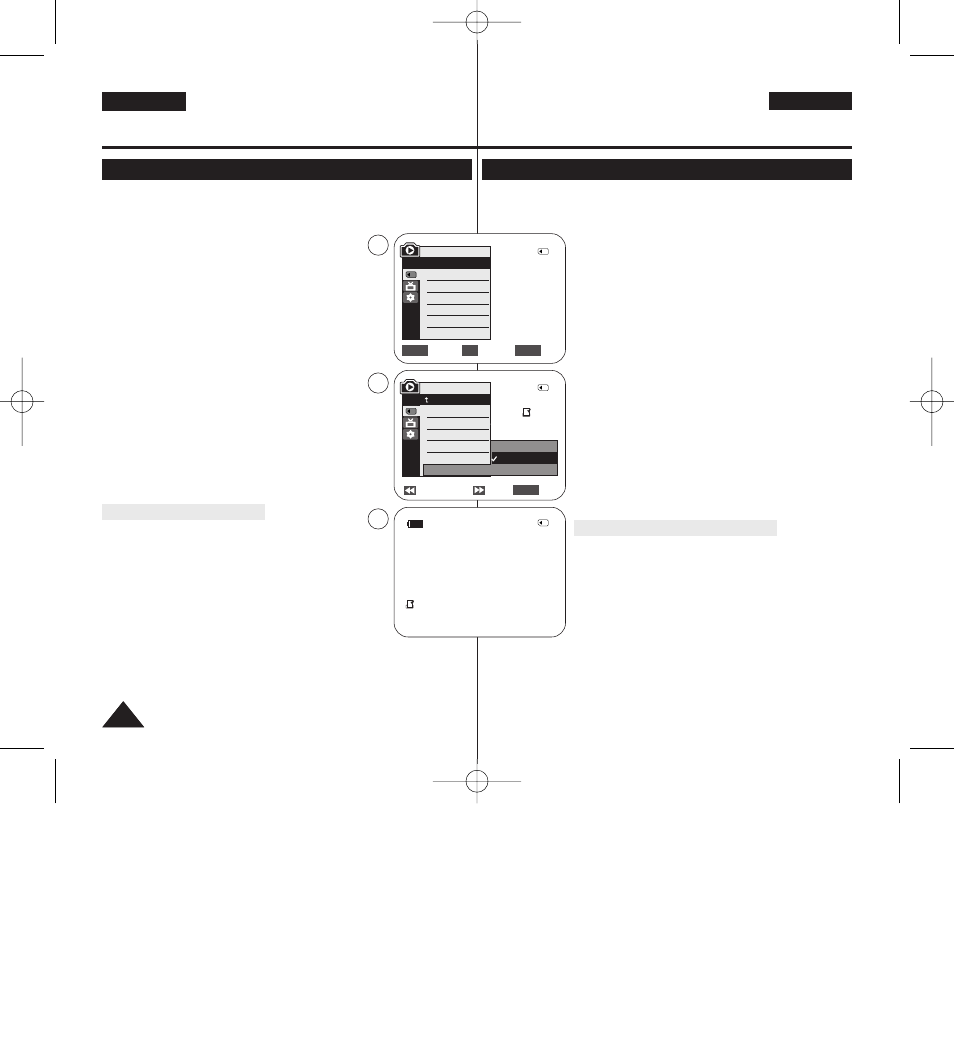
1. Set the [Power] switch to [PLAYER].
2. Set the [Mode] switch to [MEMORY].
■
The last recorded image appears.
3. Using the [œ
œœ
œ/√
√√
√ (REV/FWD)] buttons, search for the photo
image that you want to mark.
4. Press the [MENU] button.
■
The menu list will appear.
5. Move the [Zoom] lever up or down to select
6. Move the [Zoom] lever up or down to select
then press the [OK] button.
7. Move the [Zoom] lever up or down to select desired option
(All Off, This File or All Files), then press the [OK] button.
8. If you select
down to select the quantity, then press the [OK] button.
9. To exit, press the [MENU] button.
Removing the Print Mark
To remove all Print Marks select
To remove individual file’s Print Mark, select the file and set
[ Notes ]
■
Direct accessing the Print Mark function is available
simply using the [QUICK MENU].
➥page 20
■
If the Print Mark is set to
number of copies from <000> to <999>.
■
If the Print Mark is set to
number of copies to <1>.
■
The
number of stored images.
■
DPOF supporting printers are commercially available.
■
Use the USB cable provided with the Camcorder.
✤ La función de marca de impresión sólo está operativa en el modo
(Modo M.Play).
➥pág. 19
✤ Esta videocámara es compatible con el formato de impresión DPOF (Digital Print Order
Format).
✤ Es posible imprimir de manera automática imágenes grabadas en
una tarjeta de memoria con una impresora compatible con DPOF.
✤ Hay dos maneras de hacer una marca de impresión.
-
impresión en la imagen que aparece en la pantalla LCD. Se
puede ajustar hasta 999.
-
una de las imágenes guardadas.
1. Coloque el interruptor [Power] en [PLAYER].
2. Coloque el interruptor [Mode] en [MEMORY].
■
Aparece la última de las imágenes grabadas.
3. Busque la imagen que desee marcar pulsando los botones
[œ
œœ
œ/√
√√
√ (REV/FWD)].
4. Pulse el botón [MENU].
■
Aparecerá la lista de menús.
5. Mueva la palanca [Zoom] arriba o abajo para seleccionar
6. Mueva la palanca [Zoom] arriba o abajo para seleccionar
Mark> (Marca) y pulse el botón [OK].
7. Mueva la palanca [Zoom] arriba o abajo para seleccionar la
opción que desea (All Off
Arch.) o All Files (Todos Archiv)) y pulse el botón [OK].
8. Si selecciona
[Zoom] arriba o abajo para seleccionar la cantidad y pulse el
botón [OK].
9. Para salir, pulse el botón [MENU].
Eliminación de la marca de impresión
Para eliminar todas las marcas de impresión, seleccione
(Apagar todo)
Para eliminar una marca de impresión de un archivo individual,
seleccione el archivo y defina
[ Notas ]
■
Puede acceder directamente a la función Print Mark (Marca)
utilizando el botón [QUICK MENU].
➥pág. 20
■
Si Print Mark (Marca) está definido en
puede definir el número de copias de <000> a <999>.
■
Si Print Mark (Marca) está definido en
puede definir el número de copias en <1>.
■
Es posible que la opción
funcionamiento, dependiendo del número de imágenes guardadas.
■
Existen en el mercado impresoras compatibles con DPOF.
■
Utilice el cable USB que se facilita con la videocámara.
Digital Still Camera Mode
(VP-D363(i)/D364W(i)/D365W(i) only)
Modo de cámara fotográfica
digital (sólo VP-D363(i)/D364W(i)/D365W(i))
Marking Images for Printing (Print Mark)
Marcación de imágenes para impresión (Print Mark (Marca))
Previous Next
Exit
MENU
√Memory Card
√Photo
√Off
Move
Select
Exit
MENU
OK
ZOOM
M.Player Mode
√Memory
Memory Type
M.Play Select
Delete
Delete All
Protect
Print Mark
All Off
This File 002
All Files
5
7
M.Player Mode
Back
Memory Type
M.Play Select
Delete
Delete All
Protect
Print Mark
2/46
2/46
002
†
†
†
2/46
002
√
9
100-0002
800x600