Trimmer auto switch precautions 3, Caution, Connection and removal of connector – SMC Networks Series D- 7K User Manual
Page 8: Mounting with screws, Mounting and removal to din rail, Connection of sensor connector, Wiring mounting of amplifier unit, Be sure to read before handling
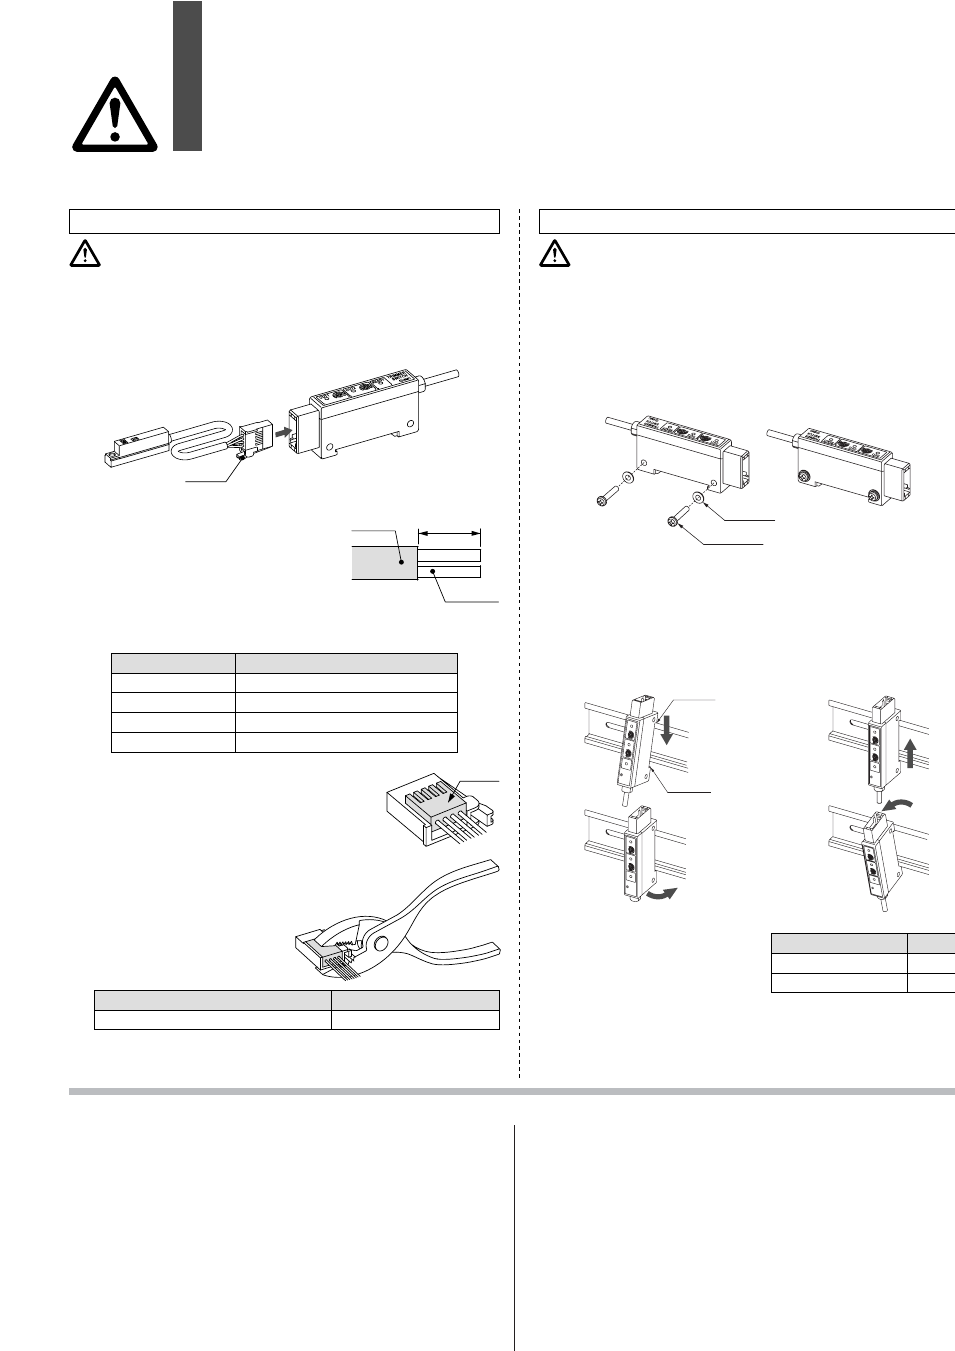
1. Connection and removal of connector
• Hold the lever and connector body with two fingers and
insert the connector straight into the pin until it is locked with
a click sound.
• To remove the connector, pull it out straight while pressing
the lever with one finger.
1. Mounting with screws
• Tighten two M3 x 16L mounting screws at a tightenin
torque of 0.5 to 0.7 N·m.
• Mounting surface should be flat and even. A bumpy
uneven mounting surface can result in damage to the case
3. Refer to each applicable actuator's catalogu
for the mounting of sensor unit.
• In the case of mounting to the
DIN rail, SMC recommends the
following end plates: as
detailed in the table on the
right. Consult each manufacturer
for the handling and details of
end plate.
2. Mounting and removal to DIN rail
Mounting
•
Hook the claw 1 of the
amplifier body to the upper
part of DIN rail, press down
and push horizontally until
the claw 2 is locked with a
click sound.
Removal
• To remove from the DIN ra
push the amplifier bod
upward and then pull
horizontally to release fro
the claw 1 side.
Wiring
Mounting of Amplifier Unit
Caution
• Use mounting screws (M3 x 16L) or DIN rail (35mm width).
• Adjust offset before mounting of the amplifier unit.
Caution
Lever
2. Connection of sensor
connector
• Cut the sensor cable as illustrated to
the right.
• Referring to the table below, insert
each lead wire of the cable at the
position marked with a number
corresponding to the colour of the
lead wire.
• Confirm that the numbers on the connector
match the colours of the wires and that the
wires are inserted to the bottom. Press
part A by hand for temporary fixing.
• Press in the central part of Part A vertically
with a tool such as pliers.
• A sensor connector cannot
be taken apart for reuse
once it is crimped. If the wire
arrangement is incorrect or
if the wire insertion fails, use
a new sensor connector.
• For detailed information about e-con connectors, please
consult the manufacturers of the respective connectors.
1
2
3
4
Part A
12
34
20mm or more
Sheath
Insulator
Connector no.
1
2
3
4
Wire core colour
Black (SOUT1)
Blue (GND)
White (SOUT2)
Brown (Vsw)
Manufacturer
Tyco Electronics AMP
Part no.
1473562-4
Manufacturer
OMRON Corporation
IDEC IZUMI Corporation
Part no
PFP-M
BNL6
Washer
M3 x 16L
Claw 2
OUT1
OUT2
TRIMMER
SWITCH
READ
Y
SMC
O
U
T
1
O
U
T
2
T
R
IM
M
E
R
S
W
IT
C
H
R
E
A
D
Y
S
M
C
Claw 1
OUT1
OUT2
TR
IMMER
SWITCH
READ
Y
SMC
O
U
T
1
O
U
T
2
T
R
IM
M
E
R
S
W
IT
C
H
R
E
A
D
Y
S
M
C
D-RNK
D-Y
7K
Trimmer Auto Switch Precautions 3
Be sure to read before handling
SMC CORPORATION (Europe)
Austria
+43 226262280
www.smc.at
Belgium
+32 33551464
www.smcpneumatics.be
Bulgaria
+359 2 9744492
www.smc.bg
Czech Republic
+42 0541424611
www.smc.cz
Denmark
+45 70252900
www.smc-pneumatik.dk
Estonia
+372 6593540
www.smcpneumatics.ee
Finland
+358 9859580
www.smc.fi
smcfi@smcfi
France
+33 164761000
www.smc-france.fr
Germany
+49 61034020
www.smc-pneumatik.de
Greece
+30 2103426076
www.smceu.com
Hungary
+36 13711343
www.smc-automation.hu
Ireland
+353 14039000
www.smcpneumatics.ie
Italy
+39 0292711
www.smcitalia.it
Latvia
+37 7779474
www smclv lv
info@smclv lv
Netherlands
+31 205318888
www.smcpneumatics.nl
Norway
+47 67129020
www.smc-norge.no
Poland
+48 225485085
www.smc.pl
Portugal
+351 226108922
www.smces.es
Romania
+40 213205111
www.smcromania.ro
Russia
+812 1185445
www.smc-pneumatik.ru
Slovakia
+421 244456725
www.smc.sk
Slovenia
+386(7)3885249
www.smc-ind-avtom.si
Spain
+34 945184100
www.smces.es
Sweden
+46 86030700
www.smc.nu
Switzerland
+41 523963131
www.smc.ch
Turkey
+90 2122211516
www.entek.com.tr
UK
+44 8001382930
www.smcpneumatics.co.uk