Schumacher Manual SE-1 User Manual
Page 2
2
Stay clear of fan blades, belts, pulleys, and other parts that can cause injury.
6.2
Check the polarity of the battery posts. The POSITIVE (POS, P, +) battery
6.3
post usually has a larger diameter than the NEGATIVE (NEG, N,–) post.
Determine which post of the battery is grounded (connected) to the chassis. If
6.4
the negative post is grounded to the chassis (as in most vehicles), see step
(6.5). If the positive post is grounded to the chassis, see step (6.6).
For a negative-grounded vehicle, connect the POSITIVE (RED) clip from the
6.5
battery charger to the POSITIVE (POS, P, +) ungrounded post of the battery.
Connect the NEGATIVE (BLACK) clip to the vehicle chassis or engine block
away from the battery. Do not connect the clip to the carburetor, fuel lines, or
sheet-metal body parts. Connect to a heavy gauge metal part of the frame
or engine block.
For positive-grounded vehicle, connect the NEGATIVE (BLACK) clip from
6.6
the battery charger to the NEGATIVE (NEG, N, –) ungrounded post of the
battery. Connect the POSITIVE (RED) clip to the vehicle chassis or engine
block away from the battery. Do not connect the clip to the carburetor, fuel
lines, or sheet-metal body parts. Connect to a heavy gauge metal part of the
frame or engine block.
When disconnecting the charger, disconnect the AC cord, remove the clip
6.7
from the vehicle chassis, and then remove the clip from the battery terminal.
FOLLOW THESE STEPS WHEN BATTERY IS OUTSIDE
7.
VEHICLE.
A SPARK NEAR THE BATTERY MAY CAUSE A BATTERY EXPLOSION.
TO REDUCE THE RISK OF A SPARK NEAR THE BATTERY:
Check the polarity of the battery posts. The POSITIVE (POS, P, +) battery
7.1
post usually has a larger diameter than the NEGATIVE (NEG, N, –) post.
Attach at least a 24-inch-long 6-gauge (AWG) insulated battery cable to the
7.2
NEGATIVE (NEG, N, –) battery post.
Connect the POSITIVE (RED) charger clip to the POSITIVE (POS, P, +)
7.3
post of the battery.
Position yourself and the free end of the cable you previously attached to
7.4
the NEGATIVE (NEG, N, -) battery post as far away from the battery as pos-
sible – then connect the NEGATIVE (BLACK) charger clip to the free end of
the cable.
Do not face the battery when making the final connection.
7.5
When disconnecting the charger, always do so in the reverse order of the
7.6
connecting procedure and break the first connection while as far away from
the battery as practical.
A marine (boat) battery must be removed and charged on shore. To charge
7.7
it onboard requires equipment specially designed for marine use.
BATTERY CHARGING - AC CONNECTIONS
8.
This battery charger is for use on a nominal 120-volt circuit.
8.1
DANGER – Never alter AC cord or plug provided – if it does not fit the out-
let, have proper outlet installed by a qualified electrician. Improper
connection can result in a risk of an electric shock.
ASSEMBLY INSTRUCTIONS
9.
No assembly required
OPERATING INSTRUCTIONS
10.
This unit is a manual charger and care must be taken to prevent over-
10.1
charging. Manual chargers will not shut off by themselves. While charging,
manual chargers must not be left unattended as severe battery damage or
other hazardous conditions may result. We recommend monitoring the bat-
tery’s condition at 1 to 2 hour intervals until full charge is reached.
Follow all safety and operating instructions in this manual.
10.2
Before connecting charger clips, make sure charger is removed from electri-
10.3
cal outlet.
When battery is installed in vehicle or equipment, follow connection se-
10.4
quence in section 6. When battery is charged outside vehicle or equipment,
follow sequence in section 7.
Insert charger into electrical outlet.
10.5
After charging is complete, disconnect charger, remove clip from vehicle
10.6
chassis and then remove clip from battery terminal. When charging battery
outside of vehicle or equipment, follow procedures covered in section 7.
Indication of a Fully Charged Battery
10.7
To determine the charge state of the battery, take a hydrometer reading
of the specific gravity of the electrolyte (fluid). A battery in good condition
should be between 1.25 and 1.285.
NOTE: During charging when a battery nears full charge (80% to 85%),
bubbles will appear on the surface of the fluid. At no time should the bub-
bling of the fluid resemble boiling water.
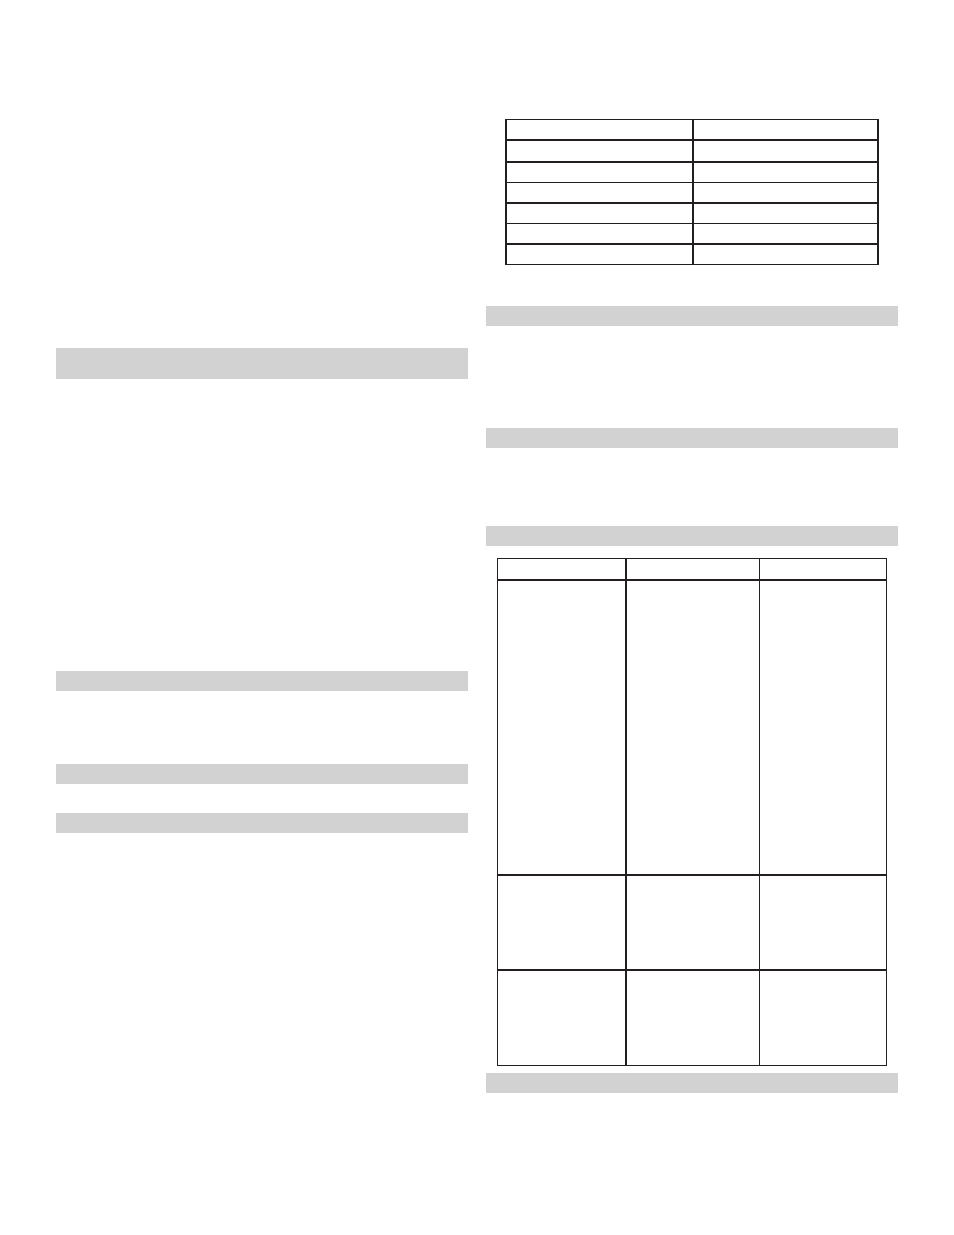
Charging Times
10.8
Find your battery’s rating on the chart below and note the charge time given.
The times given are for batteries with a 50-percent charge prior to recharg-
ing. Add more time for severely discharged batteries.
Amp Hour Battery Capacity
Average Charge Time in Hours
2
2 - 2.5
4
4 - 5
6
6 - 7.5
10
10 - 12.5
12
12 - 15
20
20 - 25
NOTE: The SE-1 is a manual battery charger. Charging must be monitored
to prevent overcharging of the battery.
MAINTENANCE INSTRUCTIONS
11.
Before performing maintenance, unplug and disconnect battery charger (see
11.1
sections 6.7 and 7.6).
After use, use a dry cloth to wipe all battery corrosion and other dirt or oil
11.2
from terminals, cords, and the charger case.
Servicing does not require opening unit, as there are no user-serviceable
11.3
parts.
STORAGE INSTRUCTIONS
12.
Store charger unplugged. Cord will still conduct electricity until it is un-
12.1
plugged from outlet.
Store inside, in a dry, cool place.
12.2
Do not store clips clipped together, on or around metal, or clipped to cables.
12.3
TROUBLESHOOTING
13.
PROBLEM
POSSIBLE CAUSE
SOLUTION
The charger is
making an audible
clicking sound.
This battery charger
is equipped with a
self-resetting circuit
breaker. This device
protects the charger
from temporary
overloads. In the
event of an overload,
the breaker will trip
open and after a short
cooling off period will
reset automatically.
This process is
known as cycling and
can be recognized by
an audible clicking
sound.
Battery is defective.
Shorted battery cables
or clips.
Severely discharged
battery, but otherwise
it is a good battery.
Reverse connections
at battery.
Have the battery
checked.
Check for shorted
cables or clips and
replace if necessary.
The battery may
not want to accept
a charge due to a
run-down state. Allow
charging to continue
until battery has a
chance to recover
sufficiently to take a
charge. If more than
20 minutes, stop
charging and have
the battery checked.
Unplug the charger
and correct the lead
connections.
Charger will not turn
on when properly
connected.
AC outlet is dead.
Poor electrical
connection.
Check for open fuse
or circuit breaker
supplying AC outlet.
Check power cord
and extension cord
for loose fitting plug.
The battery is
connected and the
charger is on, but is
not charging.
Clips are not making a
good connection.
Check for poor
connection at battery
and frame. Make sure
connecting points
are clean. Rock clips
back and forth for a
better connection.
BEFORE RETURNING FOR REPAIR
14.
When a charging problem arises, make certain battery is capable of accept-
14.1
ing a normal charge. Use a good battery to double-check all connections,
AC outlet for full 120 volts, charger clips for correct polarity, and the quality
of connections from cable to clips and clips to battery system. Clips must be
clean.