JVC VN-C11 User Manual
Page 18
18
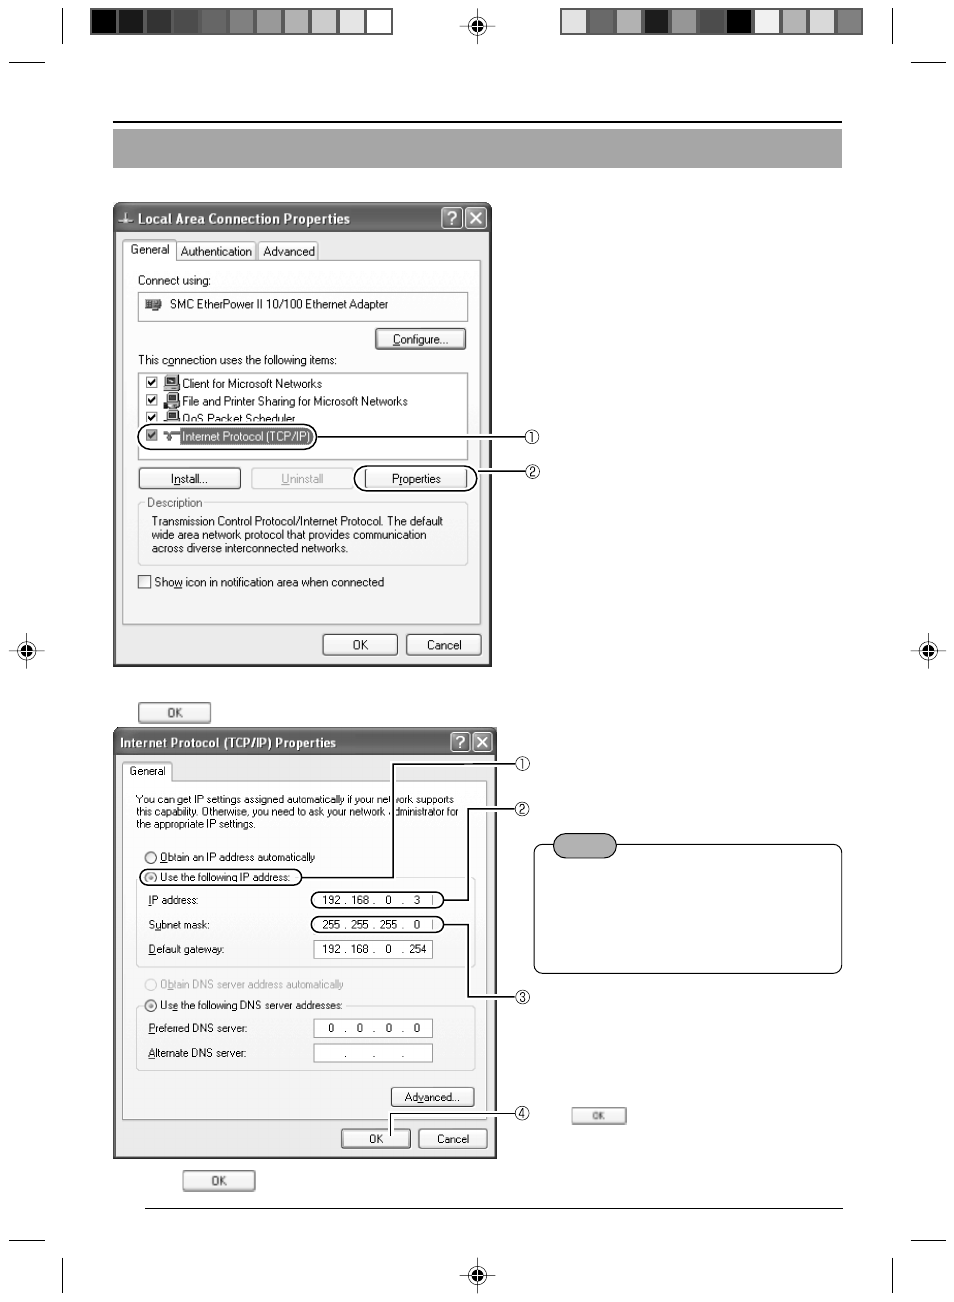
Setting the PC’s IP Address for Windows XP (continued)
3.
Select [Internet Protocol (TCP/IP)] and click [Properties].
4.
Select [Use the following IP address] to set [IP Address] and [Subnet Mask] and then click
.
Select [Internet Protocol (TCP/IP)].
5.
Click
in [Local Area Connection Properties].
Click [Properties].
Click
.
Select [Use the following IP address].
Set [IP Address] to “192.168.0.3.”
Note
● Before changing the IP address,
note down the original address.
● Do not use the same IP address
elsewhere in this network environ-
ment.
Set [Subnet Mask] to an appropriate value
according to the operating environment.
Ask the network administrator if necessary.
Preparations (Step 2 Setting the Network)
VN-C10_E_01-24.pm6e
03.4.24, 10:03 AM
18
See also other documents in the category JVC Video surveillance systems:
- LST0886-001A (85 pages)
- TK-C1530E (35 pages)
- TK-C1460 (84 pages)
- TK-C2201U (28 pages)
- WB-1550U (16 pages)
- 686BU (111 pages)
- TK-C655 (48 pages)
- VN-H217U (11 pages)
- OUTDOOR PTZ IP DOME CAMERA VN-V686WPU (44 pages)
- TK-C2201WPU (32 pages)
- VN-686WPBU (130 pages)
- LST0728-001C (168 pages)
- CU-V801U (2 pages)
- TK-C676 (44 pages)
- TK-C215V4 (16 pages)
- Wall Mount WB-S622U (4 pages)
- TK-C215VP12 (36 pages)
- VN-V26U (48 pages)
- TK-C205 (11 pages)
- VN-C215V4U (86 pages)
- LST0926-001A (18 pages)
- VN-V686U (44 pages)
- TK-C215V4U (24 pages)
- TK-C1531EG (70 pages)
- TK-C205VPU(A) (2 pages)
- WB-1550 (16 pages)
- TK-C675B (24 pages)
- TK-C215V12 (32 pages)
- VN-C625 (119 pages)
- TK-C625 (44 pages)
- TK-C215VP12U/E (40 pages)
- VN-V686WPU (119 pages)
- VN-C3U (2 pages)
- WB-1540 (16 pages)
- TK-C625U (1 page)
- TK-WD31 (48 pages)
- DZ-VCA1SE (28 pages)
- LST0728-001B (162 pages)
- VN-C215VP4U (48 pages)
- TK-C210FW (32 pages)
- TK-C926EG (60 pages)
- LWT0254-001B-H (44 pages)
- KA-H205U (2 pages)
- VN-V686UAPI (105 pages)