Installation, Removing the unit, When using the optional stay – JVC GET0576-001A User Manual
Page 144: When installing the unit without using the sleeve, Μ‘¥µ—èß, ª√–°õ∫·ºßàπ蓪н∑¡п‡¢и, Installation (in-dash mounting), Ëõ„™иµ—«¬ч¥·∫∫‡≈◊х°‰¥и, Ëõµ‘¥µ—ия™я¥ª√–°х∫‚¥¬‰¡л„™иª≈х°аяи, Х¥™я¥ª√–°õ
2
When using the optional stay /
‡¡◊ËÕ„™Иµ—«¬ч¥·∫∫‡≈◊Х°‰¥И
Note :
When installing the unit on the mounting bracket, make sure to use the 8 mm-long screws. If longer screws are
used, they could damage the unit.
À¡“¬‡Àµ
:
‡¡◊ËÕµ‘¥µ—ИЯ™я¥ª√–°Х∫≈Я„π·∑Лπ√ХЯ√—∫‰«И „АИ„™И °√Ÿ¬“«¢π“¥
8
¡¡. ∂И“„™И °√Ÿ¬“«°«Ë“π’ИХ“®∑”„АИ™я¥ª√–°Х∫‡ ’¬А“¬‰¥ф
Bracket
*
6
·∑Лπ√ХЯ√—∫
*
6
°–‡ª“–
Flat head screws (M5 × 8 mm)
*
6
°√ŸÀ—«‡√’¬∫
(M5 × 8
¡¡.
)
*
6
Screw
*
6
°√Ÿ*
6
Stay
*
6
µ—«¬÷¥*
6
Fire wall
ºπ—ß°—π‰ø
Dashboard
·ºßÀπÈ“ªн∑¡б
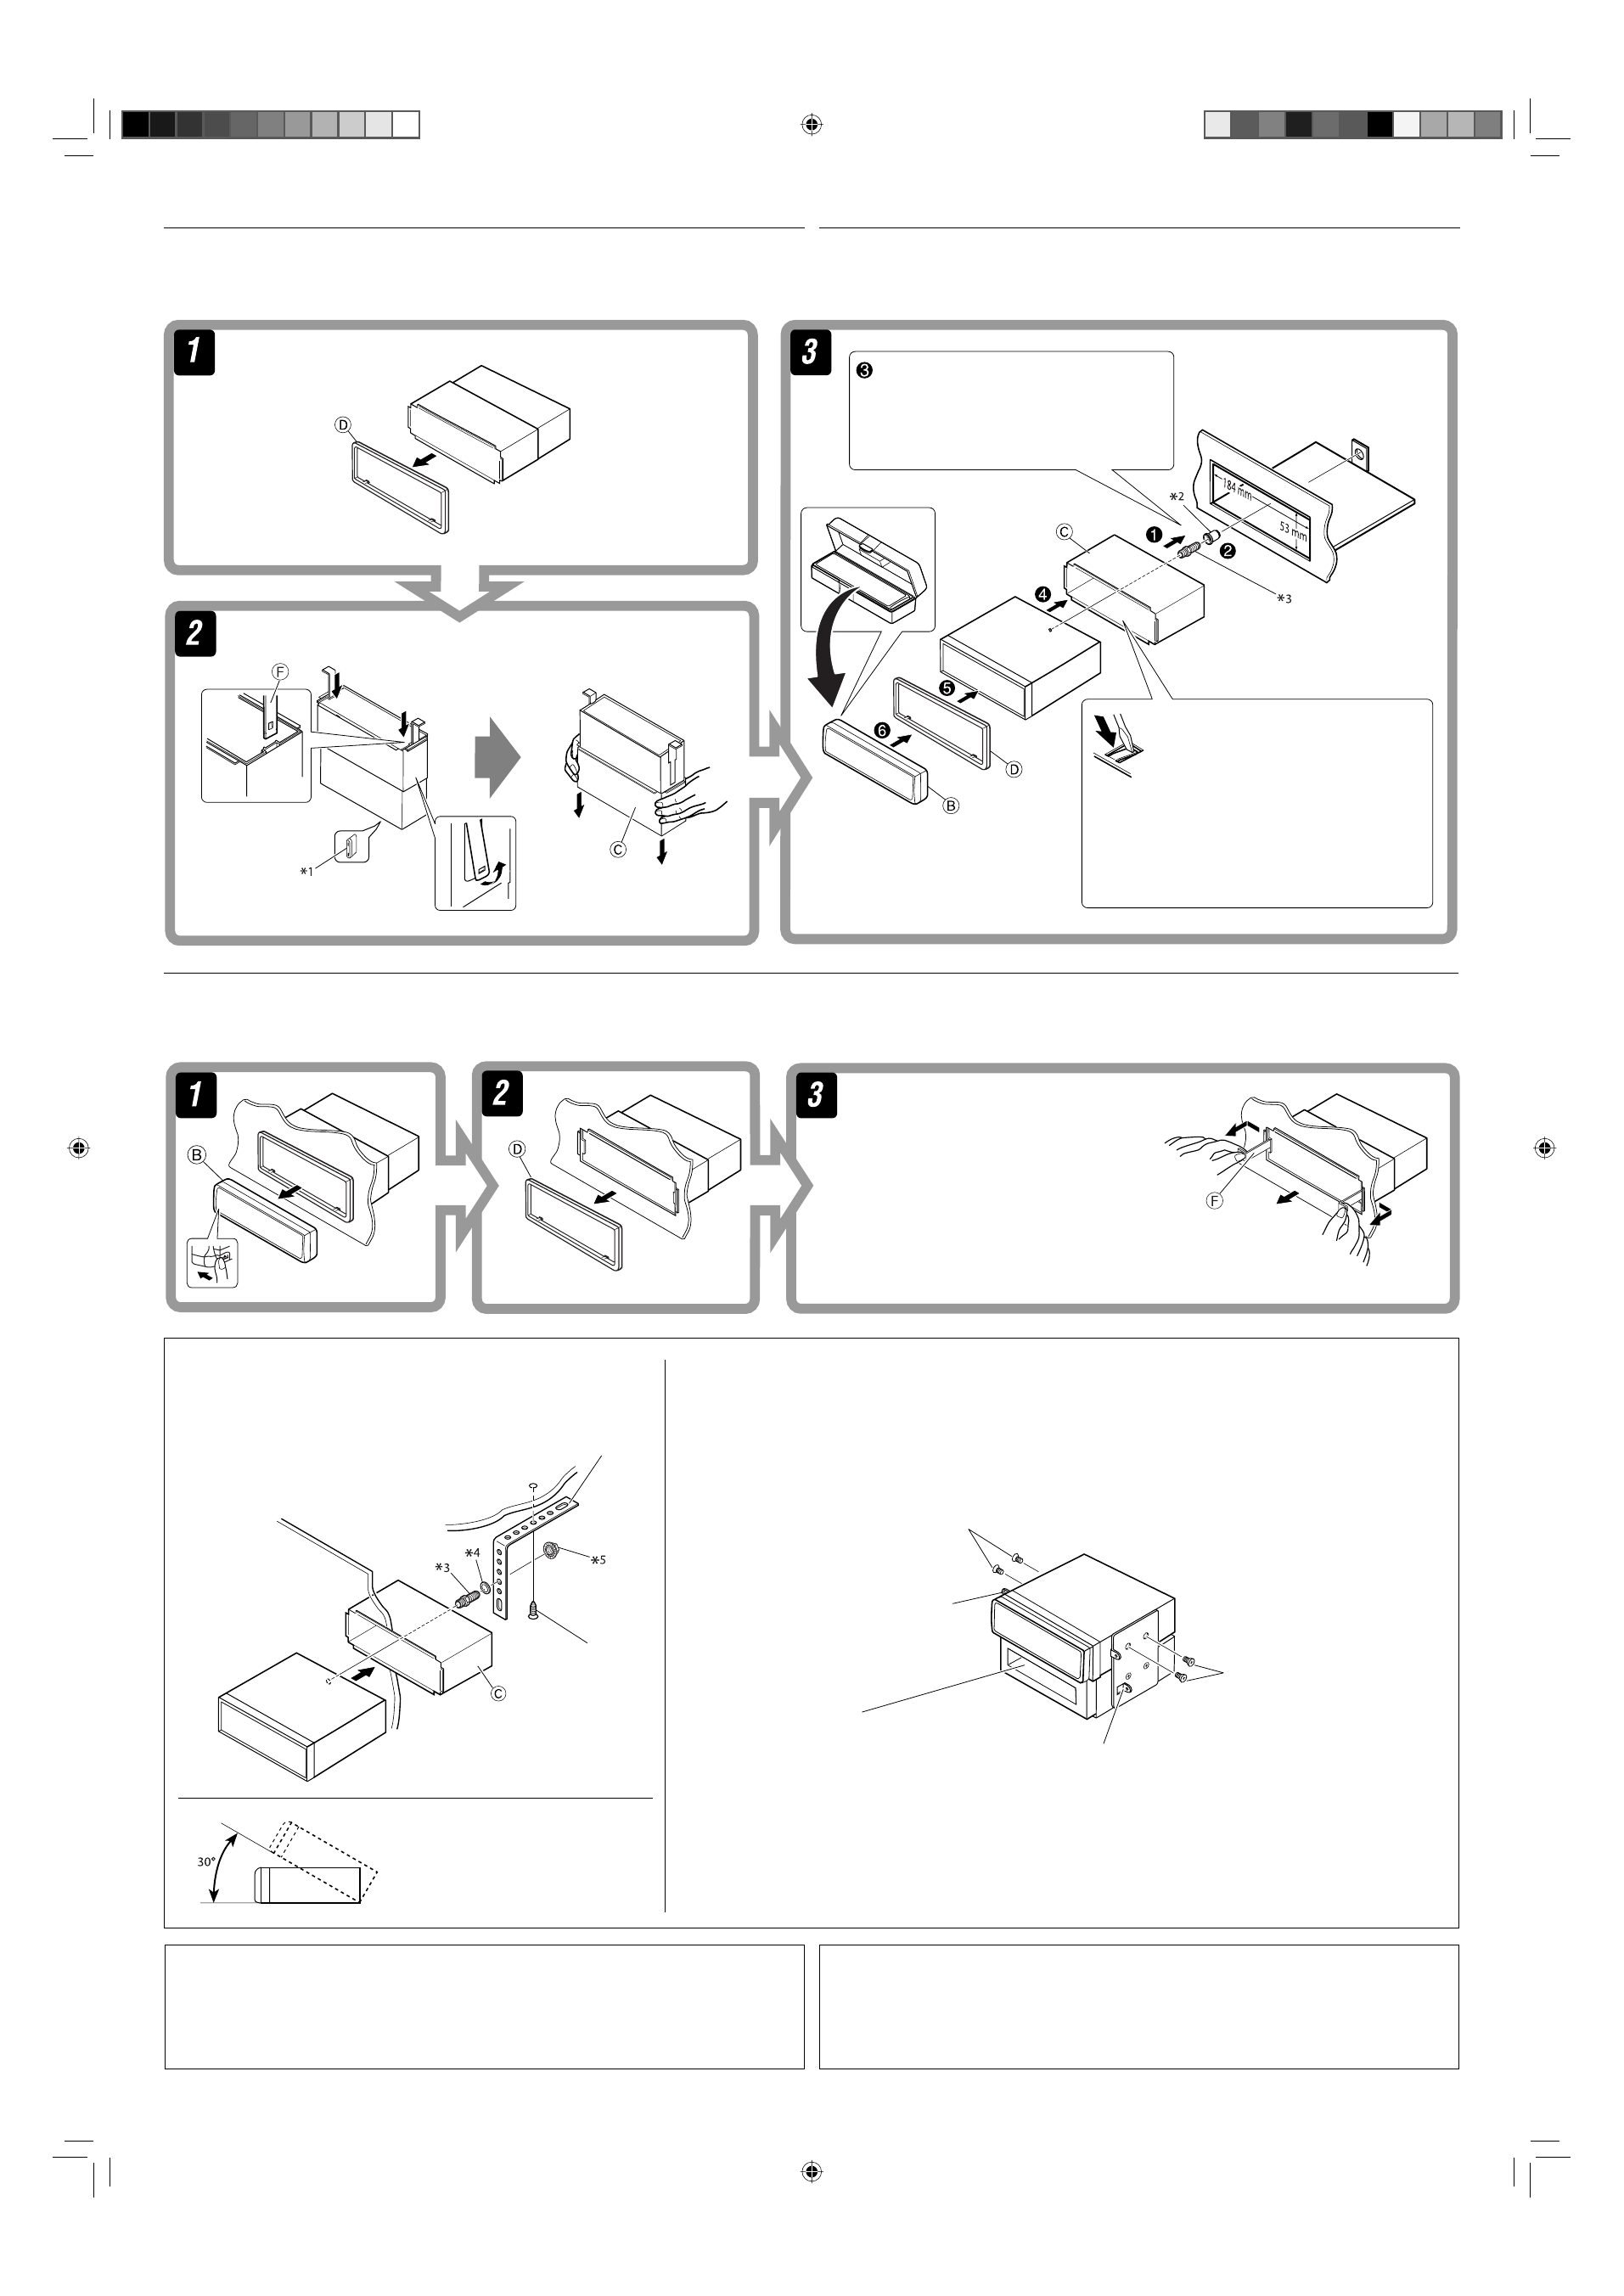
Install the unit at an angle of less than 30˚.
µ‘¥µ—ИЯ™я¥ª√–°Х∫∑’Л¡я¡µЛ”°«Л“
30˚
ХЯ»“
Removing the unit
Before removing the unit, release the rear section.
Insert the two handles, then pull them as
illustrated so that the unit can be removed.
„ ˧—π∫—Я§—∫
2
Х—π≈ß„π√ЛХЯ ”А√—∫„™Иж—π≈«¥ ¥—Я¿“ж ®“°π—Иπ
„АИ‡≈◊ЛХπ™я¥ª√–°Х∫ХХ° „π¢≥–∑’Л§ЛХ¬ К ¥чЯ§—π∫—Я§—∫∑—ИЯ ХЯ
Х—πХХ°®“°°—π
Do the required electrical connections.
µËÕ “¬‰шµ“¡∑’Л°”А𥉫И∑—ИЯА¡¥
Bend the appropriate tabs to hold the
sleeve firmly in place.
ßÕ·ºЛπ‡ж◊ЛХ¬ч¥ª≈Õ°„ÀȵËÕ°—π‡¢И“∑’Л
INSTALLATION (IN-DASH MOUNTING)
The following illustration shows a typical installation. If you have any questions or require information
regarding installation kits, consult your JVC car audio dealer or a company supplying kits.
• If you are not sure how to install this unit correctly, have it installed by a qualified technician.
When installing the unit without using the sleeve /
‡¡◊ËÕµ‘¥µ—ИЯ™я¥ª√–°Х∫‚¥¬‰¡Л„™Иª≈Х°АяИ¡
In a Toyota car for example, first remove the car radio and install the unit in its place.
µ—«Х¬Л“Я‡™Лπ „π√∂¬πµÏ‚µ‚¬µИ“ „АИ∂Х¥«‘∑¬яµ‘¥√∂¬πµÏÕÕ°°ЛХπ ·≈ф«®чЯµ‘¥µíô߇§√◊ËÕßπ’ф‡¢ф“·∑π∑’Ë
°“√µ‘¥µ—Èß
(
°“√ª√–°Õ∫·ºßÀπÈ“ªн∑¡П‡¢И“
)
¿“жµ—«Х¬Л“ßµËÕ‰ªπ’И· ¥Я∂чЯ°“√µ‘¥µ—ИЯ·∫∫∑—Л«‰ª А“°§я≥¡’ªн≠А“А√◊ÕµÈÕß°“√¢ÈÕ¡Ÿ≈‡°’Л¬«°—∫™я¥µ‘¥µ—ИЯ °√я≥“ª√÷°…“°—∫ºŸИ¢“¬‡§√◊ЛХЯ‡ ’
¬Я√∂¬πµП
JVC
¢ХЯ∑Л“πА√◊Х∫√‘…—
•
™я¥ª√–°Х∫ ∂И“§я≥‰¡Л·πЛ„®«Л“µ‘¥µ—ИЯ™я¥ª√–°Õ∫π’È∂Ÿ°µÈÕßÀ√◊Х‰¡Л „АИА“™Л“ߺŸÈ‡™’ˬ«™“≠‡ªìπºŸÈµ‘¥µ—ИЯ
°“√∂Х¥™я¥ª√–°Õ∫
°ЛХπ®–∂Х¥™я¥ª√–°Õ∫ „ÀȪ≈¥ÀπÈ“µ—¥ Ë«π∑È“¬°ËÕπ
Flat head screws (M5 × 8 mm)
*
6
°√ŸÀ—«‡√’¬∫
(M5 × 8
¡¡.
)
*
6
Bracket
*
6
·∑Лπ√ХЯ√—∫
*
6
*
1
When you stand the unit, be careful not to damage the fuse on the rear.
*
2
Rubber cushion—Not supplied for this unit.
*
3
Mounting bolt (M4 × 5 mm; M5 × 12.5 mm)—Not supplied for this unit.
*
4
Washer (ø5)—Not supplied for this unit.
*
5
Lock nut (M5)—Not supplied for this unit.
*
6
Not supplied for this unit.
*
1
‡¡◊ЛХ§я≥µ—ИЯ™я¥ª√–°Õ∫¢чИπ √–«—ЯХ¬Л“∑”„АИшо« П∫√‘‡«≥ Л«π∑И“¬‡ ’¬А“¬
*
2
¬“Я°—π°√–·∑°
—
‰¡Л‰¥И„АИ¡“°—∫™я¥ª√–°Õ∫π’È
*
3
≈—°µ‘¥
(M4 × 5
¡¡.
; M5 Ч 12.5
¡¡.
)—
‰¡Л‰¥И„АИ¡“°—∫™я¥ª√–°Õ∫π’È
*
4
ª√–‡°Бπ«Я·А«π
(ш5)—
‰¡Л‰¥И„АИ¡“°—∫™я¥ª√–°Õ∫π’È
*
5
πХµ≈БХ§
(M5)—
‰¡Л‰¥И„АИ¡“°—∫™я¥ª√–°Õ∫π’И
*
6
‰¡Л‰¥И„АИ¡“°—∫™я¥ª√–°Õ∫π’È
TH Install1-2_KD-R506_009B.indd 2
TH Install1-2_KD-R506_009B.indd 2
4/27/09 6:30:56 PM
4/27/09 6:30:56 PM