7 playback – JVC BR-DV600UA User Manual
Page 16
28
V.IN/A.MONI A.OUT
COUNTER
DV
CTL
TC
UB
CH-1/2
CH-3/4
Y/C
(CPN)
LINE
L
R
MIX
MIX
PHONES
MIC
REMOTE
LOCAL
EJECT
OPERATE
REC LEVEL
CH-2/4
CH-1/3
SHIFT
SET
SELECT
SHIFT
MENU
HOLD
SHIFT
A. DUB
ADVANCE PRESET
REW
STOP
FF
REC
PLAY
PAUSE
ON/OFF
MENU
OVER
OVER
H
M
S
F
AUD LOCK
SP
32k
48k
SLAVE
PB
NDF
SERVO RF
DEW
AUTO OFF
HOLD
CH 2/4
CH 1/3
VIDEO CASSETTE RECORDER BR-DV600UA
dB
40 30
20
10
0
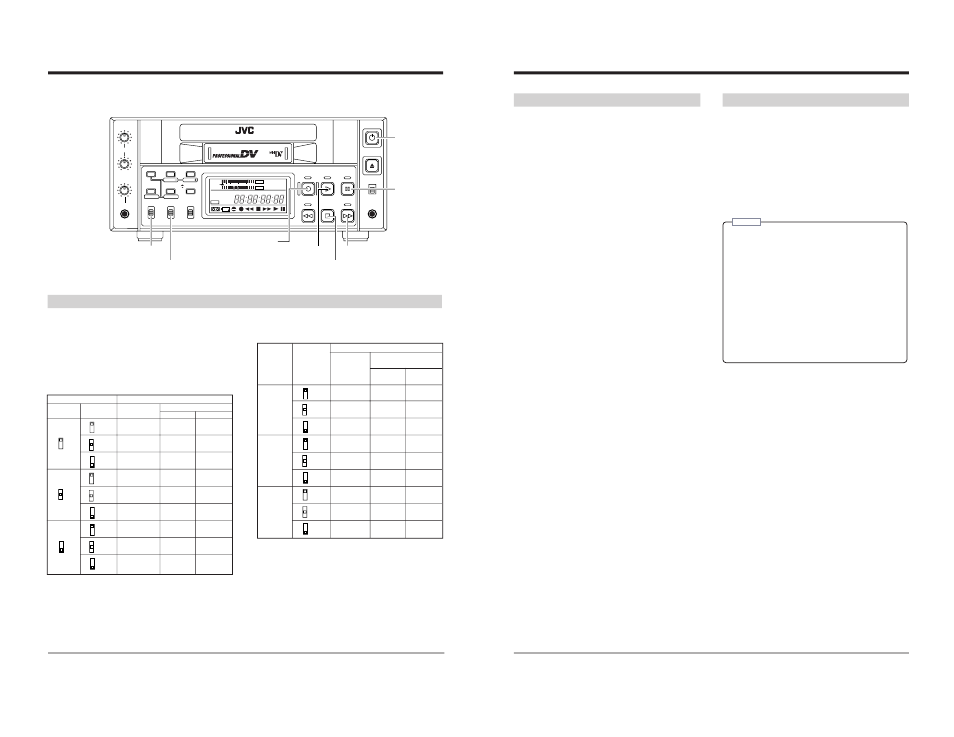
7 PLAYBACK
[AUDIO OUTPUT] switch
[PLAY] button
[FF] button
[PAUSE]
button
[REC] button
[STOP] button
[OPERATE]
button
[AUDIO MONITOR] switch
Playback preparation
1 Press the [OPERATE] button to turn the power ON.
2 Insert the cassette into the cassette loading slot.
3 Select the audio output channel.
Select output signals with the switch on the front panel or
menu switch.
5 Selection with the switch on the front panel
• Menu switch setting
No. 054
CH1
CH1
CH2
CH1/3
CH1/3
CH2/4
CH3
CH3
CH4
CH1/2
CH1
CH2
CH1/2/3/4
CH1/3
CH2/4
CH3/4
CH3
CH4
CH2
CH1
CH2
CH2/4
CH1/3
CH2/4
CH4
CH3
CH4
R
L
MIX
CH1/2
MIX
CH3/4
CH1/2
MIX
CH3/4
CH1/2
MIX
CH3/4
AUDIO switch
Connector
MONITOR
OUTPUT
MONITOR OUT
AUDIO OUT
CH1/3
CH2/4
* To switch video input signals, use the No. 108
menu switch.
5 Selection with the menu switch
• Menu switch setting
No. 054
CH1
CH1
CH2
CH1/3
CH1/3
CH2/4
CH3
CH3
CH4
CH2
CH1
CH2
CH2/4
CH1/3
CH2/4
CH4
CH3
CH4
CH1/2
CH1
CH2
CH1/2/3/4
CH1/3
CH2/4
CH3/4
CH3
CH4
R
L
MIX
CH1/2
MIX
CH3/4
CH1/2
MIX
CH3/4
CH1/2
MIX
CH3/4
Connector
MONITOR
AUDIO OUT
OUT
CH1/3
CH2/4
Menu switch
No. 211
AUDIO
OUTPUT
switch
29
Repeat play
1 Set the No. 311
REW> menu switches to “ON”.
੬
See No. <311 AUTO PLAY> and No. 312 REW> on pages 21 to 22. 2 Press the [PLAY] button to start playback. At tape end, the tape is rewound automatically and 3 To stop Repeat Play, press the [STOP] button. Playback 1 Press the [PLAY] button. Video and audio signals are output from each output 2 To stop playback, press the [STOP] button. 3 To temporarily stop playback, press the [PAUSE] button. during playback. • For fast reverse playback, press the [REW] button during playback. • You can select whether or not to play sound during fast-forward playback or fast reverse playback with the Notes: • If audio dubbing is performed repeatedly on a short section of the tape, there may be some noise when • When a tape recorded on a consumer MiniDV VCR is played back on this unit, the sound level may be low. • When the Pause mode continues for more than 5 minutes, the Stop mode is automatically engaged
playback starts again. This operation repeats each time
the tape ends.
connector. Other data recorded on the tape is read out
(time code, user bits, etc.)
• For fast-forward playback, press the [FF] button
No. 212
this section is played back.
to protect the tape. If tape remaining time is less
than 3 minutes or the unit is being used in a low-
temperature environment, the Stop mode is
engaged within about 3 minutes. The Stop mode is
also engaged automatically if slow playback
continues for more than 1 minute with the remote
controller or reverse slow playback continues for
more than 20 seconds.