JVC 1105RYMMDWJEIN User Manual
Page 15
11
VIDEO
IN
DVR/DVD
IN
FRONT
L
R
AUDIO
) IN
DVR/DVD IN
HDMI
DVR/DVD
Å
ı
Y
P
B
P
R
COMPONENT VIDEO
MONITOR OUT
DVR/DVD
IN
VIDEO(VCR)
IN
З
О
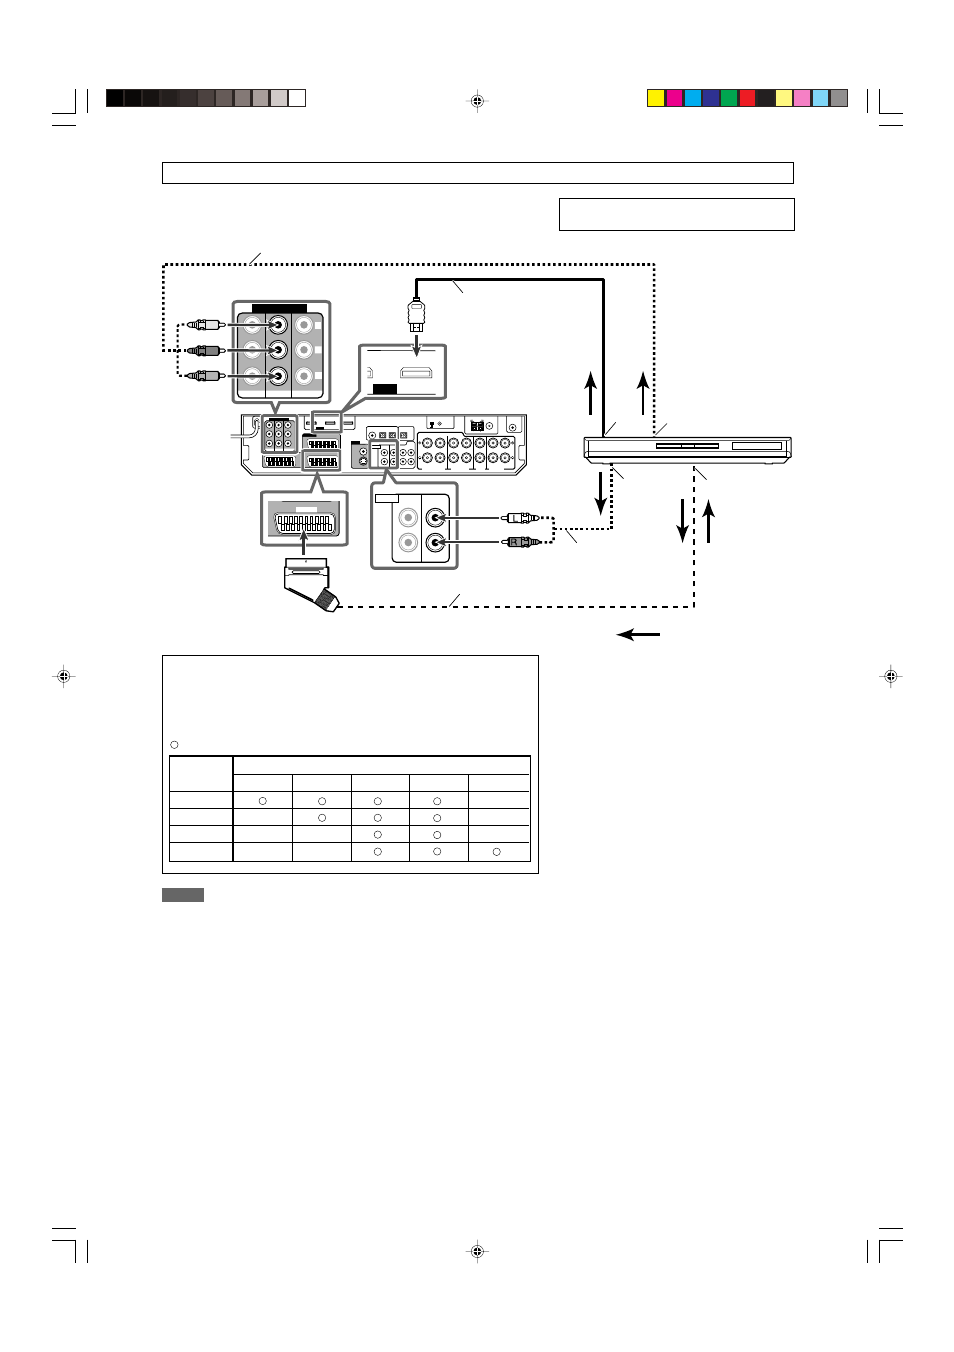
7 Connecting a DVD recorder or DVD player:
HDMI cable (not supplied)
SCART cable (not supplied)
Green
Blue
Red
Component video cable (not supplied)
Stereo audio cable
(not supplied)
DVD recorder or
DVD player
Available video input setting for each video output setting:
: Available –: Not available
HDMI
CMPNT
S
C
RGB
HDMI
–
CMPNT
–
–
S
–
–
–
RGB/C
–
–
Å
To HDMI output
ı
To component video output
• Connect Y, P
B
, and P
R
correctly.
Ç
To left/right audio channel output
Î
To SCART terminal
NOTES
• Do not connect different components to the AUDIO DVR/DVD IN jacks and AV IN/OUT (SCART) DVR/DVD terminal; otherwise,
sounds from both components come out of the speakers at the same time.
• When playing back audio and video with the HDMI connection, the HDMI lamp on the front panel lights up.
• Select the audio and video input setting according to the connection method. See page 20 for details.
• Set the audio input setting to “HDMI” when you enjoy sound with the HDMI connection. See “Selecting the audio input setting” on page
20.
• By using a HDMI-DVI conversion cable, you can connect the source components or the TV with DVI output. When connecting those
components or TV, change the audio input setting to the setting other than “HDMI.” (See page 20.)
• In addition to using the HDMI cable, you can enjoy digital sound as well using a digital audio cable (coaxial or optical). When shipped
from the factory, the digital coaxial terminal (DIGITAL IN 1 (DVR/DVD)) on the rear of the receiver is set for a DVD recorder and DVD
player. For details of digital audio connection, see page 16.
• If your DVD recorder or DVD player is equipped with the analogue multi channel output terminals, you can enjoy the sound recorded in
DVD-Audio by connecting your DVD recorder or DVD player to DVD MULTI IN jacks. See page 12 for details.
When you enjoy the sound recorded in DVD-Audio with HDMI connection, see “When you enjoy sound recorded in DVD-Audio...” on
page 12.
• When enjoying multi channel PCM sound with the audio input setting set to “HDMI” (see page 20), some functions are not available.
See page 12 for details.
Turn off all components before making
connections.
Do not connect the AC power plug to the wall outlet until all connections are completed.
: signal current
VIDEO INPUT
VIDEO
OUTPUT
Select the appropriate VIDEO INPUT (see page 20) according to the
connection you have made. If you do not, you cannot view the playback
picture on the TV.
White
Red
09-15RX-D701S[B]_f.p65
05.11.7, 2:54 PM
11