Dv dubbing (dvd deck only), Pg. 41 – JVC DR-MV5S User Manual
Page 41
Masterpage:Right+
EN
41
Filename [MV5S_08Basic TimerDub.fm]
EDITING
Page 41Thursday, 24 February 2005 16:05
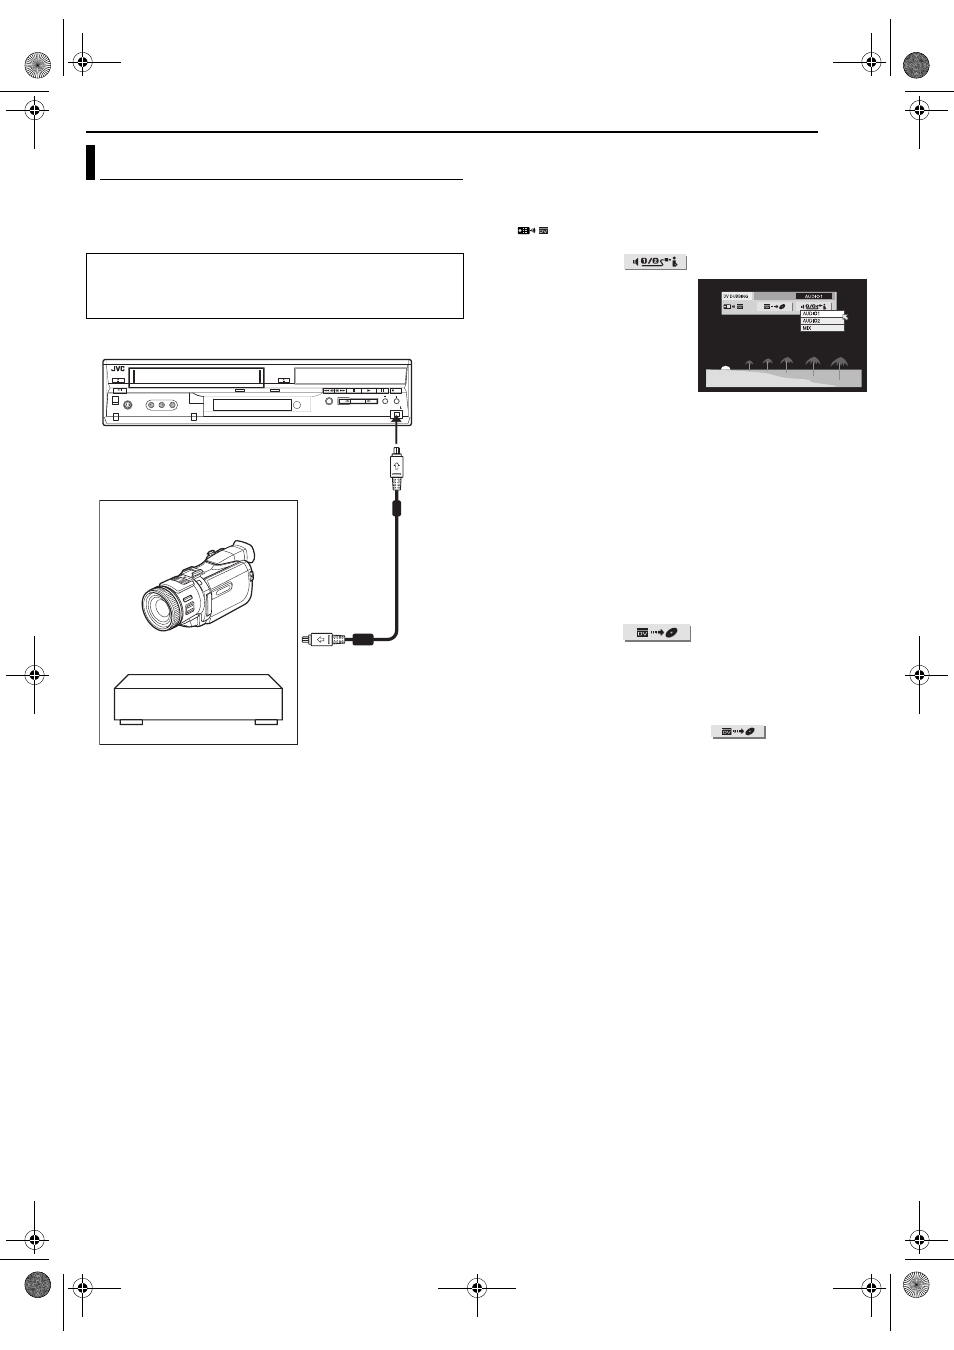
You can dub programs from a camcorder or DV equipment
connected to the unit with a DV cable. The unit’s remote control
allows you the limited control of the connected camcorder or DV
equipment functions during dubbing.
1
Connect a camcorder or DV equipment to the [DV IN] connector
on the unit’s front panel.
2
Load a DVD-RAM/RW/R disc on the unit.
3
Press CH +/– to set the channel to “DV”.
● The “DV DUBBING” controller appears on the TV screen.
● If “
” does not appear on the “DV DUBBING” controller, make
sure the DV equipment is connected correctly.
4
Press w e to select
, then press ENTER.
5
Press rt to select the desired
sound track, then press ENTER.
AUDIO 1
: Select this to record the
original stereo sound played
back on the connected DV
equipment.
AUDIO 2
: Select this to record the
dubbed stereo sound played
back on the connected DV
equipment.
MIX
: Select this to record the sound of both “AUDIO 1” and
“AUDIO 2”.
● Note that this selection is not available when the source program is
recorded in 16BIT (48 kHz) mode.
6
Press REC MODE repeatedly to set the recording mode.
7
Locate the point from where you want to start dubbing, then
stop or pause playback by pressing the following buttons on the
remote control: 4, 5, 3, 8, 9
● To play back in slow speed (1/10 of the normal speed), press 9 to
pause playback, then press 3 or 5.
● To play back frame-by-frame, press 9 to pause playback, then press
9 repeatedly. Each press of 9 advances a frame.
● To change the playback direction, press 3 or 5.
8
Press w e to select
, then press ENTER. The
dubbing starts.
● Playback on the external DV equipment and recording on the unit
should start simultaneously.
● When the playback from the beginning is not possible, the “DV
DUBBING” controller cannot be used. Perform dubbing without using
the “DV DUBBING” controller. (
੬ below)
● To pause dubbing, press w e to select
, then press
ENTER. Both the unit and the external DV equipment pause dubbing.
Pressing 9 on the unit also works the same way.
● To clear the “DV DUBBING” controller from the TV screen, press
ON SCREEN.
9
Press 8 on the remote control to stop dubbing.
● Both the unit and the external DV equipment stop dubbing.
NOTES:
● Dubbing copyright guarded programs is not possible.
● Original DV informations such as the recording date and time are not
recorded.
● The superimposed indication during the operation or dubbing is not
recorded.
● It is not possible to perform dubbing when “]” lights up on the unit.
Press VHS] so that “]” lights off.
Performing dubbing without using the “DV DUBBING”
controller
A Press CH +/– to set the channel to “DV”.
B Press REC MODE repeatedly to set the recording mode.
C Start playback on the external DV equipment slightly before the
actual point from where you wish to start dubbing.
D Press 7 on the unit to start recording. Or press and hold 7 and
press 4 on the remote control. The dubbing starts.
E When the dubbing ends, press 8 on the unit, then stop
playback on the external DV equipment.
DV Dubbing (DVD Deck Only)
NOTES:
● Be sure to use the DV cable VC-VDV 204U for connection.
● When you connect a PC to the [DV IN] connector, we do not
assure the normal operation of this unit.
VHS/DVD
DVD
VHS
REC
VHS
DVD
DUBBING
CH
DV IN
STANDBY/ON
S-VIDEO
VIDEO
AUDIO
To [DV IN]
DV cable
(VC-VDV 204U)
(not provided)
Camcorder
DV connector
Your unit
DV equipment
MV5S_00.book Page 41 Thursday, February 24, 2005 4:14 PM