Connecting to a tv, Connecting, Making component video connections – Integra DPS-7.3 User Manual
Page 13: Making s-video connections
13
Connecting to a TV
Before connecting
• Refer also to the instruction manual of the TV.
• When you connect the DVD Player to the TV, be sure to turn off the
power and unplug both units from the mains before making any
connections.
• Connect the DVD Player to the TV directly. If you connect the DVD
Player to a VCR, TV/VCR combination, or video selector, the playback
picture may be distorted as DVD videos are copy protected.
• When this DVD player is connected to a TV compatible with
progressive signal using the VIDEO OUTPUT COMPONENT jacks, the
video output to “Progressive” (see page 48) will produce a higher
quality picture.
• Connect the plugs securely.
Incomplete
Insert completely
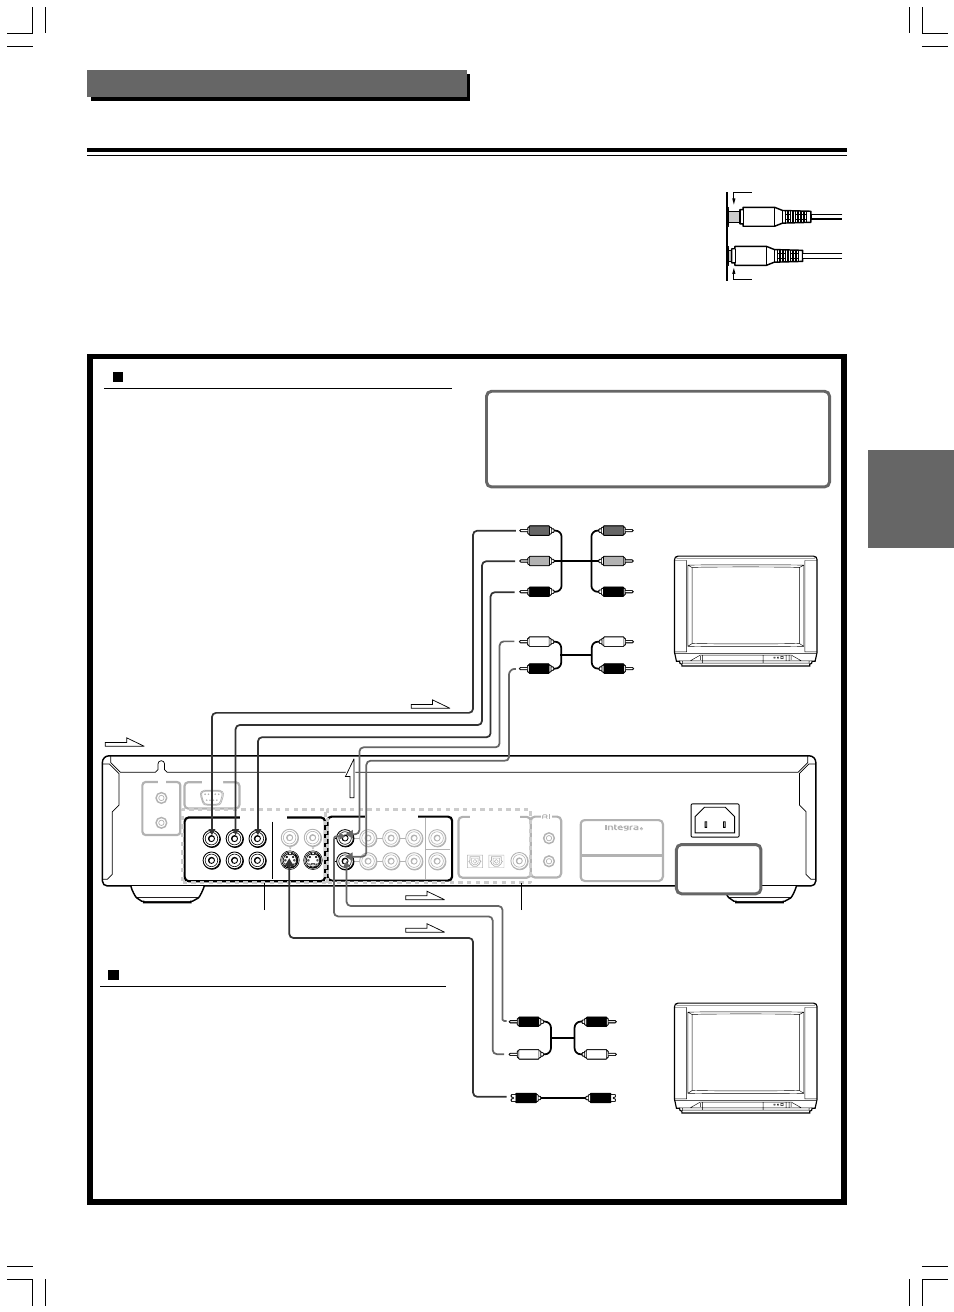
Making component video connections
If the TV or monitor has component video inputs, making
this type of video connection will produce the ideal picture
quality for the presentation of DVD-Video. Using a
component video cable (sold separately), connect the
VIDEO OUTPUT COMPONENT CH 1 or CH 2 jacks to the
corresponding component video input jacks on the TV.
Actual labels for component video inputs may vary
depending on the TV manufacturer. (e.g. Y, R-Y, B-Y or Y,
C
B
, C
R
)
In some TVs or monitors, the color levels of the playback
picture may be reduced slightly or the tint may change. In
such a case, adjust the TV or monitor for optimum
performance.
By making connections to a stereo system, you can improve
the quality of the sound. Using an audio cable (not
supplied), make audio connections from the ANALOG
OUTPUT CH 1 or CH 2 L and R jacks to the corresponding
jacks on the stereo component.
AC INLET
Y
P
B
P
R
COMPONENT
VIDEO
S VIDEO
OPTICAL
COAXIAL
REMOTE
CONTROL
OUT
IN
DIGITAL OUTPUT
CH 1
CH 2
FRONT
SURR
CENTER
SUB
WOOFER
VIDEO OUTPUT
ANALOG OUTPUT
L
R
CH1
CH2
RS-232
DVD AUDIO/VIDEO PLAYER
MODEL NO.
DPS-7.3
IR
: Signal flow
BE sure to set the TV Aspect after connection using
the Setup Navigator explained in “Setting Up the
Player” starting on page 17 or the function setting
menu explained in “Adjusting Audio and Video
Settings” starting on page 41.
Stereo audio connection cable
To audio input
L (White)
R (Red)
DO NOT connect
the mains lead at
this time.
Component video cable
To component video input
Stereo audio connection cable
To audio input
Making S-video connections
If the TV or monitor has an S video input, make the S video
connection. The S video connection will provide higher
quality picture playback.
By making connections to a stereo system, you can
improve the quality of the sound. Using an audio cable (not
supplied), make audio connections from the ANALOG
OUTPUT CH 1 or CH 2 L and R jacks to the corresponding
jacks on the stereo component.
Note
• If the TV audio is monaural, leave the red plug disconnected.
S video connection cable
To S video input
L (White)
R (Red)
Jacks for video
connections
Jacks for audio
connections
Connecting