Milwaukee 0300-20 User Manual
Page 8
15
14
Maintaining Tools
Keep your tool in good repair by adopting a
regular maintenance program. Before use,
examine the general condition of your tool.
Inspect guards, switches, tool cord set and
extension cord for damage. Check for
loose screws, misalignment, binding of
moving parts, improper mounting, broken
parts and any other condition that may af-
fect its safe operation. If abnormal noise
or vibration occurs, turn the tool off imme-
diately and have the problem corrected
before further use. Do not use a damaged
tool. Tag damaged tools DO NOT USE until
repaired (see Repairs).
Under normal conditions, relubrication is
not necessary until the motor brushes
need to be replaced. After six months to
one year, depending on use, return your
tool to the nearest MILWAUKEE service
facility for the following:
Lubrication
Brush inspection and replacement
Mechanical inspection and cleaning
(gears, spindles, bearings, housing,
etc.)
Electrical inspection (switch, cord,
armature, etc.)
Testing to assure proper mechanical
and electrical operation
WARNING!
To reduce the risk of injury,
always unplug your tool before
performing any maintenance.
Never disassemble the tool or try
to do any rewiring on the tool's
electrical system. Contact a
MILWAUKEE service facility for
ALL repairs.
WARNING!
To reduce the risk of injury,
electric shock and damage to the
tool, never immerse your tool in
liquid or allow a liquid to flow
inside the tool.
MAINTENANCE
Cleaning
Clean dust and debris from vents. Keep
the tool handles clean, dry and free of oil
or grease. Use only mild soap and a damp
cloth to clean your tool since certain clean-
ing agents and solvents are harmful to plas-
tics and other insulated parts. Some of
these include: gasoline, turpentine, lacquer
thinner, paint thinner, chlorinated cleaning
solvents, ammonia and household deter-
gents containing ammonia. Never use flam-
mable or combustible solvents around
tools.
Repairs
If your tool is damaged, return the entire
tool to the nearest service center.
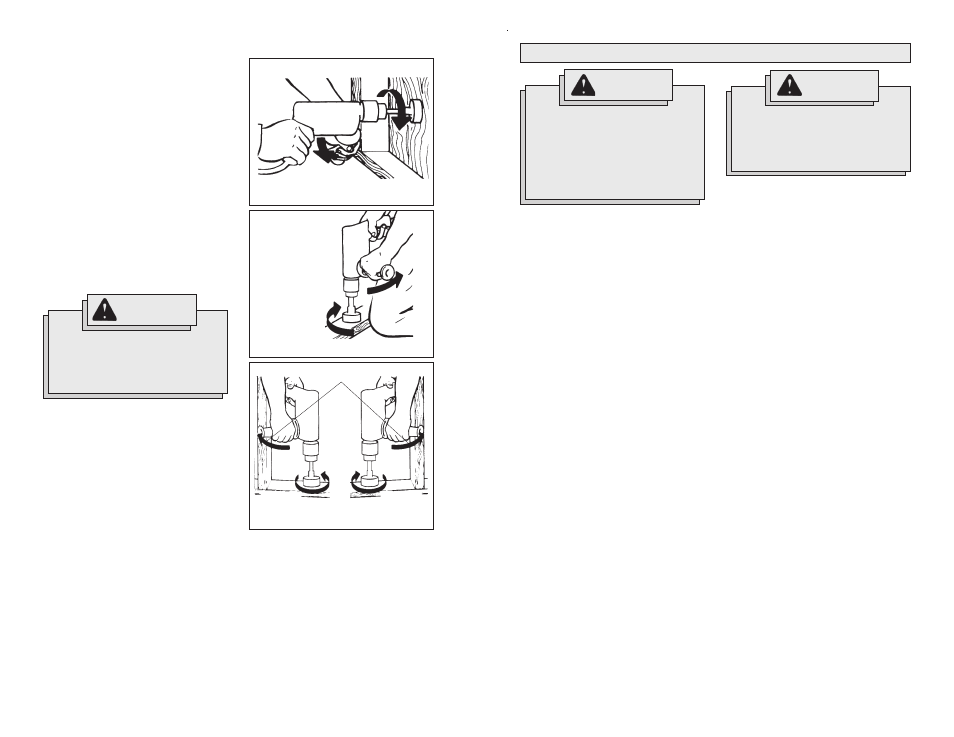
Bit Binding
A high rotational force occurs when a bit
binds. If the bit binds, the tool will be forced
in the opposite direction of the bit rotation
(See Fig. 12-14). Bits may bind if they are
misaligned or when they are breaking
through a hole. Wood boring bits can also
bind if they run into nails or knots. Be pre-
pared for bit binding situations.
To reduce the chance of bit binding:
Use sharp bits. Sharp bits are less likely
to bind when drilling.
Use the proper bit for the job. There are
bits that are designed for specific
purposes.
Use caution when drilling pitchy, knotty,
wet or warped material or when drill-
ing in material that may contain nails.
Driving Screws
When driving screws, use the proper
screwdriver bit for your job. After drilling
pilot and shank holes, start the screw
slowly and increase the speed as driving
progresses. Set the screw by slowing to
a stop. Do not run screws down at exces-
sive speeds. To remove screws, reverse
the motor.
Stalling
If the tool seems as if it is about to stall,
maintain a firm grip and reduce pressure
slightly to allow the bit to regain speed. If
the tool does stall, release the trigger im-
mediately. Reverse the motor, remove the
bit from the work and start again. Do not
pull the trigger on and off in an attempt to
start a stalled drill. This can damage the
drill.
Fig. 12
Forward rotation
Reaction
Bracing against the floor
Fig. 14
Bracing against a stud
Reverse rotation
Reaction
Forward rotation
Fig. 13
Forward
rotation
Bracing against your leg
Reaction
Typical Bracing Methods
WARNING!
High rotational force. To reduce
the risk of injury, always hold or
brace securely. Always use side
handle on tools rated 1200 rpm or
less.