Setting up – Gemini UF-I064 User Manual
Page 5
(5)
(5)
(5)
(5)
(5)
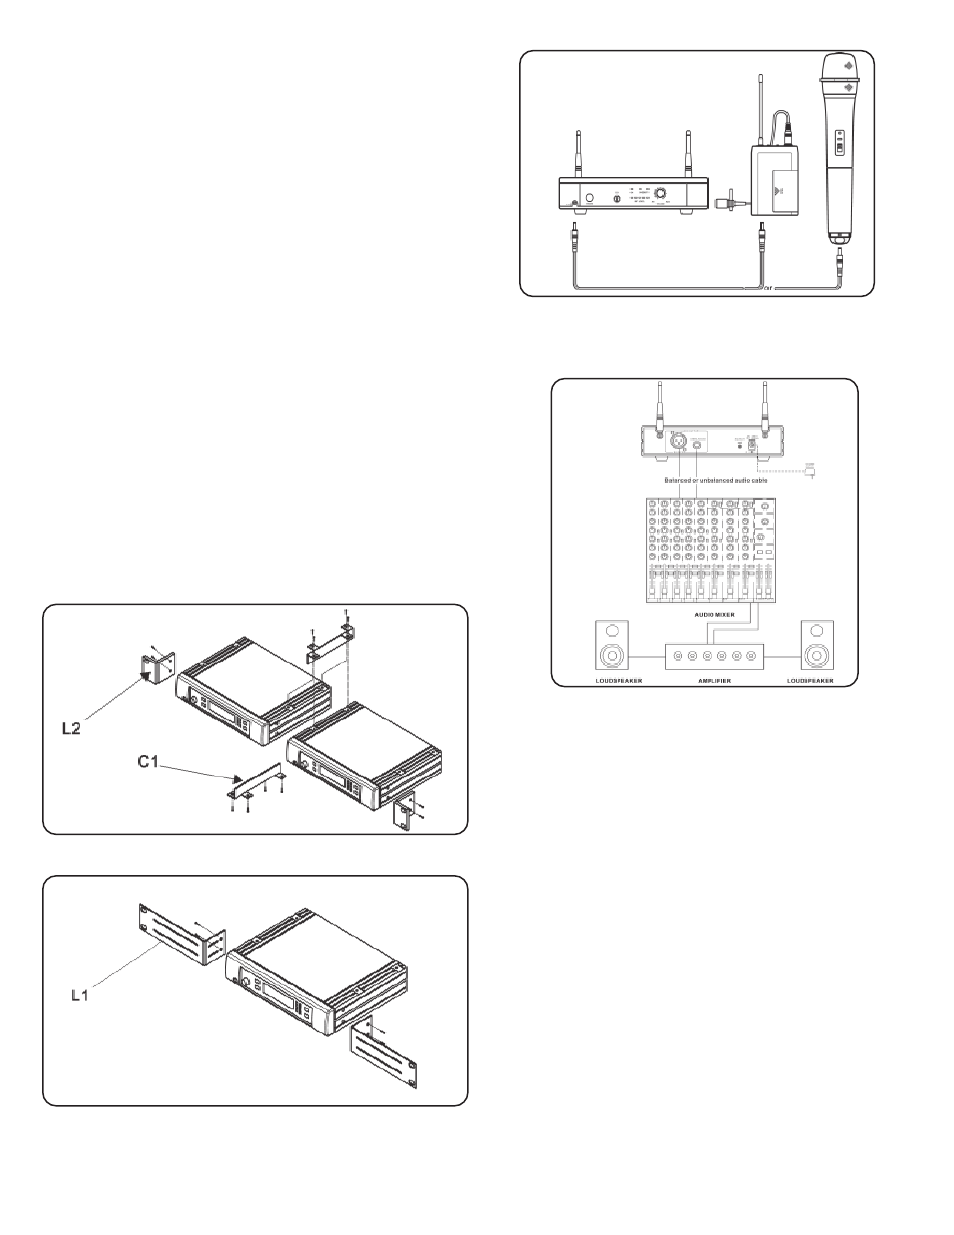
BASIC CONNECTIONS:
Connect the receiver output to the audio mixer or amplifier input, using a
standard audio cable with XLR connectors or 1/4” phone plugs. Never
use the balance & unbalanced outputs at the same time! This may
cause signal loss or increased noise.
SETTING UP:
Prior to setting up, check that the transmitter and receiver are tuned to
the same frequency. Two or above transmitters operating in the same
frequency can not be used at the same time and area, so please select
the different frequencies which can be used simultaneously at local area.
CONNECTING THE RECEIVER TO POWER:
• Point the antennas upward.
• Check that the voltage of the supplied AC adapter (AC110 or AC220)
conforms to the voltage available in local area. Using the wrong AC
adapter may cause irreparable damage to the unit.
• Plug the feeder cable of the supplied AC adapter into DC IN socket on
the receiver. Then plug the AC adapter into a power outlet.
CONNECTING THE RECEIVER TO AN AUDIO MIXER
OR AN AMPLIFIER:
In order to make sure the sound quality and avoid distortion, please
adjust the volume level according to following instructions.
INSERTING BATTERIES INTO THE HANDHELD /
BODYPACK TRANSMITTER:
• Push to open the battery cover and insert batteries into the battery
compartment conforming to the polarity (+)(-) marks. The transmitter can
not work with incorrectly inserted batteries.
• When push the ON/OFF switch to “ON” to switch the power on, the LED
will flash momentarily. If the battery has sufficient power, the LED flashes
once. If the LED stayed on, it indicates that the battery has insufficient
power and should be changed soon. If the status LED fails to flash, the
battery is either dead or not positioned correctly, and you should correct the
positioning or change the battery.
• Push back the battery cover to click it shut.
FB-64 BODYPACK TRANSMITTER:
The bodypack transmitter operates in UHF band frequency with PLL
synthesized control. UHF 64 preprogrammed selectable frequencies to
avoid interference. Various uni-directional electret condenser capsule
options. Use 1.5V x 2 AA size batteries for low operating cost.
(1)INPUT CONNECTOR: Mini XLR microphone connector, connect the
headset or lavalier here.
(2)ON/OFF SWITCH: Turns transmitter power on and off.
(3)LOW BATTERY LED: LED indicates battery status. Switching the power
to “ON”, the LED flashing once indicates that the transmitter has
sufficient power. If the LED stays on, it indicates that the battery has
insufficient power and should be changed soon. If the status LED fails to
flash, the battery is either dead or not positioned correctly, and you
should correct the positioning or change the battery.
(4)MIC/LINE SELECTOR (optional for use with mini XLR connector):
This switch sets the audio input either to microphone level or line level.
(5)ANTENNA: Permanently connected, helical antenna.
(6)CHANNEL SELECTOR: Changes transmitter channel setting.
(7)GAIN: The rotary control adjusts the sensitivity of the transmitter’s audio
to the level of the connected lapel microphone or instrument.
(8)MIC. UNIT: The uni-directional electret condenser unit features the wide
frequency response for warm, rich bass and clear sound.
(9)TIE CLIP: Use to clip onto shirt or tie. for free movement.
(10) CABLE: Connect the CABLE to the mini XLR connector to connect to the transmitter
(11) BATTERY COMPARTMENT: Insert two AA batteries into the
compartment and make sure that the polarity of batteries is correct.
(12) CHARGING INPUT: The inserted rechargeable batteries can be
charged by using
the supplied DC-plug cable connection to DC Out on
the receiver. It takes up to 10 hours for charging.
To combine two receivers in a 19" standard rack by using 2 short L type plastic
racks (L2) and 2 metal connecting plates (C1). (Each system includes a L2 and a C1.)
To mount a receiver in a 19" standard rack by using 2 long L type metal
racks (L1).
NOTE: THE UF-8264 RECIEVERS CANNOT BE COMBINED WITH EACH OTHER.
CHARGING CONNECTING DIAGRAM:
Connect the supplied DC cable to the receiver and the microphone, and it takes
around 10 hours to charge and the LED of transmitter is flashing all the time.