Thru-the-wall installations, Warning – Friedrich X Star EQ08 User Manual
Page 10
8
STEP 1
After removing the unit from shipping carton, remove tape holding
decorative front in place. Lay front in a safe out-of-the-way place,
then slide chassis out of cabinet (see Figure A, page 7).
STEP 2
Remove the shell channel from the top of the cabinet (see Figure
B, page 7).
NOTE: Not applicable to heat pump models sold without quick
mounting cabinet.
STEP 3
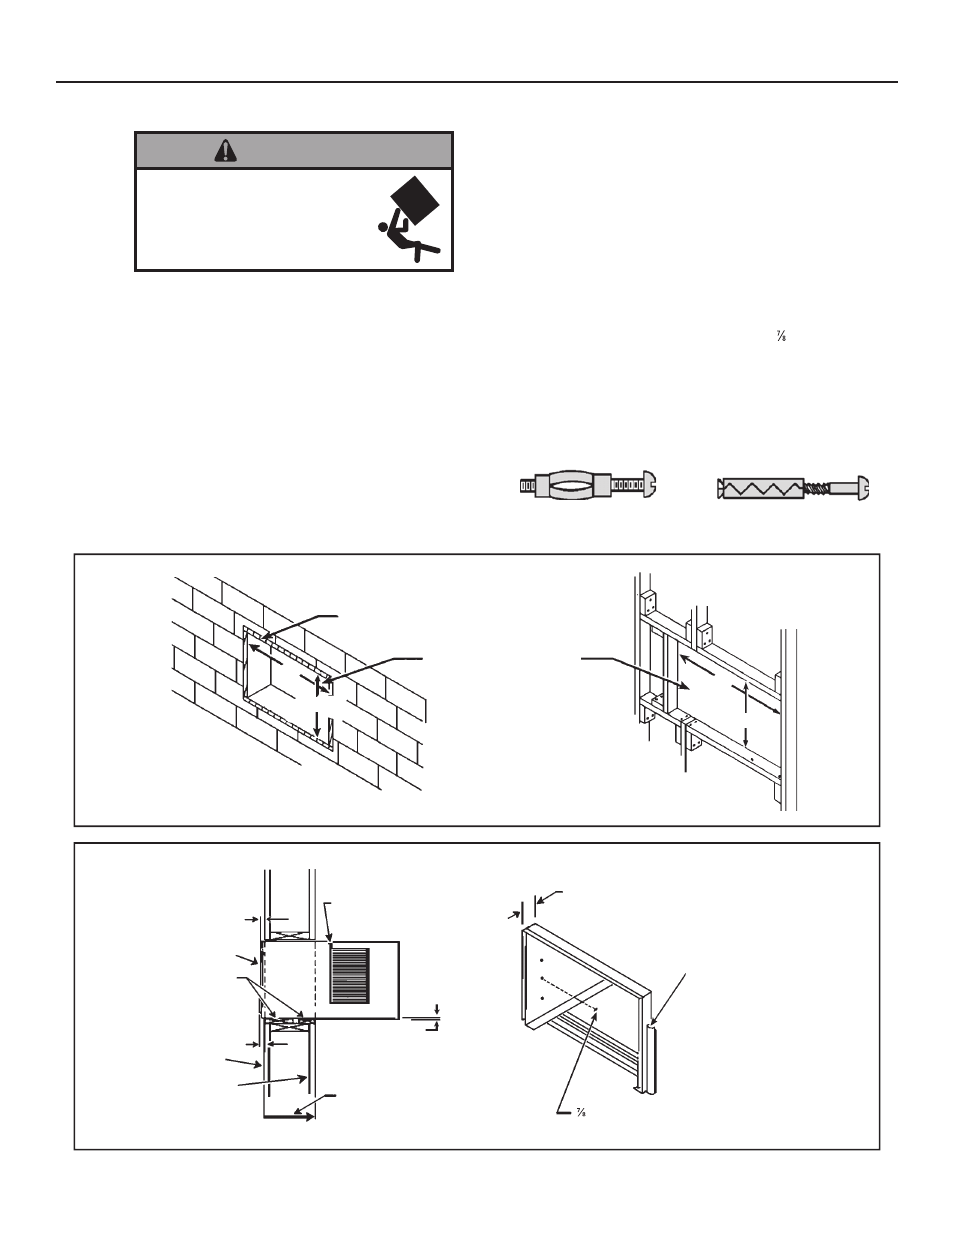
LAYOUT - Cut and frame in an opening in the desired wall area
using the illustration as a guide (see Figure F).
STEP 4
Place the cabinet in the framed opening.
NOTE: Measure and shim void spaces between the side of
cabinet and wood framing before securing to wall.
EXPANSION ANCHOR BOLT
MOLLY OR TOGGLE BOLT
STEP 5
Position the front edge to extend into the room 3/4" minimum at
top of cabinet and 1" minimum at bottom (see Figure G).
STEP 6
Secure each side of the cabinet with No. 8 x " hex head screws
(item #3, page 6) or nails through the holes in the sides.
NOTE: ALTERNATE FASTENERS WHICH MAY BE USED FOR
SECURING THE UNIT CABINET TO A WALL, INCLUDING
MASONRY WALLS, ARE NOT FURNISHED (AVAILABLE AT
LOCAL HARDWARE STORES).
Thru-the-wall installations
Falling Object Hazard
Not following Installation Instructions
for mounting your air conditioner can
result in property damage, injury, or
death.
WARNING
Figure F
FINISHED OPENING SIZE
2" x 8" FRAME
20"
14 ¼"
14 ¼"
20"
CONCRETE BLOCK CONSTRUCTION
FRAME CONSTRUCTION
Figure G
¾" MINIMUM
CABINET FRONT
1" THICK LUMBER
1" MINIMUM
INSIDE WALL
EXTERIOR WALL
TRIM AROUND THE CABINET
WITH A SUITABLE WOOD
MOULDING AND FINISH TO SUIT.
CAULK ALL AROUND CABINET
ON OUTSIDE TO INSURE A
WEATHER TIGHT SEAL.
¼" SLOPE
DOWN. POSITION AND
SECURE CABINET
DOWNWARD. SLOPE
OUTSIDE FOR DRAINAGE.
MAX. WALL
THICKNESS
ALLOWED 8 ½"
FRONT EDGE OF LOUVERS
MUST ALWAYS BE OUTSIDE OF
EXTERIOR WALL SURFACE
¾" MINIMUM FRONT
EDGE OF CABINET TO
INSIDE WALL SURFACE.
" SLOTTED HEAD SCREWS (3 EA. SIDE)
NAILS MAY BE USED IF DESIRED.