Chapter 3 setting up for network use, Ԙԙ ԛ, 4 attaching the keyboard cover – FUJITSU Network Scanner fi-6010N User Manual
Page 8: 1 logging in
5
2.4 Attaching the Keyboard
Cover
The layout of the keyboard may differ according to the
language selected for the operating environment. The
layout of each keyboard cover is prepared according to
language requirements. Take the keyboard cover for the
selected language out of its packaging, and attach it to
the scanner. This scanner is set up for use with an
English (US) keyboard. Therefore, if the scanner is to be
used with an English (US) keyboard attaching a key-
board cover is not required.
1. Clean the surface of the keyboard.
2. Turn the keyboard cover over and remove the
paper backing from the top strip of double-
sided tape.
3. Align the top edge of the keyboard cover with
the protruding guides, and firmly smooth the
double-sided tape down.
Align and attach the top-left corner first, then the
center, and last the top-right corner.
4. Flip up the keyboard cover and remove the
paper backing from the bottom strip of double-
sided tape.
5. Gently stretch the keyboard cover forward and
smooth the double-sided tape down.
Continue setting up the network.
ATTENTION
Check that the power is turned off
before attaching the keyboard cover.
Pay particular attention
to these areas
Underside
Paper backing tape
Ԙ
ԙ
Ԛ
Top-left guide
Top-center guide
Top-right guide
Top
attachment
area
Flip up the
keyboard cover
Paper
backing tape
Bottom
attachment area
fi-6010N Network Scanner Getting Started
6
Chapter 3
Setting up for Network Use
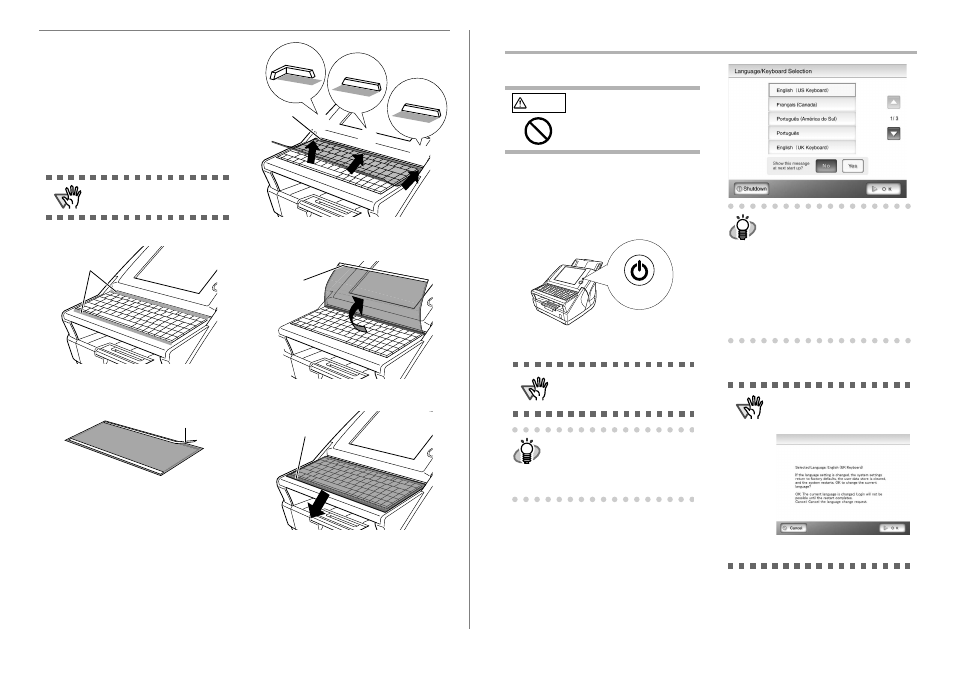
3.1 Logging in
To set up the network connection, you must login as the
administrator. The user name and initial password for
the administrator are as follows:
• User Name: admin
• Password: password
1. Press the startup button.
⇒
After the system starts up, the "Language /
Keyboard Selection" screen appears.
2. Select a language.
Select the desired language for the operating envi-
ronment. The default language is "English (US
Keyboard)".
3. Press the [OK] button.
⇒
The "Login" screen appears.
4. Enter the user name.
User name is case sensitive. Enter "admin" here.
CAUTION
Do not move or shake the
scanner when it is turned on.
This can damage the rotating
hard disk drive and cause data to
be lost.
ATTENTION
After turning the power off, wait for at
least ten seconds before turning the
power back on again.
HINT
If touch panel responses seem out of
alignment with the positions of
objects on the LCD screen, calibrate
the screen.
For details, refer to "Appendix A Cali-
brating the Touch Panel" (page 18).
Startup button
HINT
You can select whether or not to display
this screen again at the next start up. To
display the screen again, for "Show this
message at next start up?", press the
[Yes] button. To not display this screen at
next start up, press the [No] button.
To change the setting back to displaying
this screen at the next start up, login as
the administrator and for "Show the
"Language/Keyboard Selection" screen
at next start up?", press the [Yes] button
on the "Language/Keyboard Selection"
screen.
ATTENTION
If the language is changed in Step 2,
the following screen appears.
The message is displayed in the
selected language.
Pressing the [OK] button restarts the
scanner, and the "Login" screen.