Step 3 - assembling the fan – Hunter Fan Hunter Ceiling Fans 41462-01 User Manual
Page 10
10
41462-01 10/14/2005
®
STEP 3 - ASSEMBLING THE FAN
STEP 3 - ASSEMBLING THE FAN
STEP 3 - ASSEMBLING THE FAN
STEP 3 - ASSEMBLING THE FAN
STEP 3 - ASSEMBLING THE FAN
CAUTION
CAUTION
CAUTION
CAUTION
CAUTION
The pipe has a special coating
on the threads. Do not remove
this coating; the coating pre-
vents the pipe from unscrew-
ing. Once assembled, do not re-
move the pipe.
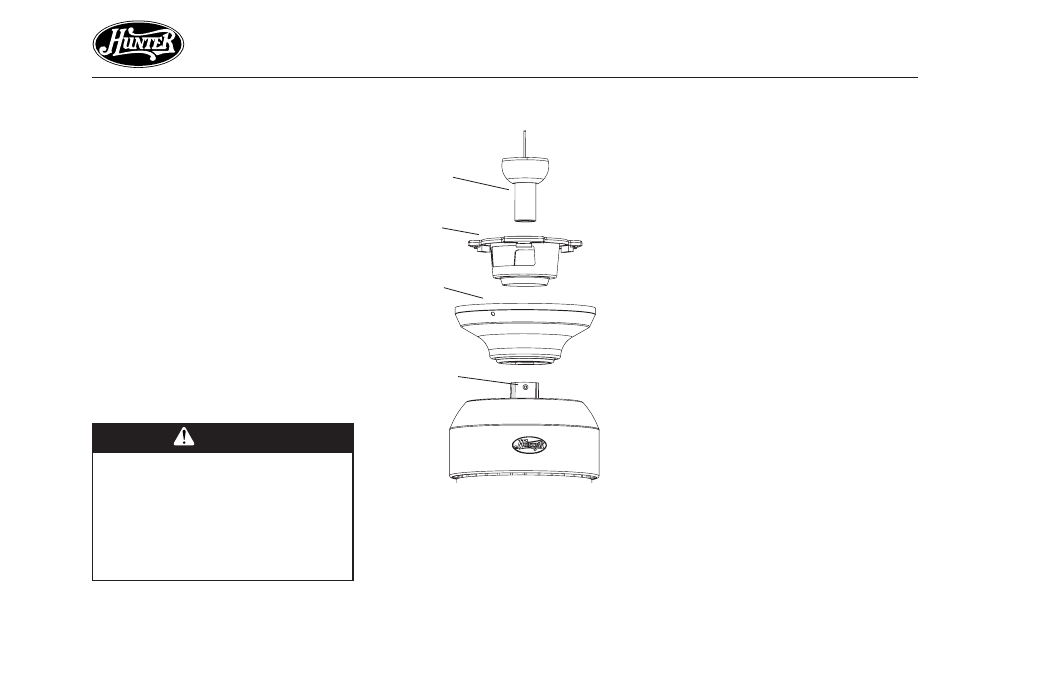
1. Insert the pipe through the hanger
bracket and canopy as shown in
Figure 3a. Feed wires from the fan
through the pipe.
2. Screw pipe into fan assembly un-
til tight. IMPORTANT! Tighten
allen head pipe set screw as shown
in Figure 3 with the included allen
wrench.
Figure 3 - Inserting Pipe through
Figure 3 - Inserting Pipe through
Figure 3 - Inserting Pipe through
Figure 3 - Inserting Pipe through
Figure 3 - Inserting Pipe through
Hanger Bracket and Canopy
Hanger Bracket and Canopy
Hanger Bracket and Canopy
Hanger Bracket and Canopy
Hanger Bracket and Canopy
Pipe
Canopy
Allen
Head
Pipe Set
Screw
Hanger
Bracket
- 21422 (2 pages)
- Hunter Ceiling Fans Type (12 pages)
- Type (16 pages)
- Type (18 pages)
- Type (13 pages)
- TypeG (17 pages)
- 21100 (2 pages)
- 28665 28642 (2 pages)
- 81004 (32 pages)
- 21325 (2 pages)
- fan parts 2.84453E+19 (4 pages)
- 20182 (2 pages)
- HUNTER Ceiling Fans (14 pages)
- Saturn 90054 (40 pages)
- 21337 (2 pages)
- 43041-01 (65 pages)
- Ceiling Fans (12 pages)
- 20178 (2 pages)
- 21562 (2 pages)
- Grandview 23923 (14 pages)
- 23963 (2 pages)
- 21317 (2 pages)
- 28528 (2 pages)
- 28039 (2 pages)
- Ceiling Fan Parts 23933 (2 pages)
- LA STRADA 82022 (63 pages)
- 42501-01 (15 pages)
- 82005 (28 pages)
- 21620 (4 pages)
- 25745 (2 pages)
- Hunter 21201 (2 pages)
- 21425 (2 pages)
- 83001 (40 pages)
- 21321 (2 pages)
- Fan Parts & Hardware 20806 (2 pages)
- VENTURA BATH VENTILATOR FAN WITH LIGHT 81004 (32 pages)
- Ceiling Fan Parts 28609A (2 pages)
- HUNTER CEILING FAN TYPE (15 pages)
- 23909 (2 pages)
- 82003 (28 pages)
- 20531A (2 pages)
- Fan Parts 25860 (1 page)
- ELLIPSE 90064 (40 pages)
- 23488 23489 (2 pages)
- 28665 (2 pages)