Connections, Connection to a tv, This unit – FUNAI SV2000 WV10D6 User Manual
Page 13: Input mode names for common tv brands
13
EN
Recording
Playing discs
Editing
Before you start
Connections
Getting started
Changing the
Setup menu
Others
Español
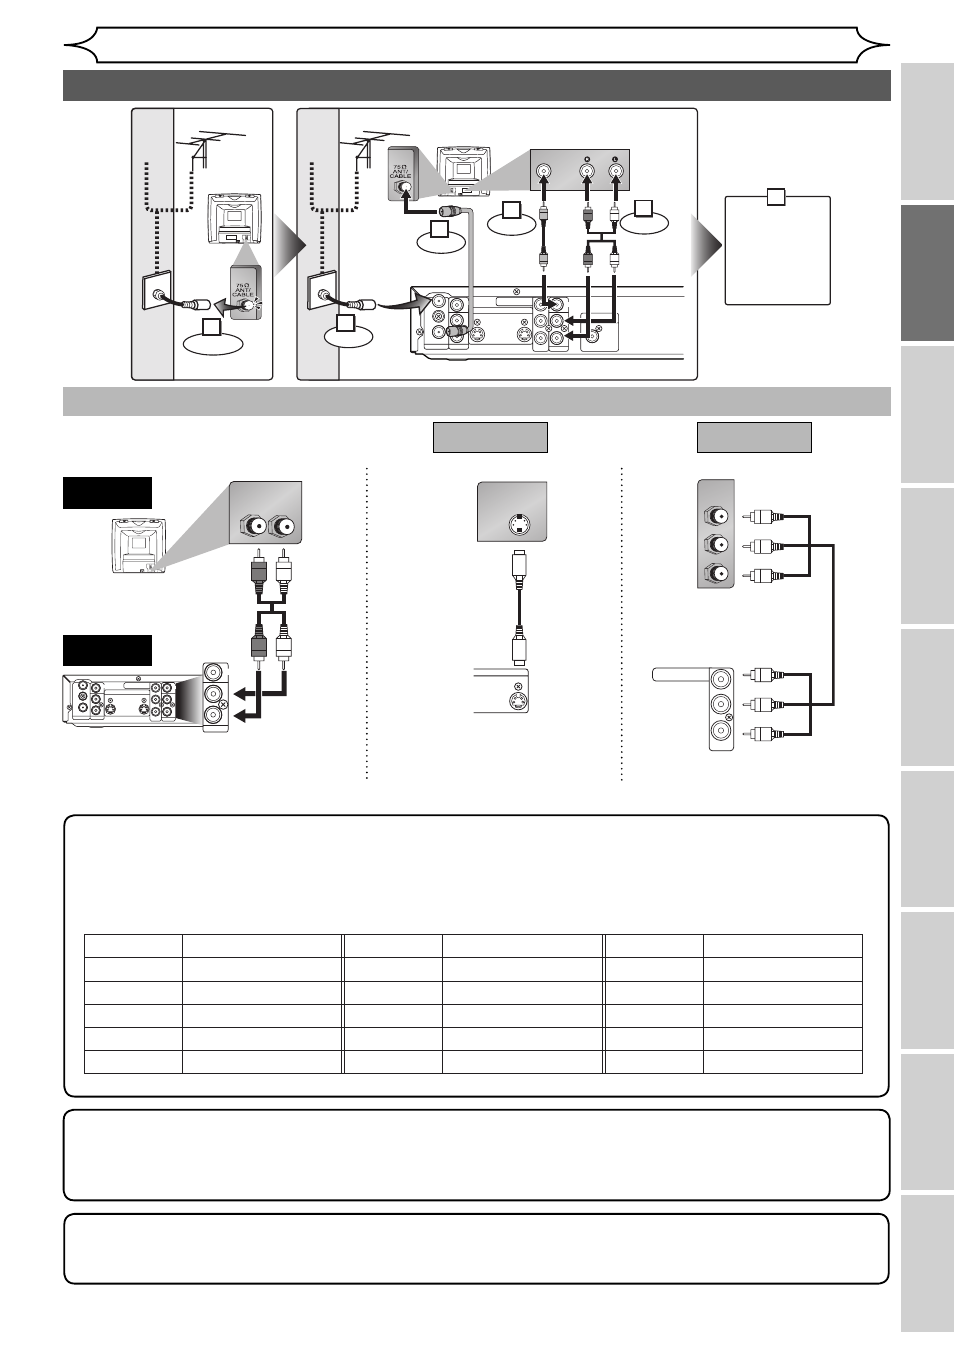
Connections
Connection to a TV
Make one of the following connections, depending on the capabilities of your existing equipment.
ANTENNA
(E1)
Y
PB/CB
PR/CR
AUDIO IN
VIDEO IN
L
R
AUDIO OUT
VIDEO OUT
IN
IN
OUT
OUT
S-VIDEO
COMPONENT
VIDEO OUTPUT
L
R
COAXIAL
R
L
AUDIO OUT
VIDEO OUT
L
R
S-VIDEO IN
OUT
S-VIDEO
P
B
/C
B
Y
P
R
/C
R
COMPONENT
VIDEO IN
COMPONENT
VIDEO OUTPUT
Y
P
B
/C
B
P
R
/C
R
AUDIO OUT
TV
Basic Audio
Method 1
Method 2
Better picture
Best picture
S-VIDEO OUT
COMPONENT VIDEO OUT
Audio cable
(supplied)
S-Video cable
(commercially available)
Component Video cable
(commercially available)
This unit
ANTENNA AUDIO IN
VIDEO IN
L
R
AUDIO OUT
VIDEO OUT
(E1)
IN
IN
OUT
OUT
S-VIDEO
COMPONENT
VIDEO OUTPUT
L
Y
PB/CB
PR/CR
R
DIGITAL AUDIO OUTPUT
PCM / BITSTREAM
COAXIAL
AUDIO IN
VIDEO
RF cable
(supplied)
Video
cable
(supplied)
Audio
cable
(supplied)
(Back of TV)
or
Cable
TV signal
or
Cable
TV signal
Connect
Connect
Connect
Connect
Disconnect
Antenna
Antenna
(Back of this unit)
(Back of TV)
3
2
1
4
5
Plug in the AC
power cord
of this unit.
6
Note
• Connect this unit directly to the TV. If the A/V cables are connected to a VCR, pictures may be distorted
due to the copy protection system.
• When Progressive Scan mode is selected, no video signal will be output from the VIDEO OUT or
S-VIDEO OUT jack.
After you have completed connections
• Switch the input selector on your TV to an appropriate external input channel (usually near channel 0). Press a
button on the TV’s original remote control that selects an external input channel until the DVD recorder’s picture
appears. Check your TV owner’s manual for details.
To set progressive scan mode, refer to page 68
• This unit is compatible with the Progressive Scan System. The feature provides you with the higher definition
images than the traditional output system does. To utilize this feature, you must set Progressive Scan mode to “ON”.
Admiral
Curtis Mathis
GE
Hitachi
JVC
Kenwood
LXI-Series
Magnavox
AUX
LINE1, LINE2, 00, 90, 91, 92, 93
INPUT, TV/VCR, 00, 90, 91, 92, 93
INPUT, AUX
VIDEO, VIDEO1, VIDEO2, VIDEO3
AUX
00
AUX CHANNEL
Input Mode Names for Common TV Brands
Panasonic
RCA
Samsung
Sanyo
Sharp
Sony
Toshiba
Zenith
TV/VIDEO
INPUT, TV/VCR, 00, 90, 91, 92, 93
TV/VIDEO
VIDEO
00
VIDEO1, VIDEO2, VIDEO3
TV/GAME
00