Fig. 3, Fig.3 – Medal Sports SMUS1458415 User Manual
Page 9
www.themdsports.com
1458415
8
(Continúe en la siguiente página.)
(Continued on the next page.)
Español
English
FIG.3
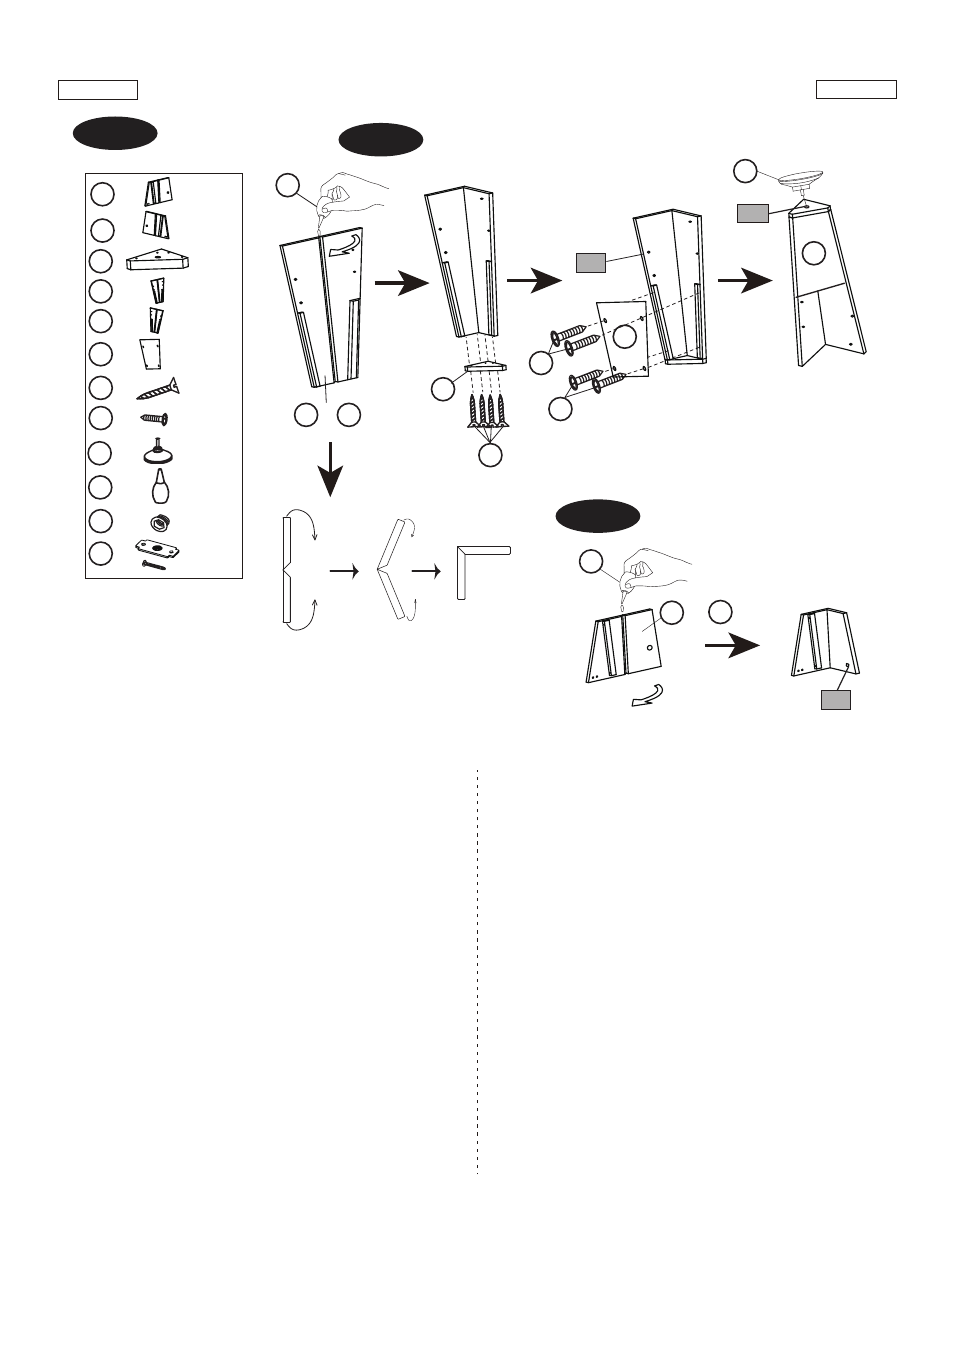
7. Apply the Glue (#46) in the grooves of the Right Leg
and Left Leg (#6 & #7).
See FIG. 3A.
8. Attach one Leg Base (#5) to Right Leg and Left Leg
(#6 & #7) using four Bolts (#26) per Leg Base.
See
FIG. 3A
Attach one Leg Panel-B (#15) to Right Leg and Left
Leg (#6 & #7) using four Bolts (#30) per Leg Panel-B.
See FIG. 3A
10. Screw the Leg Levelers (#45) into the button of
each leg.
See FIG. 3A
11. Apply the Glue (#46) in the grooves of the Right
Side Corner and Left Side Corner (#3 & #4).
See
FIG. 3B.
FIG. 3
FIG. 3A
FIG.3
7. Aplique el Pegamento (#46) a las muescas de la
Pierna Derecha y Pierna Izquierda (#6 & #7).
Vea la
FIG. 3A.
8. Aplique 1 Base de Pierna (#5) a la Pierna Derecha y
Pierna Izquierda (#6 & #7), usando 4 Cerrojos (#26)
por Base de Pierna.
Vea la FIG. 3A.
9. Adjunte 1 Panel de Pierna –B (#15) a la Pierna
Derecha y Pierna Izquierda (#6 & #7) usando 4
Cerrojos (#30) por Panel de Pierna – B.
Vea la FIG.
3A.
10. Atornille los Niveladores de Pierna (#45) dentro del
botón de cada pierna.
Vea la FIG. 3A.
11. Aplique el Pegamento (#46) a las muescas de
Córner Lateral de Derecha y Córner Lateral de
Izquierda (#3 & #4).
Vea la FIG. 3B.
P1
P2
X 4
45
45
X 16
26
26
X 16
30
30
30
X 4
5
5
X 2
6
6
7
X 2
7
X 4
15
15
15
X 1
X 20
X 4
46
46
P1
P2
X 2
3
X 2
4
FIG. 3B
46
P1
4
3
or
or