Fig.10 fig.11, Fig.10, Fig.11 – Medal Sports SMUS1458415 User Manual
Page 13
www.themdsports.com
1458415
12
(Continúe en la siguiente página.)
(Continued on the next page.)
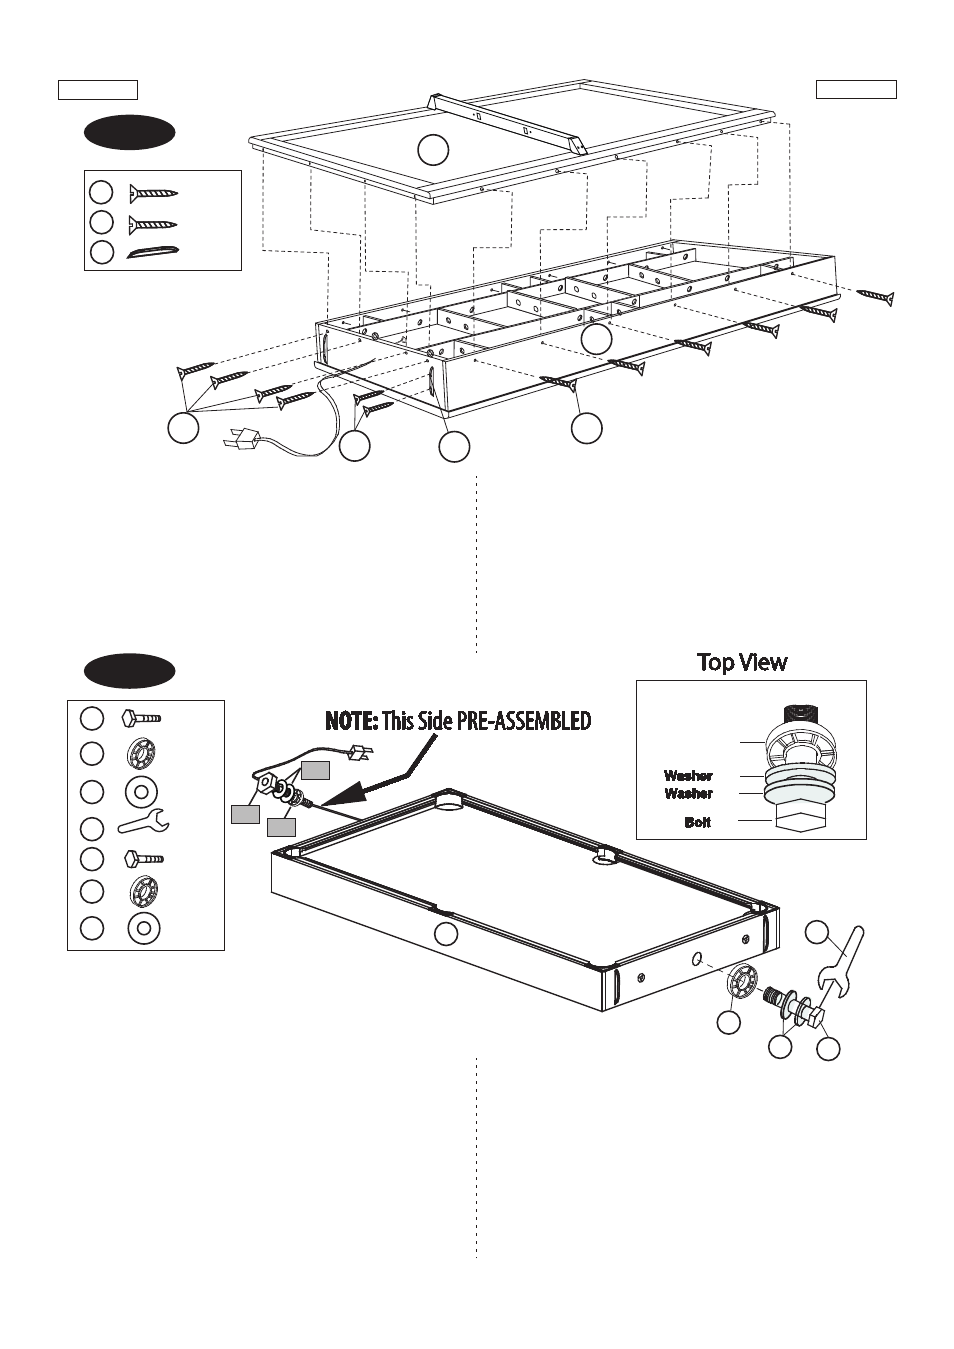
FIG.10
FIG.10
19. Attach the Hockey Playfield (#2) to Billiard Mainframe
(#1) using twenty screws (#25) .
See FIG. 10
20. Attach the Plastic Strip (#48) to Billiard Mainframe
(#1) using two screws (#31) per Plastic Strip.
See
FIG. 10
19. Adjunte el Campo de Juego de Hockey (#2) al
Gabinete de Billar (#1) usando 20 Tornillos (#25).
Vea la FIG. 10.
20. Adjunte la Tira Plástica (#48) al Gabinete de Billar
(#1) usando 2 Tornillos (#31) por Tira Plástica.
Vea
la FIG. 10.
FIG.11
FIG.11
21. Preparing the table top for mounting. The threaded
shaft in the Billiard Mainframe (#1) cannot be
removed, be sure to pull it out as far as possible,
about 2 to 3 inches on each side. Attach washer
(#35) and Bushing (#34) onto the bolt - Hex (#33) .
Hand tighten bolt - Hex (#33) until the nut is snug to
the cabinet. Slide 2 more washers (#35) on each
side.
21. Prepare la parte superior de mesa para el
montaje. El eje enhebrado en el Marco Principal
de Billar (#1) no puede ser quitado, está seguro
retirarselo más lejos posible, aproximadamente de
2 a 3 pulgadas sobre cada lado. Adjunte arandela
(#35) y Cojinete (#34) sobre el cerrojo - Hex (#33).
Apretado el cerrojo - Hex (#33) hasta que la tuerca
está cómoda al gabinete. Deslice 2 arandelas
(#35) más sobre cada lado.
FIG.10
FIG.11
Español
English
X 20
25
X 8
31
X 4
48
2
1
25
25
31
48
X 1
33
34
35
36
P7
P8
P9
X 1
X 2
X 1
X 1
X 1
X 2
1
33
34
35
36
P9
P7
P8
#34
#35
#35
#33
Bushing