Fig.7, Cd2005tt, Maintenance – Sealey CD2005TT User Manual
Page 3: Heater operation
5. MAINTENANCE
Before attempting any maintenance ensure the unit is unplugged from the mains power supply and that it is cool.
5.1. Clean the unit with a soft dry cloth. DO NOT use abrasives or solvents.
5.2. Periodically check the air inlet and outlet to ensure the air way is clear.
NOTE: It is our policy to continually improve products and as such we reserve the right to alter data, specifications and component parts without prior notice.
IMPORTANT: No liability is accepted for incorrect use of this product.
WARRANTY: Guarantee is 12 months from purchase date, proof of which will be required for any claim.
Original Language Version
CD2005TT Issue: 2(L) - 16/04/15
© Jack Sealey Limited
Environmental Protection.
Recycle unwanted materials instead of disposing of them as
waste. All tools, accessories and packaging should be sorted,
taken to a recycle centre and disposed of in a manner which
is compatible with the environment.
WEEE Regulations.
Dispose of this product at the end of its working life in compliance
with the EU Directive on Waste Electrical and Electronic Equipment.
When the product is no longer required, it must be disposed of in an
environmentally protective way. Contact your local solid waste
authority for recycling information.
Parts support is available for this product. To obtain a parts listing and/or diagram, please log on to:
www.sealey.co.uk, email: [email protected] or phone: 01284 757500.
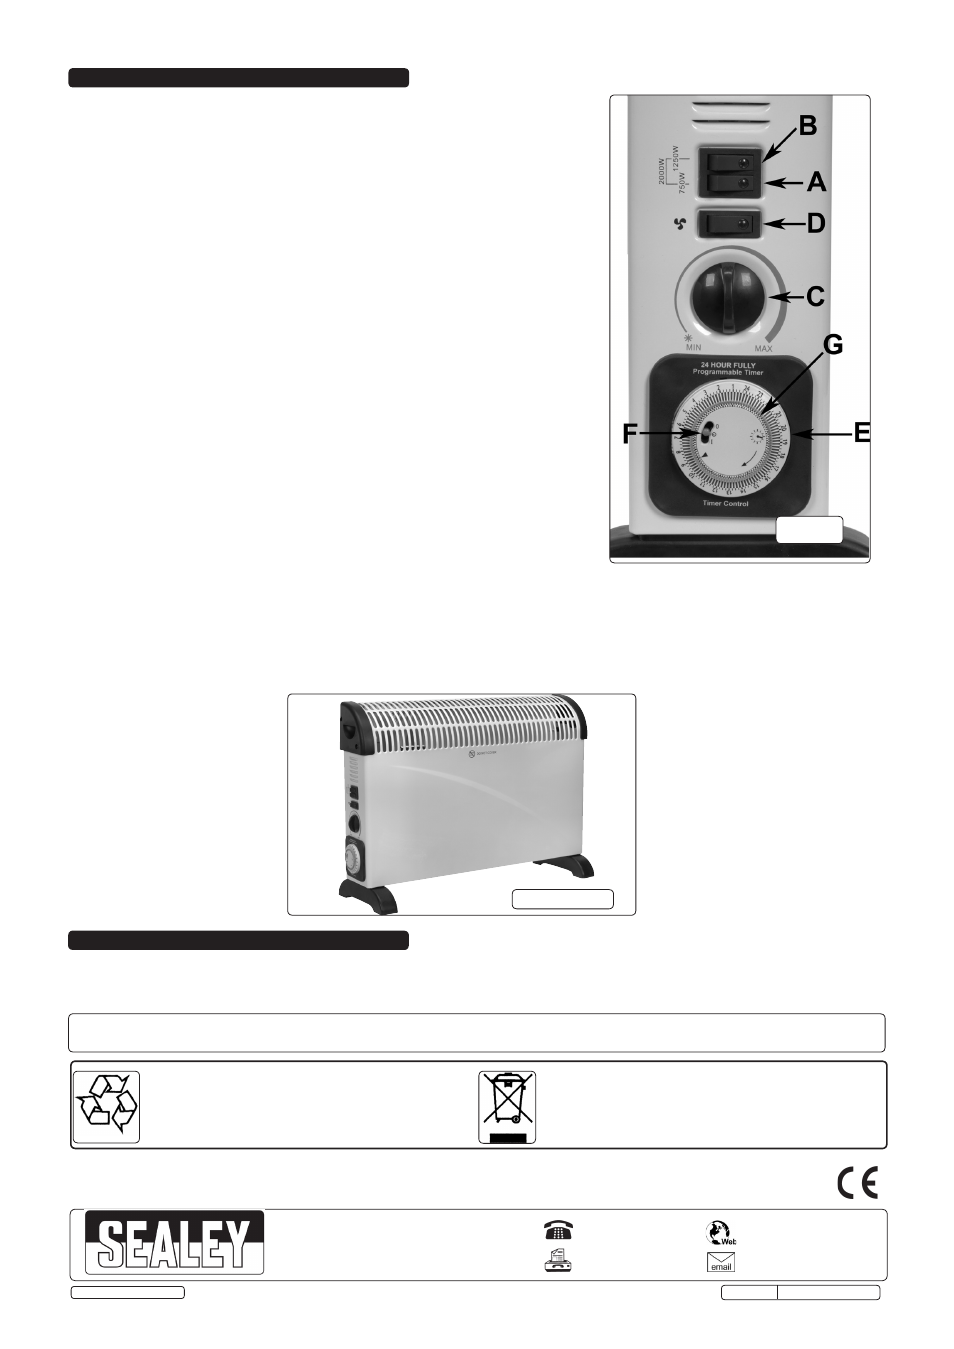
4. HEATER OPERATION
4.1.
Operating the heater. (See fig.7)
4.2. Place the heater in a suitable position in the area you require to heat.
Allow a minimum of 500mm between the heater and adjacent objects such as
furniture etc.
4.3. Plug the heater into the mains supply.
4.4. Turn the thermostat knob (fig.7.C) to a high setting.
Selecting the heat output.
4.5. Choose the required heat output by selecting the appropriate switch which will light
up when pressed.
Low setting
(750W)
Select switch 'A'
Medium setting
(1250W)
Select switch 'B'
High setting
(2000W)
Select both switches.
4.6. Using the thermostat.(fig.7.C)
Once the required room temperature has been achieved, turn the thermostat down
slowly in the direction of the min. setting until the heat output switch light (part of each
switch) goes out. The heater will then keep the surrounding air at the set temperature
by switching on and off at intervals. You may reset the thermostat at any time.
4.7. Turbo fan feature.
To boost the output of air at any temperature setting select switch 'D' which has a
fan symbol beside it. The fan can also be used to circulate cool air only by
switching off the two heat setting switches.
4.8. Timer function.
4.8.1. To activate timer function, turn the outer ring (fig.7.E) to the correct time. This will
need to be repeated every time that the heater is reconnected to the power supply.
4.8.2. The function selector switch (fig.7.F) has three positions:
Left............Heater on permanently
Centre........Heater timed.
Right.........Heater off. The heater will not operate at all with the switch set in this
position.
4.8.3. To select the time during which the heater is active, move the timer pins (fig.7.G.)
outwards for the period required. Each pin is equal to 15minutes.
4.9. To switch the unit off, turn the heat selecting switches off and unplug from the mains.
Allow the unit to cool before handling or storage.
WARNING! DO NOT touch the top of the heater when in use as it becomes hot.
fig.7
4.10. Safety cut out feature.
The heater is fitted with a thermostatic safety cut out which will turn the heater off automatically should the airflow become blocked or if
the heater has a technical malfunction. Should this happen, switch the heater off and unplug it from the mains power supply.
WARNING! In such a case the heater will be very hot.
DO NOT connect the heater to the power supply again until the reason the safety cut out activated has been identified. Allow the
heater to cool completely before handling and then check the air inlet and outlet for obstructions before attempting to switch the unit
back on.
If the cause is not obvious return the heater to your local Sealey dealer for servicing.
CD2005TT
01284 757500
01284 703534
Sole UK Distributor, Sealey Group,
Kempson Way, Suffolk Business Park
,
Bury St. Edmunds, Suffolk,
IP32 7AR
www.sealey.co.uk