Fig.4, Fig.5, Operation – Sealey LP1500 User Manual
Page 3
4. OPERATION
Note: The infrared lamp is fragile and therefore it is important that it is not subjected to any unnecessary shocks or vibration and is not moved
when it is on.
WARNING! Ensure you have read, understood and applied the safety instructions in Section 1 before using the heater.
4.1. Position the heater at least 1m from any object.
4.2. Plug in the heater and switch on.
4.3. Model LP3000 has two heats settings:
- One button switched on initiates the low heat setting.
- Two buttons switched on initiates the high heat setting.
4.4. When the heater is no longer required, switch off and/or unplug the unit.
4.5. Allow heater to cool after use before attempting any maintenance or relocation.
WARNING! DO NOT touch the heater when in use as it becomes hot.
fig.4
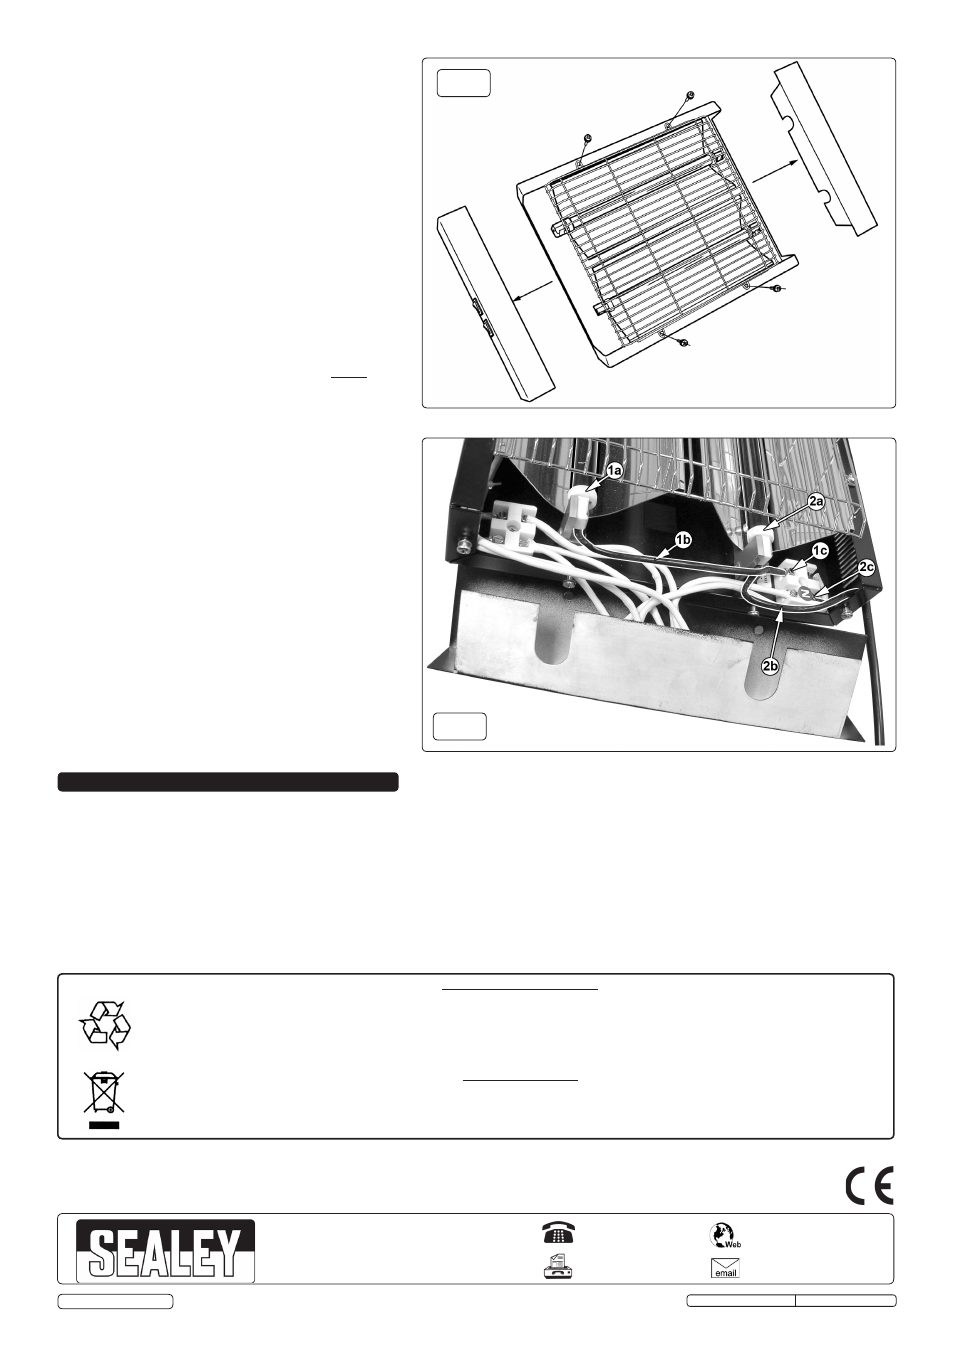
3.3. ELEMENT REPLACEMENT - LP3000.
WARNING! Never touch the element glass
directly with fingers, only touch the ceramic ends
or use a soft cloth, otherwise the tube may get
damaged.
WARNING! When removing/replacing the
element, take great care not to expose it to
excessive force as this may cause it to fracture.
3.3.1. Place the heater face up on a clean work surface.
3.3.2. Remove the four screws which retain the grille
and lift it clear of the main body. (See fig.4)
3.3.3. Remove the four screws which retain the plain
right hand endplate and lift it clear of the main
body. (See fig.4)
3.3.4. Remove the four screws which retain the left
hand endplate and allow it to rest on the work
surface. Do not stretch the wires that connect
to the switches as this may result in loose or
faulty connections.(See fig.5)
3.3.5. The wires at the end of each element should be
disconnected from the terminal blocks before
attempting to unclip the elements.
3.3.6. Refering to fig.5, loosen screw 1c on the terminal
block and slide out the forked connector attached
to wire 1b which connects to element 1a.
3.3.7. Refering to fig.5, loosen screw 2c on the terminal
block and slide out the forked connector attached
to wire 2b which connects to element 2a.
3.3.8. Disconnect the element wires at the other end of
the heater in a similar manner.
3.3.9. Each element can now be removed from it’s clips.
3.3.10. Insert a new element into the clips with the wire
connections facing downwards.
3.3.11. Reconnect each element to the terminal blocks
making reference to fig.5.
3.3.12. Refix the endplate with the switches attached
ensuring that no wires are trapped or showing.
3.3.13. Refix the plain endplate ensuring that no wires
are trapped or showing.
3.3.14. Refix the grille and check that the heater is
functioning correctly before placing it back into
service.
fig.5
Environmental Protection
Recycle unwanted materials instead of disposing of them as waste. All tools, accessories and packaging should be
sorted, taken to a recycling centre and disposed of in a manner which is compatible with the environment.
When the product becomes completely unserviceable and requires disposal, drain off any fluids (if applicable)
into approved containers and dispose of the product and the fluids according to local regulations.
WEEE Regulations
Dispose of this product at the end of its working life in compliance with the EU Directive on
Waste Electrical and Electronic Equipment (WEEE). When the product is no longer required, it must be disposed
of in an environmentally protective way. Contact your local solid waste authority for recycling information.
NOTE: It is our policy to continually improve products and as such we reserve the right to alter data, specifications and component parts without prior notice.
IMPORTANT: No liability is accepted for incorrect use of this product.
WARRANTY: Guarantee is 12 months from purchase date, proof of which will be required for any claim.
INFORMATION: For a copy of our latest catalogue and promotions call us on 01284 757525 and leave your full name and address, including postcode.
01284 757500
01284 703534
Sole UK Distributor, Sealey Group,
Kempson Way, Suffolk Business Park
,
Bury St. Edmunds, Suffolk,
IP32 7AR
www.sealey.co.uk
Original Language Version
© Jack Sealey Limited
LP1500.V2, LP3000 Issue: 3(L) - 10/06/14