Fig.1 fig.2, Mounting installation, Introduction & specification – Sealey IWMH2003RC User Manual
Page 2: Operation
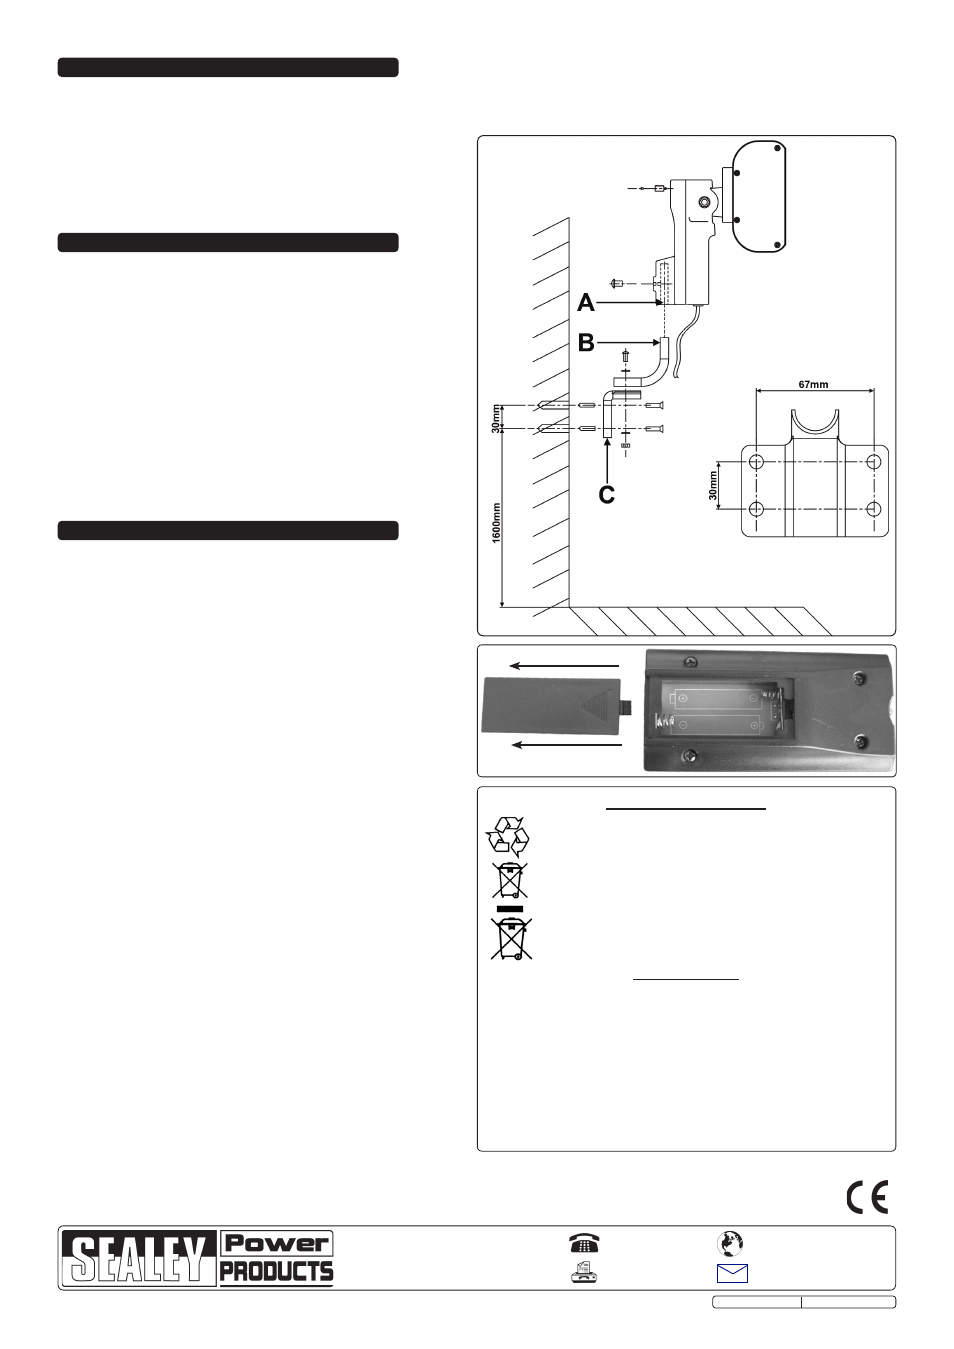
3. MOUNTING INSTALLATION
3.1 WALL MOUNTING (fig.1).
IMPORTANT! The following points should be noted: The heater
should always have a minimum clearance of 450mm from a
ceiling and at least 900mm from any object. Ensure that
mounting surface is capable of supporting the weight of the
heater.
3.2
Use the bracket (fig.1C) as a template, fix the metal bracket to
the wall by means of the four holes and appropriate fixings
(not supplied).
3.3
Secure the neck (fig.1B) to the heater head (fig.1A) using a
single bolt.
3.4
Next with the help of a second person holding the heater, bolt the
neck (fig1.B) to the wall bracket (fig.1C) using a nut, bolt and two
washers.
3.5 Adjust the angle of heater to direct heat where required.
2. INTRODUCTION & SPECIFICATION
A totally dry heat, no condensation, no gas, no fumes and no smell. Reaches maximum heat output within seconds of being turned on. Highly polished
aluminium reflector for maximum heat efficiency. Adjusts horizontally through 25° while mounted. Three settings, controlled by push on/off switch or
remote control, allowing unit to be on full, half or low power. Ideal for industrial or domestic applications. Suitable for indoor and outdoor use, if weather
protected.
4. OPERATION
Note: The infrared lamp is fragile and therefore it is important that it is
not subjected to any unnecessary shocks or vibration and is not
moved when it is on or still warm. Only move once completely
cooled down.
WARNING! Ensure you read, understand and apply the
safety instructions in Section 1 before using the heater.
4.1
Ensure the heater is at least 900mm from any object. The heater
can be tilted from 0° to 25°, set it to the required angle before
switching the heater on.
4.2
Plug in the heater and switch it on using either the control on the
base of the heater or by using the remote.
4.3
The heater will start on the low setting, each press of the on/
power button will cycle the heater onto the medium setting, high
setting and then back to the low setting.
4.4
When the heater is no longer required, switch off, using the off
button on the unit or the off button on the remote and unplug the
unit.
4.5
make sure the heater plug is disconnected from the mains supply
before any cleaning is attempted. Also allow the heater to cool
completely.
DO NOT use water or other liquids, or harsh abrasive
cleaners to clean the heater.
DO NOT touch the glass elements
with fingers as this may damage the tube(s).
4.6
Clean the exterior with a soft damp cloth with some mild
detergent.
4.7
To replace any of the lamps, contact your authorised Sealey
dealer.
4.8
To change the remote batteries, press down and push back the
battery cover (fig.2), remove old batteries and replace with two
new AAA batteries.
WARNING! DO NOT mix old and new batteries and dispose
of old batteries in accordance with local authority
regulations.
4.9
IWMh2003RC.V2 is fitted with an tilt safety mechanism so
that if for any reason the heater would be tilt beyond 25° the
heater will cut-out. Position the heater upright to turn the
heater back on.
fig.1
fig.2
NOTE: It is our policy to continually improve products and as such we reserve the right to alter data, specifications and component parts without prior notice.
IMPORTANT: No liability is accepted for incorrect use of this product.
WARRANTY: Guarantee is 12 months from purchase date, proof of which will be required for any claim.
INFORMATION: For a copy of our latest catalogue and promotions call us on 01284 757525 and leave your full name and address, including postcode.
01284 757500
01284 703534
Sole UK Distributor, Sealey Group,
Kempson Way, Suffolk Business Park
,
Bury St. Edmunds, Suffolk,
IP32 7AR
www.sealey.co.uk
Web
Power: . . . . . . . . . . . . . . . . . . . 2000W
Input supply: . . . . . . . . . . . . . . . 230V 50Hz 13A
Dimensions (W x H x D): . . . . . 485 x 250 x 170mm
Original Language Version
IWmH2003RC.V2 Issue: 1 - 31/05/12
Environmental Protection.
Recycle unwanted materials instead of disposing of them as
waste.
All tools, accessories and packaging should be sorted, taken
to a recycle centre and disposed of in a manner which is
compatible with the environment.
When the product is no longer required, it must be disposed
of in an environmentally protective way. Contact your local
solid waste authority for recycling information.
Battery Removal.
To remove batteries, see 4.8.
•
Ensure correct polarity.
•
Dispose of batteries according to local authority
guidelines.
Under the Waste Batteries and Accumulators Regulations 2009, Jack
Sealey ltd are required to inform potential purchasers of products
containing batteries (as defined within these regulations), that they are
registered with Valpak’s registered compliance scheme.
Jack Sealey ltd’s Batteries Producer Registration Number (BPRN) is
BPRN00705