Auriol 2-LD3824-4 User Manual
Page 3
- 3 -
Features
•
Radio controlled time
•
Automatic daylight saving time
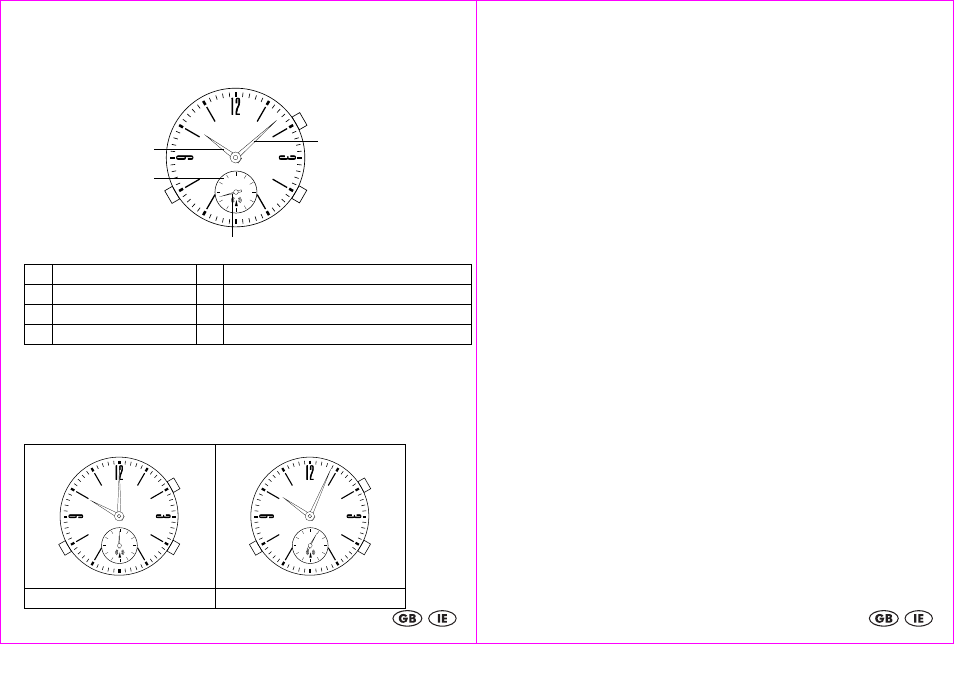
A
Button (up)
1
Hour hand
B
Button (down)
2
Minute hand
C
Button (confirm)
3
Second hand
4
Reception indicator (RX, OK, NG)
Checking time signal reception
The time signal is received every night at 3 or 4 o’clock. The time signal reception can be checked by briefly
pressing button A while the second hand is moving at normal speed (1 step per second). The second hand will
move to “OK” if the last reception attempt was successful or to “NG” if the last reception attempt failed. The
second hand will move back to the current time in seconds shortly.
Successful
Failed
RX
OK NG
A
B
C
1
3
4
2
RX
OK NG
RX
OK NG
- 4 -
Manually starting the time signal reception
The watch may show the correct time, even if it has not received the daily time signal.
The time signal reception can be started manually at any time:
Press and hold button A for 3 seconds.
The second hand will move to the RX position and the time signal reception will be started. The reception
process will take between 4 to 8 minutes to complete.
Once the time signal has been received, the watch will set itself automatically.
If battery power is low, reception can not be activated.
Manual time setting
The minutes can be set manually, if the time shown on the watch differs from the actual time by one or more
minutes. Press and hold button C for about 5 seconds while the second hand is moving at normal speed. The
second hand will move to the 0-second position.
Press A to move the minute hand 1 minute forward
Press B to move the minute hand 1 minute backward
Press C to confirm your setting
The watch will return to normal time display mode.
Calibration
Replacement of the battery, shock or strong magnetic fields may cause the hands to lose synchronisation with
the actual time stored in the watch. If this occurs, the hands must the calibrated.
Press and hold buttons A and B together for around 5 seconds. The minute hand will move to the 12 o’clock
position and the second hand will move the 0 second position.
Calibrating the second hand (image 1)
Setting the second hand exactly to the 0 second position:
Repeatedly press button A to move the second hand forward.
Repeatedly press button B to move the second hand backward.
When the second hand is exactly at the 0 second position, press button C to confirm your setting.
Calibrating the minute hand (image 2)
Setting the minute hand exactly to the 12 o’clock position:
Repeatedly press A. The minute hand will move forward (1/6 of a minute per button press). Repeatedly press
B
. The minute hand will move backward (1/6 of a minute per button press).
When the minute hand is exactly at the 12 o’clock position, press button C to confirm your setting.
Calibrating the hour hand (image 3)
The second hand will now attempt to show the exact position of the hour hand- 1 second equals 1 hour. For
example, if the hour hand is at 10 o’clock, the second hand must move to the 10 second position. If this is not
the case, repeatedly press A or B to move the second hand to the 10 second position.
Press C to end the calibration process.
The second hand will move to the RX-Position and time signal reception will begin automatically (image 4).