Auriol 2-LD3824-8_9 User Manual
Page 3
- 3 -
Features
•
Radio controlled time
•
Automatic daylight saving time
Checking time signal reception
Normally the time signal is transmitted and received between 3 and 4 o’clock at night. It is possible to test the
last time signal reception by pressing button B. If the reception attempt was successful, the second hand will
briefly move to the 12 o’clock position. If the reception attempt failed, the second hand will briefly move to the
6 o’clock position. After about 3 minutes, the current time will once again be shown.
The watch may show the correct time, even though it has not received the daily time signal.
Manually starting time signal reception
The time signal reception process can be started at any time.
Press button A for about 3 seconds. The time signal reception process is started once the second hand has
moved to 11 o’clock. The reception process will take between 3 to 8 minutes. If the time signal reception
process was successful the correct time will be set automatically. If the time signal reception process failed, the
second hand will move to the 6 o’clock position for about 30 seconds and then move back to the previously
set time.
Manual time setting
Please only use manual time setting if time signal reception is impossible. The time signal can only be
received within Europe. Should the watch show the incorrect time, please follow the instructions in the
chapter „Troubleshooting“.
To set the time manually, pull the crown C to position 1 and press button A until the second hand is a the 6
o’clock position. Now press and hold B for approximately 5 seconds. The second hand will automatically
advance to the 12 o’clock position and stop. You can now turn the crown C to set the correct time. Press the
crown C back to the case- the second hand will begin to move normally again.
To go from manual time setting to radio controlled time, please restart the time signal reception as described in
the chapter “Manually starting time signal reception”.
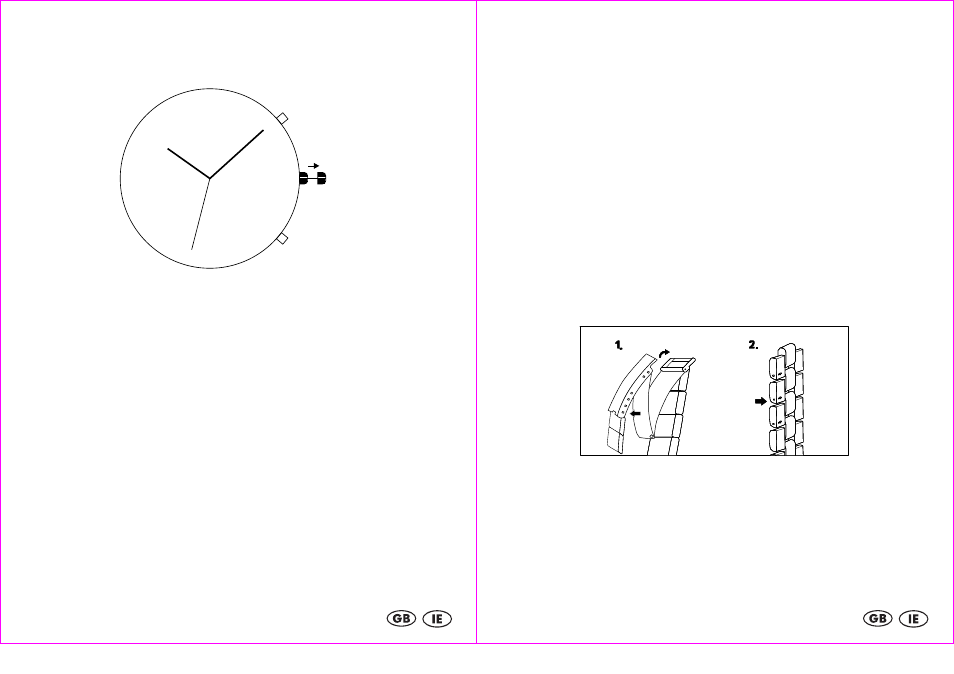
A
B
0
1
C
- 4 -
Calibration
Replacing the battery, strong magnetic fields or strong vibrations may cause the hands to lose synchronisation
with the internal time. In this case the hands must be recalibrated.
Pull the crown C to position 1 and repeatedly press button A to move the second hand to the 12 o’clock
position.
Turn the crown C to set the minute and hour hands to 12 o’clock.
Press the crown C back to the case (position 0). The second hand will now jump to 11 o’clock and the time
signal reception process will start.
Troubleshooting
If your watch displays an incorrect time, this can have different causes.
1.
The time differs by one or more minutes and possibly hours.
Restart radio reception first. See "Manually starting time signal reception".
If the problem persists, follow the instructions in the chapter "Calibration".
2.
The battery power may be too low for time signal reception.
Have the battery replaced by an
expert. Restart radio reception first. See "Manually starting time signal reception". If the problem
persists, follow the instructions in the chapter "Calibration".
Metal strap shortening instructions
Your wristwatch strap may be shortened in two ways.
1. At the buckle (see fig. 1.)
Unlock the safety cover (if applicable) and open the buckle. The strap is held in position by a spring bar. The
spring bar can be compressed with a pointed tool to enable shortening of the strap. Move the strap to the
desired position and allow the spring bar to lock into place.
2. At the strap (see fig. 2)
Shortening of the strap can also be achieved by removing segments. Open the buckle and remove the spring
bar as described in part 1.
Place the wristwatch on a soft surface with the dial facing downward. The segments that can be removed are
marked with an arrow. Push a pointed tool into the opening on the backside of the strap and push the bolt out
of the strap in the direction of the arrow. Pull out the bolt (you may need to use tweezers).