ShoreLand'r SLDB14A-00STS User Manual
Page 4
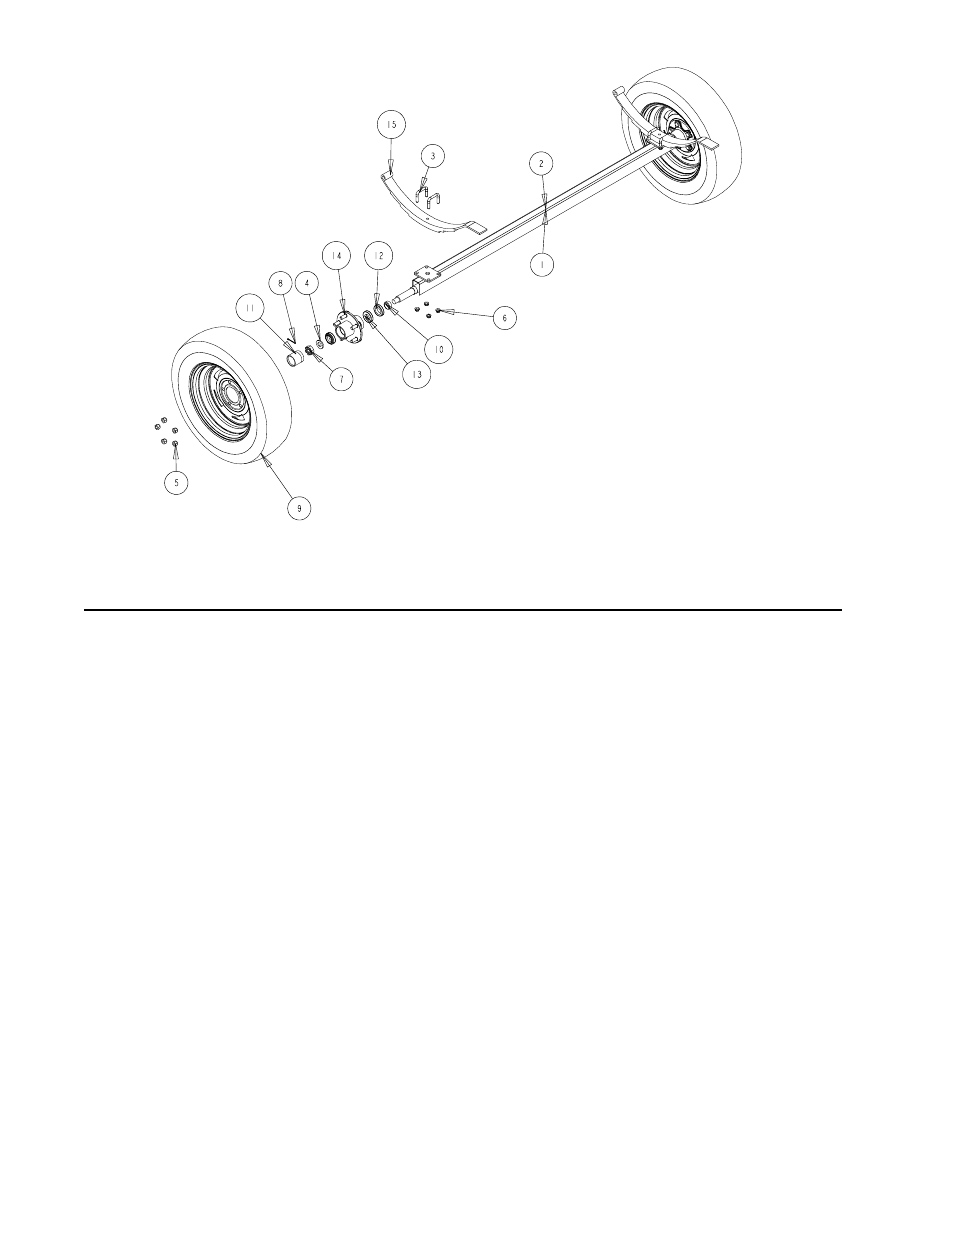
REF# PART#
DESCRIPTION
QTY
1
6443500 AXLE WMENT - FISHING SERIES ......... 1
2
6444900 AXLE ASSY - FISHING SERIES ............. 1
3
0310060 SUB 3/8-16 X 2 3/16 X 1 3/4 ................... 4
4
1340206 WASHER 1.5ODX.765IDX.186/.206 ....... 2
5
1410230 HEX LUGNUT 1/2-20 3/4 OD Z&U .......... 10
6
1440101 FLANGE LOCKNUT SMALL 3/8-16 ........ 8
7
1440349 HEX NUT SLOTTED PLAIN .................... 2
8
1540038 COTTER KEY 1/8 X 1 1/2 ....................... 2
9
4300209 ST155/80R13C TIRE/GALV DIR RIM ..... 2
10
4410087 SPINDLE SLEEVE - 1 1/16 ..................... 2
11
4410247 BEARING BUDDY - STAINLESS STEEL 2
12
4410275 SEAL ........................................................ 2
13
4440160 ROLLER BEARING 1 1/16IN ................ 4
14
4470337 HUB 1 1/16 X 1 1/16 CAST ................... 2
15
4610010 SLIPPER LEAF SPRING ......................... 2
using 3/8 X 5 full threaded carriage bolts and 3/8
flange lock nuts. Refer to the parts drawing for proper
placements.
Side Marker Lights:
Locate the side marker light holes on the side of the
tongue. Mount the amber side marker light into the
tongue using two (2) #10 X 3/4 self drill screws.
Repeat on other side of the tongue.
Winch:
Mount the winch stand to the tongue in a desired
location that best fits your boat. Secure with three (3)
3/8 X 3-3/4 hex bolts and 3/8 flange lock nuts.
Mount the bow stop bracket to the winch stand using
two (2) 3/8 X 1 carriage bolts and two (2) 3/8 flange
lock nuts.
Place the 3 bow roller inside the small winch
bracket. Insert the bow roller pin through the small
winch bracket and the 3 bow roller. Secure this
assembly using two (2) 1/2 push nuts.
Mount the winch assembly on top of the small winch
bracket. Secure the winch assembly using two (2) 3/
8 X 1 hex bolts and 3/8 flange lock nuts. NOTE:
Use a 3/8 flat washer on the bolt head used in the
slotted hole on the winch.
Mount the winch handle on the winch using the
hardware provided with the winch.
Safety Chain:
Insert a 3/8 X 1-1/4 hex bolt through a 3/8 flat
washer and safety chain. Then insert this assembly
into the lower hole on the tongue and secure with a 3/
8 flat washer and 3/8 flange lock nut on the inside of
the tongue. Repeat on the opposite side of the
tongue.
Coupler:
Mount the coupler to the top holes on the tongue
using a 1/2 X 4 hex bolt in the rear hole and using
two (2) 1/2 X 1 hex bolts in the front holes. Secure
with 1/2 flange lock nuts. NOTE: The ground wire
will be secured to the 1/2X 4 hex bolt for
grounding purposes.
Made in the USA
Midwest Industries, Inc. Ida Grove, IA 51445 Tele: 712/364-3365
0002920
REV 9/21/00
continued from page 1