ShoreLand'r 5 Brake Swing Tongue User Manual
Page 2
Midwest Industries, Inc.
Ida Grove, IA 51445
800.859.3028
www.shorelandr.com
0003839
Page 2
08/15/07
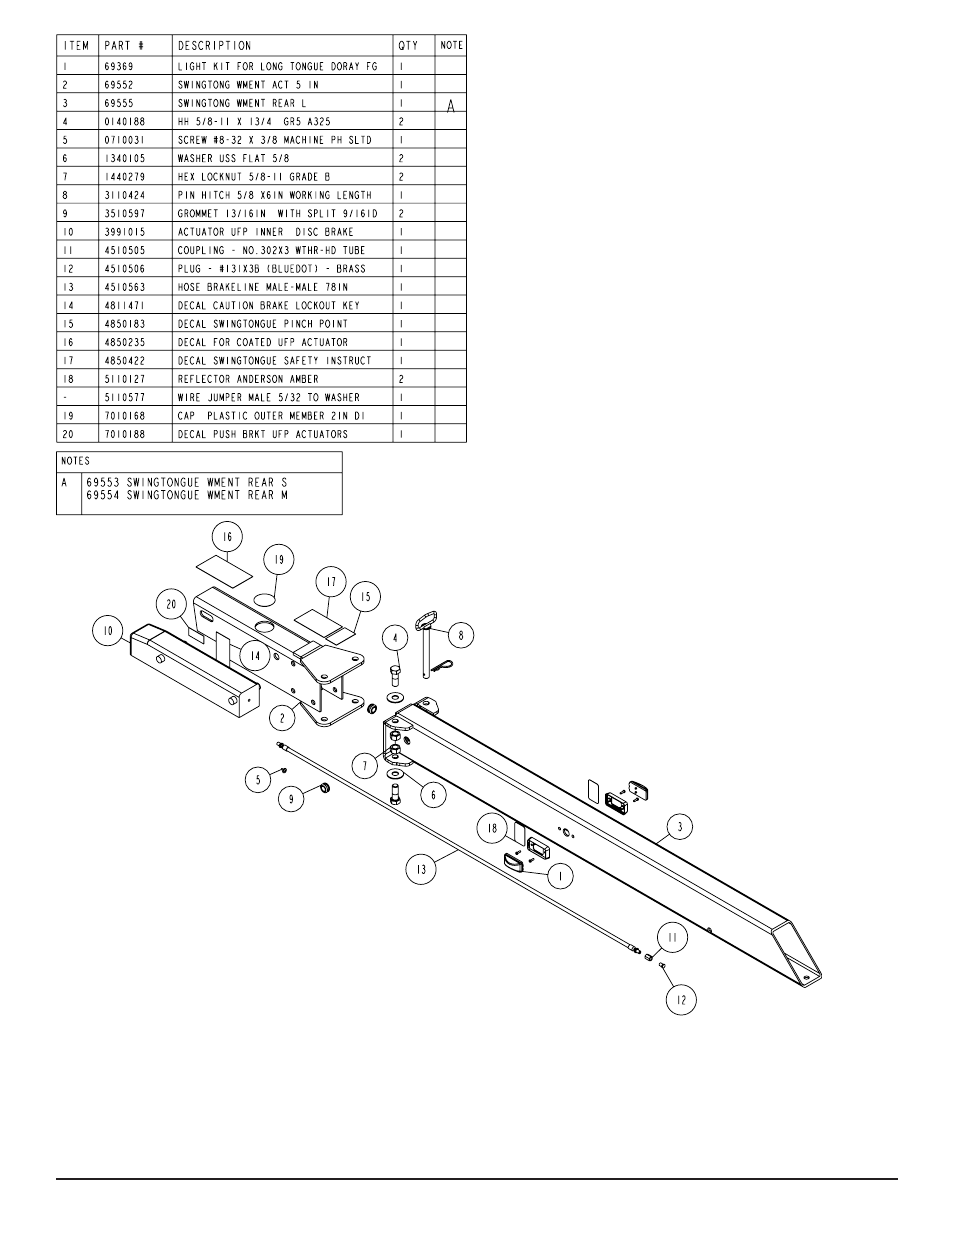
the front of the tongue channel.
• Disconnect the tongue brake hose from the frame brake hose
where they are joined together with a brass coupler.
• Disconnect the side frame wire harnesses from the tongue har-
ness. Pull the tongue harness forward out the hole in the top of
the tongue. Disconnect the white and blue wires that are con-
nected to the brake solenoid. Remove the old tongue assembly
from the frame.
I
nstalling the New Swing Tongue to the Frame
• Locate the new swing tongue and slide the rear section into the
frame tongue channel.
• Align the cross hole in the new tongue with the hole in the frame
tongue channel. Insert the ½” x 4” cross bolt just removed through
the aligned hole to secure it in position. Place on the flange lock
nut.
DO NOT tighten at this point.
• Locate the white and blue wires from the brake solenoid that are
extended out the hole in the right side of the rear tongue section
just behind the hinge. Mate and connect the white and blue wires
from the solenoid to the tongue harness just removed.
• Once connected, insert the end of the tongue wire harness into
the hole where the connections were just made. Push the wire
out the rear of the tongue.
NOTE: If the swing tongue being in-
stalled is the 78” long version, the additional side marker lights
provided will have to installed in the holes provided on either side
of the tongue rear section. The wires for the lights are routed
backwards and will be plugged into the tongue harness during
the installation process.
• Place the wire harness through the hole provided in the tongue
cap along with the brake hose that is supplied inside the swing
tongue.
• Reconnect the tongue harness to the frame harnesses. Push the
excess wire back into the tongue.
• Connect the new tongue brake line hose to the frame brake hose
using the brass coupler. Tighten.
• Align the hole in the rear of the tongue, the tongue channel and
the tongue cover. Secure with the ½” x 1 ½” hex bolt and flange
lock nut removed earlier. Tighten the bolt just installed plus the
cross bolt installed earlier.
• Re-attach the safety chains using the hardware removed from
the old tongue.
• Tighten all of the bolts not tightened at this time.
• Rebleed the brake system using the bleeding procedure de-
scribed in the brake manual.
• Assembly is complete.
• Position the winch post assembly on the new swing tongue so
it is the samd distance from the frame tongue channel as it was
mounted on the old tongue. Secure in place using the bolts or
U-bolts removed earlier.
• Place the boat on the trailer. Winch the boat into the winch post
bow roller and check for proper winch post adjustment.
• If satisfactory, assembly is complete.
CAUTION: always check the brake hose location in the hinge
area when swinging the tongue back into its towing position.
Doing so will prevent the hose from becoming pinched and/or
damaged in the tongue hinge.