Rs-485 address, Moving image overlay – Studio Technologies 5150 V.3 User Manual
Page 12
Issue 1, June 2013
Model 5150 User Guide
Page 12
Studio Technologies, Inc.
Model 5150
Video Generator Module
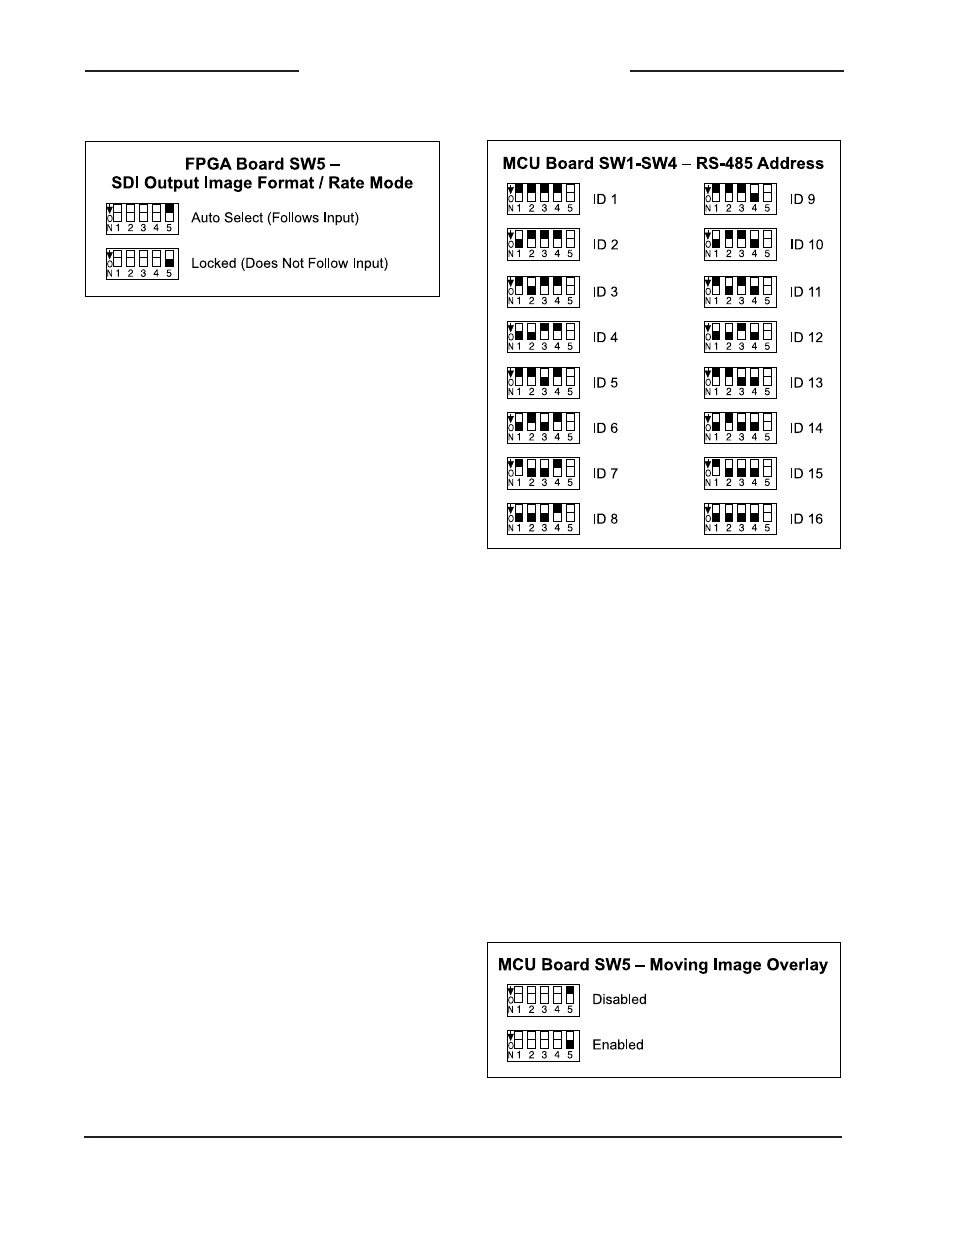
The format and rate of the internal SDI gen-
erator can also be “locked” so that it will not
change. When switch 5 is in its down (on)
position the format and rate that’s currently
being used cannot be changed, no matter
what signal is connected to the SDI input.
While the format and rate is “locked” when
switch 5 is down, it’s not difficult to change
the Model 5150 to a different “locked” for-
mat and rate. Begin by changing the mode
back to automatic by placing switch 5 on the
FPGA board to off (up). Then connect (or
leave connected) an SDI signal that has the
desired format and rate. After approximately
five seconds the new format and rate values
will be saved in nonvolatile memory. This will
serve as the new format/rate parameters.
Then return switch 5 to its on (down) posi-
tion to “lock” the format/rate and prevent
further changes.
RS-485 Address
One configuration setting must be performed
for applications that implement remote con-
trol of Model 5150 functions. While up to 16
Model 5100-Series modules can “share” the
RS-485 data bus, each module must have
a unique address. Selecting the device’s
address involves setting four configuration
switches on the MCU board.
Moving Image Overlay
A “moving” graphic image can be overlaid
onto the stored “720” and “1080” images
when either is being output by the Model
5150. The image is a red-colored box that
slowly moves around the screen. This
simple icon provides an indication to per-
sonnel located downstream of the Model
5150 that the SDI signal is active. This can
be important to ensure that a distinction
can be made between an active image and
an image that’s the result of the last valid
frame being held and displayed while an
SDI input is no longer present.
Figure 7. RS-485 Address Settings
Figure 8. Moving Image Overlay Settings
Figure 6. SDI Output Image Format/Rate Mode
Settings