Setup, Dip switch settings, Connection – Sierra Video RS-485 Pushbutton Control Panels User Manual
Page 18
SIERRA VIDEO
12
Setup
DIP switch settings
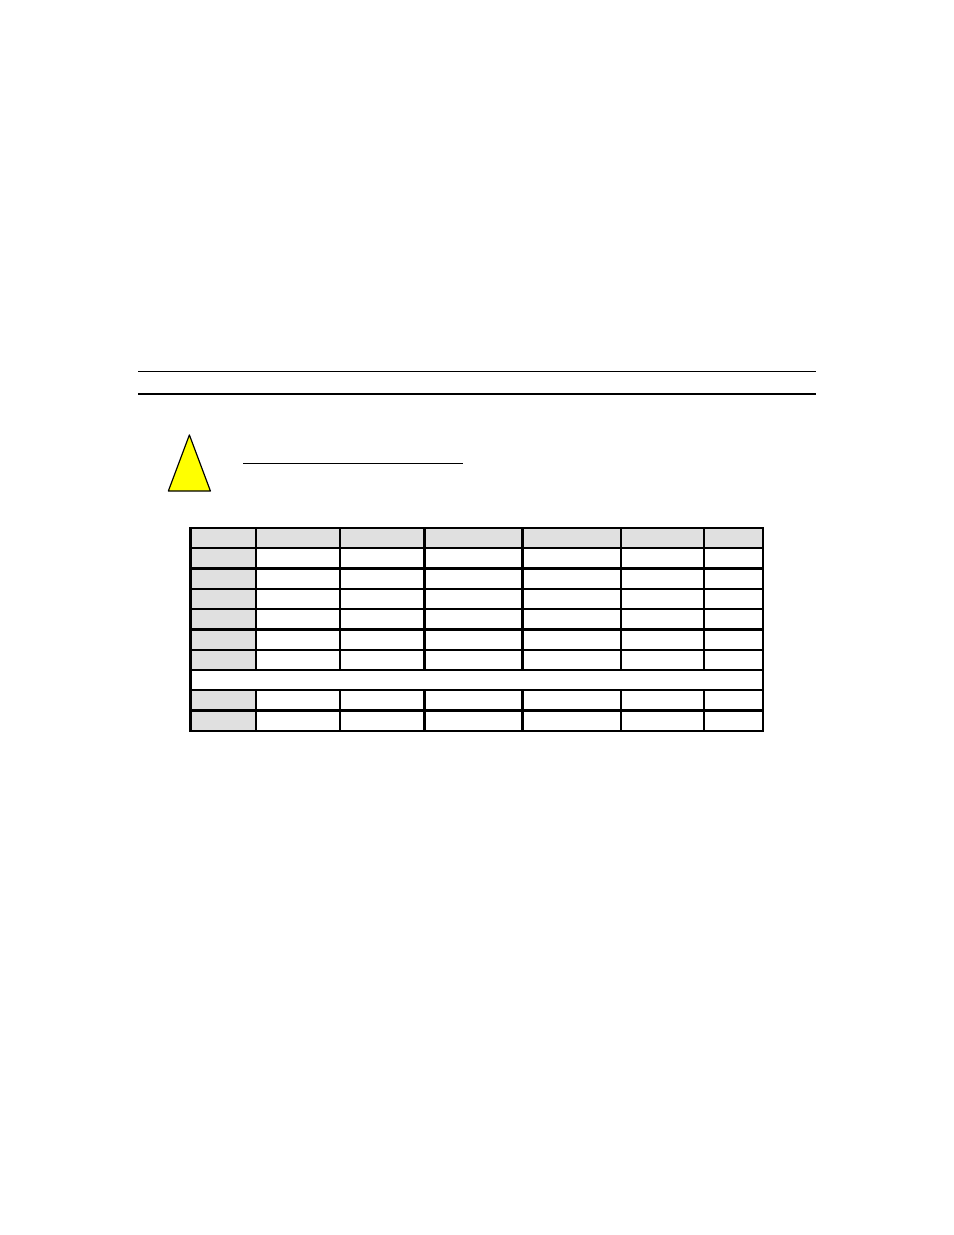
The panels have DIP switches that set the panel’s ID number and baud rate. ID numbers
are randomly set at the factory. If you need to change any values, follow the table below.
Switch 8 is unused
Switch 7 is Port Speed:
OFF = 9,600 bps
*ON = 31,250 bps (factory default)
Switches 1 through 6 are to set ID number. (Switches are in binary).
CAUTION!
Each Control Panel must have its own ID number. No panels may have the same ID number.
Disconnect the panel’s power and remove the rear cover to access the DIP
switches. The table below shows the settings available:
Binary
1
2
4
8
16
32
ID 0
1 Off
2 Off
3 Off
4 Off
5 Off
6 Off
ID 1
1 On
2 Off
3 Off
4 Off
5 Off
6 Off
ID 2
1 Off
2 On
3 Off
4 Off
5 Off
6 Off
ID 3
1 On
2 On
3 Off
4 Off
5 Off
6 Off
ID 4
1 Off
2 Off
3 On
4 Off
5 Off
6 Off
ID 5
1 On
2 Off
3 On
4 Off
5 Off
6 Off
ETC.
ID 62
1 Off
2 On
3 On
4 On
5 On
6 On
ID 63
1 On
2 On
3 On
4 On
5 On
6 On
Connection
Once the panels DIP switch settings are compatible with the system (i.e. each panel has
its own unique ID number), the panel can be connected to the RS-485 network and
power applied.
The panel has two mini XLR connectors. The mating connectors used are Switchcraft
TA3F. If these are not available locally, they can be purchased from Sierra Video.
The cable entry hole into these connectors is quite small and we have found that Belden
8451 cable fits quite well through the strain relief.
The pinout of the connector is as follows:
Pin 1………RS-485 +
Pin 2………Ground
Pin 3………RS-485 –
!