2 remote control, 5 connecting to external equipments – MEGAPOWER MVP-732 User Manual
Page 5
1
2
3
4
5
6
7
8
11
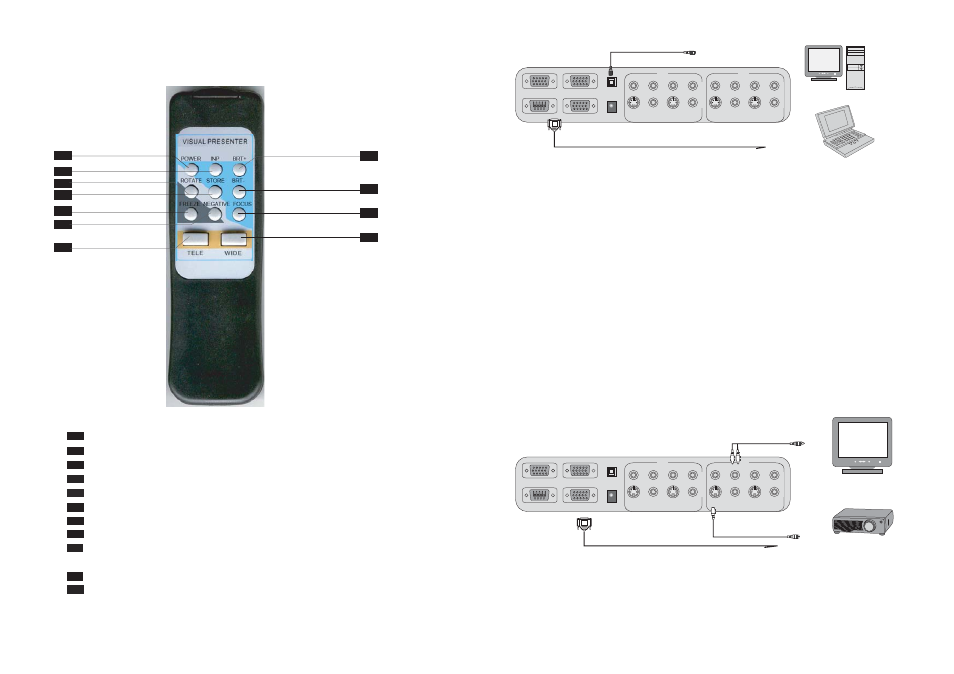
POWER
turns Power to the digital Presenter On/Off
INP selects Video signal:- Video 1, Video 2
BRIT+ increases the brightness of the image
ROTATE switches image from Left to Right
STORE
stores images
BRIT- decreases the brightness of the image
FREEZE freezes the current image
NEGATIVE negative function button
FOCUS automatically adjusts focus to mantain a
sharp image
TELE zooms in and enlarges size of object
WIDE
zooms out and reduces size of object
3.2 Remote Control
The following describes the control button on the remote control of the Digital Presenter.
7
7
11
8
3
9
10
1
4
6
9
2
5
10
RS-232C
RGB OUT-1
1
2
S-VIDEO
L
R
AUDIO
VIDEO
IN
S-VIDEO AUDIO
VIDEO
L
R
1
2
S-VIDEO
L
R
AUDIO
VIDEO
OUT
S-VIDEO AUDIO
VIDEO
L
R
12V DC IN
RGB OUT-2
RGB IN
USB
RS-232C
RGB OUT-1
1
2
S-VIDEO
L
R
AUDIO
VIDEO
IN
S-VIDEO AUDIO
VIDEO
L
R
1
2
S-VIDEO
L
R
AUDIO
VIDEO
OUT
S-VIDEO AUDIO
VIDEO
L
R
12V DC IN
RGB OUT-2
RGB IN
USB
+
-
PC
Notebook
3.3 PC Control (USB) & RS-232C Control Setup
3.4 RS-232C Control Operation
Load the RS-232C Driver Software onto any folder on the hard disk of the PC. Execute the driver
to activate the RS-232C control software.
The RS-232C control window will be displayed on the PC. The use is identical to the buttons on
the digital presenter or remote control.
The application software is compatible with Win98, WinME, Windows 2000 & Windows XP.
Connecting to PC Monitor or Multimedia Projector
+
-
PC Monitor
or TV
Multimedia
Projector
VGA Cable: Connect one end to the PC Monitor or Multimedia Projector and the other
end to the PC Out port of the Visual Presenter
Stereo Audio Cable: Connect one end to the audio equipment (or Multimedia Projector) and
the other end to the PC Out (Audio) port of the Visual Presenter
3.5 Connecting to External Equipments
RGB, Composite Video or
S-Video output signal
RCA Cable: Plug the yellow connector into the video port of the TV or Multimedia
Projector
S-Video Cable: A better image will be obtained through the S-Video signal, which only
delivers internal signal from the Visual Presenter
8
Use the USB cable to connect the USB port of the digital presenter
and the PC. Install the USB Driver Software onto the PC.
Presenter can be controlled by the PC via the USB port
Use the RS-232C cable to connect the RS-232C port of the digital presenter to
COM1 port on the PC. The Digital Presenter can be controlled via the RS-232C
through the installed RS232C driver software.