Foreword, Unpacking and cleaning, Motor specifications – Delta 40-570 User Manual
Page 4: Extension cords
4
FOREWORD
Delta Model 40-570 16" Scroll Saw is designed to give high quality, smooth cutting performance with capacity to cut
up to 16" wide by 2" thick woodworking materials and has a 3/4" stroke. Delta Model 40-570 comes equipped with;
basic machine, integral dust port, variable speed 600-1650 spm, lock-out switch, cast iron table for minimal vibration,
Quickset II
®
Blade Chuck System for ergonomic “wrench-free” blade changing, threading and tensioning, accepts
wide variety of 5" flat end blades, 45° left tilting for bevel cuts, adjustable dust blower to keep cutting line free of dust.
UNPACKING AND CLEANING
Your new scroll saw is shipped completely assembled in the carton. Carefully unpack the saw and all loose items.
Remove the protective coating from the saw table surface. This coating may be removed with a soft cloth
moistened with kerosene (do not use acetone, gasoline or lacquer thinner for this purpose). After cleaning, cover
the table surface with a good quality paste wax. Buff out the wax thoroughly to prevent it from rubbing into your
workpieces.
CONNECTING SCROLL SAW TO POWER SOURCE
POWER CONNECTIONS
A separate electrical circuit should be used for your tools. This circuit should be protected with a fuse or circuit
breaker. Have a certified electrician replace or repair a worn cord immediately. Before connecting power, make sure
the switch is in the “LOCKED OFF” position and the electric current is of the same characteristics as stamped on the
nameplate. Running on low voltage will damage the motor.
WARNING: DO NOT EXPOSE THE TOOL TO RAIN OR OPERATE THE TOOL IN DAMP LOCATIONS.
MOTOR SPECIFICATIONS
Your scroll saw is wired for 110-120 volt, 60 HZ current. Before connecting the saw to the power source, make sure
the switch is in the “OFF” position.
0-6
0-6
0-6
0-6
120
120
120
120
up to 25
25-50
50-100
100-150
18 AWG
16 AWG
16 AWG
14 AWG
Ampere
Rating
Volts Total Length of
Cord in Feet
Gage of
Extension Cord
6-10
6-10
6-10
6-10
120
120
120
120
up to 25
25-50
50-100
100-150
18 AWG
16 AWG
14 AWG
12 AWG
10-12
10-12
10-12
10-12
120
120
120
120
up to 25
25-50
50-100
100-150
16 AWG
16 AWG
14 AWG
12 AWG
12-16
12-16
12-16
120
120
120
up to 25
25-50
14 AWG
12 AWG
GREATER THAN 50’ NOT RECOMMENDED
0-6
0-6
0-6
0-6
6-10
6-10
6-10
6-10
10-12
10-12
10-12
10-12
12-16
12-16
12-16
240
240
240
240
240
240
240
240
240
240
240
240
240
240
240
up to 50
50-100
100-200
200-300
up to 50
50-100
100-200
200-300
up to 50
50-100
100-200
200-300
up to 50
50-100
18 AWG
16 AWG
16 AWG
14 AWG
18 AWG
16 AWG
14 AWG
12 AWG
16 AWG
16 AWG
14 AWG
12 AWG
14 AWG
12 AWG
GREATER THAN 100’ NOT RECOMMENDED
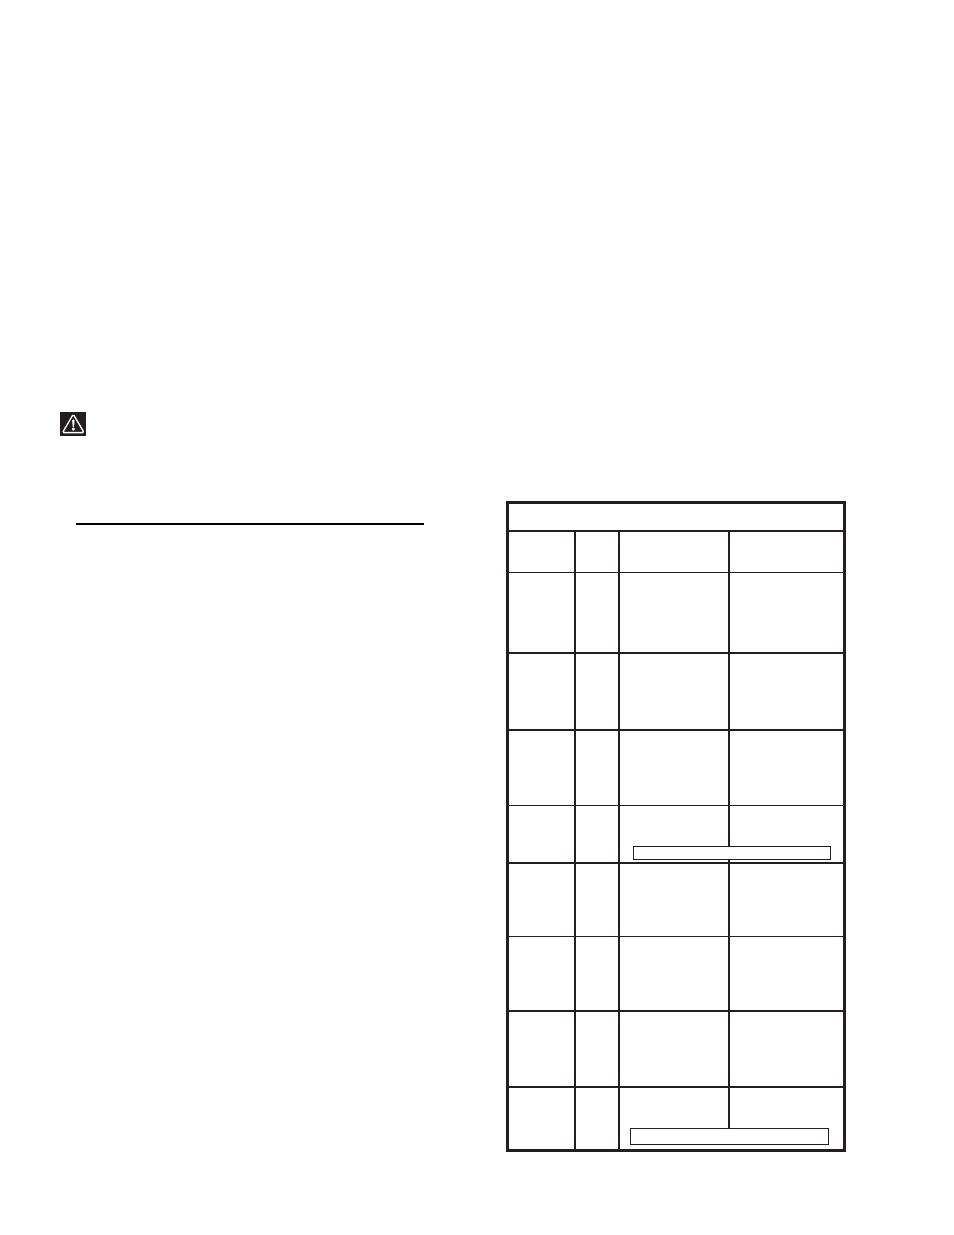
MINIMUM GAUGE EXTENSION CORD
EXTENSION CORDS
Use proper extension cord. Make sure your extension
cord is in good condition. When using an extension
cord, be sure to use one heavy enough to carry the
current your product will draw. An undersized cord will
cause a drop in line voltage resulting in loss of power
and overheating. Fig. 1 shows the correct size to use
depending on cord length and nameplate ampere
rating. If in doubt, use the next heavier gage. The
smaller the gage number, the heavier the cord.
Fig. 1