Kanguru Defender Basic+ Quick Start User Manual
Page 2
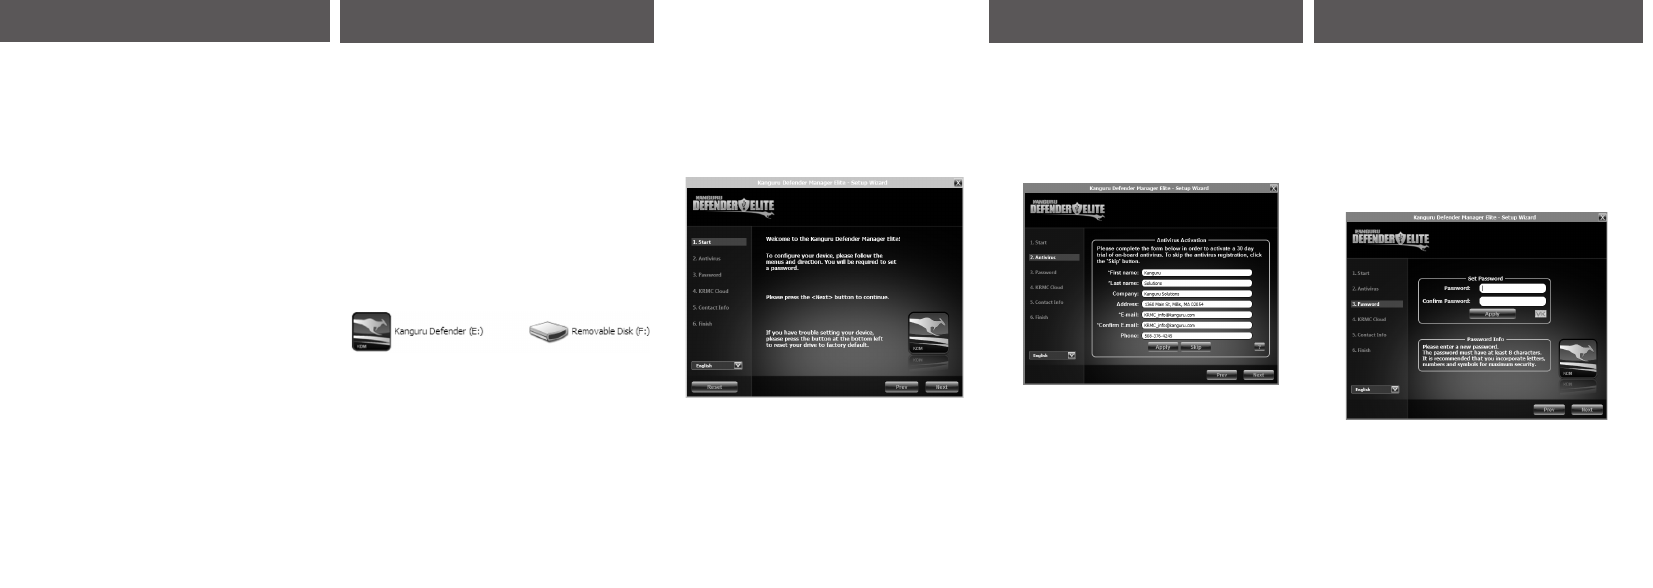
4. SETTING A PASSWORD
The password that you choose must contain at least
8 characters (by default). For security reasons, it is
recommended that you incorporate letters, numbers and
symbols to achieve maximum security.
If your passwords do not match or there is any conflict
with the passwords you entered in the Set Password
section, an explanation will be visible in the Password
Info section.
Note: The Password Info section updates in real time.
Please disregard the messages in the Password Info
section until you have finished entering your password
in both the Password and Confirm Password fields.
After you have entered your password in both boxes,
click on the Apply button and then click on the Next
button.
1. INTRODUCTION
Thank you for purchasing the Kanguru Defender. The
Kanguru Defender is a compact USB storage device that
utilizes AES hardware encryption, keeping your data
secure and available wherever you are.
System Requirements
• 1 Available USB port (USB 2.0 or 3.0 Recommended)
• 256MB of internal DDR RAM or more
• 500MHz internal CPU or faster
Package Contents
If any of the items listed are missing, please call Kanguru
Solutions’ Tech Support department at: (508) 376-4245
and replacement parts will be shipped to you ASAP.
• Kanguru Defender USB device
• Quick Start Guide
• Registration Form
• USB Extension Cable (with select models only)
Note: This is a Quick Start Guide only. Instructions
here are described specifically for Windows operating
systems, even though your device may be compatible
with multiple operating systems. For complete
instructions, including instructions for use with other
supported operating systems, please download the
device’s user manual from the Kanguru Support Site
under the Downloads section at:
http://support.kanguru.com/
Kanguru Defender Manager (KDM) manages your
password and allows you to access the Defender’s secure
partition. It is pre-loaded on your Kanguru Defender so
no installation on your PC is necessary.
To start KDM, plug your Kanguru Defender into a USB
port on your computer. KDM should autorun itself.
If KDM does not run automatically, open My Computer
or Windows Explorer. The Kanguru Defender will be
displayed as two drive letters. One drive is the CD-
ROM partition where KDM is pre-loaded, the other
drive is the secured partition which will appear as a
removable disk (the secure partition will appear as
SECURITY after you login).
Open the CD-ROM partition and then double-click on
the KDM.exe file to start the application.
The KDM.exe file will remain on your Kanguru
Defender’s CD-ROM partition so that you can run the
application on different computers from your Defender.
Please always run the application from the CD-ROM
partition and never from a hard drive on your laptop or
desktop.
CD-ROM Partition
Secure Partition
↑
↑
2. KANGURU DEFENDER MANAGER
Note: If your Kanguru Defender flash drive has a
physical write-protect switch, the switch needs to be
set to the unlocked position (switched towards the USB
connector) in order to setup KDM.
When you start KDM for the first time, you will be
greeted by the Setup Wizard.
To begin, click on the Next button and then follow
the simple instructions to setup your Defender’s login
password.
3. ACTIVATING ANTIVIRUS
KDM will automatically check if your drive has a
valid antivirus license key. Your Defender needs to be
connected to a computer with internet access in order
to activate the on-board antivirus protection. Note:
Antivirus is only available for Windows. If your drive
is an Enterprise Edition device, this step will not be
available.
If your Defender does not already have a valid antivirus
license key, then you must fill out the registration form
with the required information and then click on the
Apply button in order to activate your free antivirus
trial. If you decide to skip activating your antivirus now,
you will not be able to activate without first resetting
your drive to the factory default setting.
Click on the Next button to continue with setting up
your Defender’s login password.