Reference – Greenheck KSFB / KSFD (463556) User Manual
Page 7
KSFB and KSFD Make-Up Air
®
TOOLS REQUIRED
• 5/16 inch nut runner
• Caulk gun with weatherproof sealant
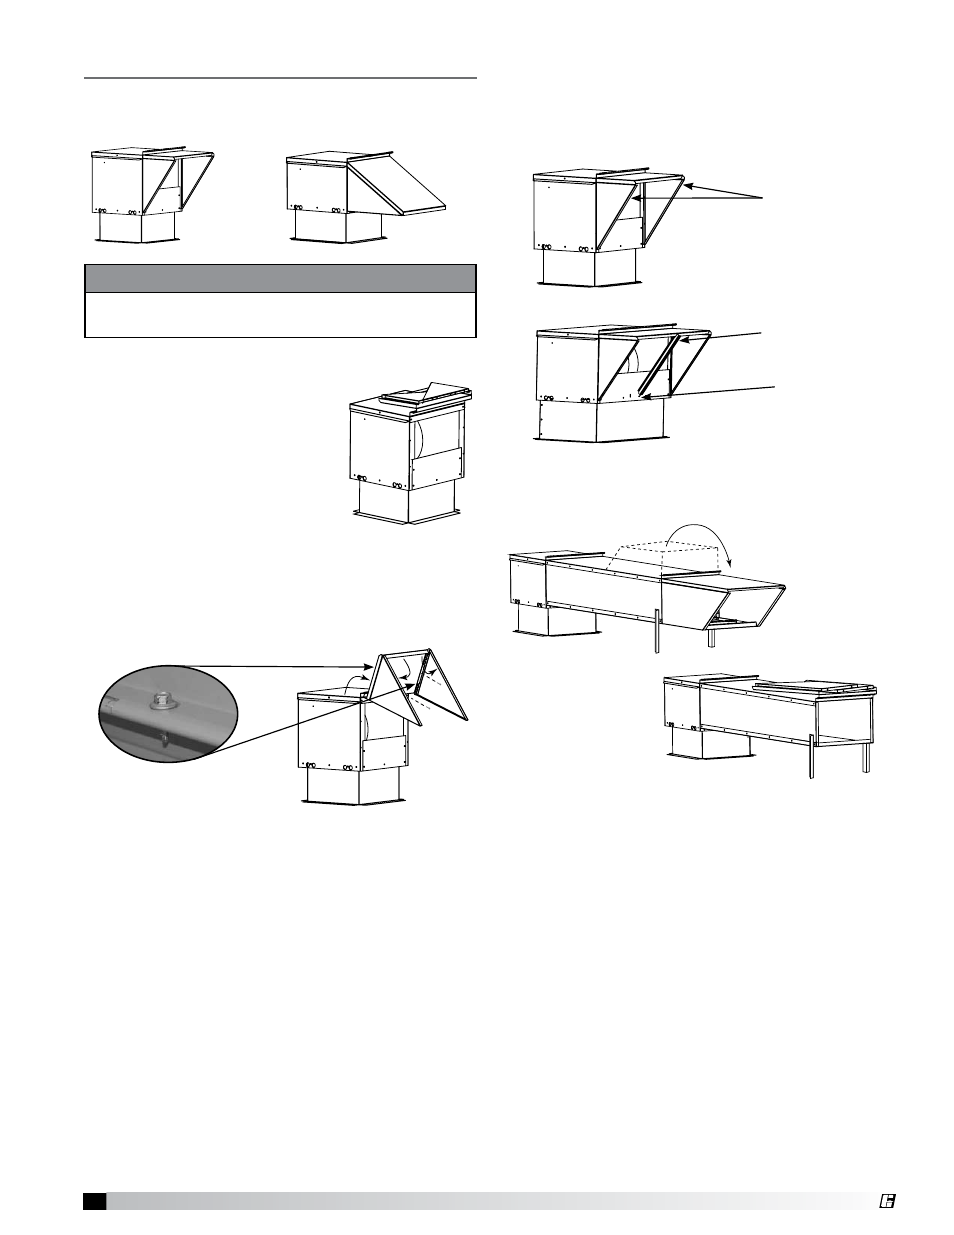
The KSFB/D Standard HZ and DB3 weatherhoods are
folded up and shipped on top of
the unit.
To install:
1. Rotate one side up on
weatherhood.
a. Run one (1) sheet metal
screw where shown to
hold side in rotated position.
b. Rotate opposite side up on weatherhood and
repeat step 1A.
2. Rotate assembly forward.
3. Screw the sides of the weatherhood to the unit.
Pilot holes are provided.
4. Caulk all seams with an appropriate weatherproof
sealant.
5. There are four housing sizes: H05, H08, H15, and
H25.
• The H05 housing requires a single filter at the
face of the intake hood.
• The H08, H15, and H25 housings require multiple
filters installed at the face of the intake hood.
As such, these three units require installation of an
additional center track (two pieces) to support the
multiple filters. The filters and center track pieces
are shipped inside the KSFB/D housing. Slide
the tabbed end of each track into the slot at the
bottom of the intake opening on the unit housing.
Rotate the tracks up to the top outer edge of the
weatherhood such that the weatherhood edge
slides into the slot in the tracks.
6. Insert the factory provided aluminum mesh intake
filter(s) into the track located in the face of the
weatherhood. Filters slide in from the top. Be
sure the filters are properly orientated (an airflow
direction arrow is located on the side of the filters).
Center filter track
(2 pieces)
Slot in unit
Housing 05 HZ
Track for aluminum
mesh intake filters.
Housing 05, 08, 15 & 25 HZ
Extended 0 ft. DBC Weatherhood
Assembly Instructions
The KSFB/D extended 10 ft. weatherhood is made up
of up to three parts: 1) a fixed section attached to the
unit, 2) a folded up section shipped on top of the fixed
section, and 3) an assembled section shipped on top
of the fixed section. This three part assembly applies
to both the DB and HZ arrangements.
To install:
1. Lift unit onto curb. Prior to disconnecting from
crane, adjust support legs on fixed section of the
extended weatherhood to appropriate height to
support hood.
2. For housing sizes H05 and H08, rotate the
assembled section of the weatherhood forward.
3. For housing sizes H15 and H25, rotate one side up
on the weatherhood.
a) Run one (1) sheet metal screw where shown to
hold side in rotated position.
b) Rotate opposite side up on weatherhood and
repeat step 3A.
Reference
Standard HZ and DB3 Weatherhood
Assembly Instructions
Housing 05 HZ
Housing 05 DB3
Housing 15 & 25
Housing 05 & 08
Rotate sides up, install screws.
Rotate assembly forward. See Step 3.