Figure 4: create sip register trunk – Grandstream UCM6100 Busy Camp-on Guide User Manual
Page 8
UCM6100 Busy Camp-on Guide Page 7 of 10
3. Make the same configuration for extension 5000 on UCM2. This extension is for UCM1 to register SIP
trunk on UCM2.
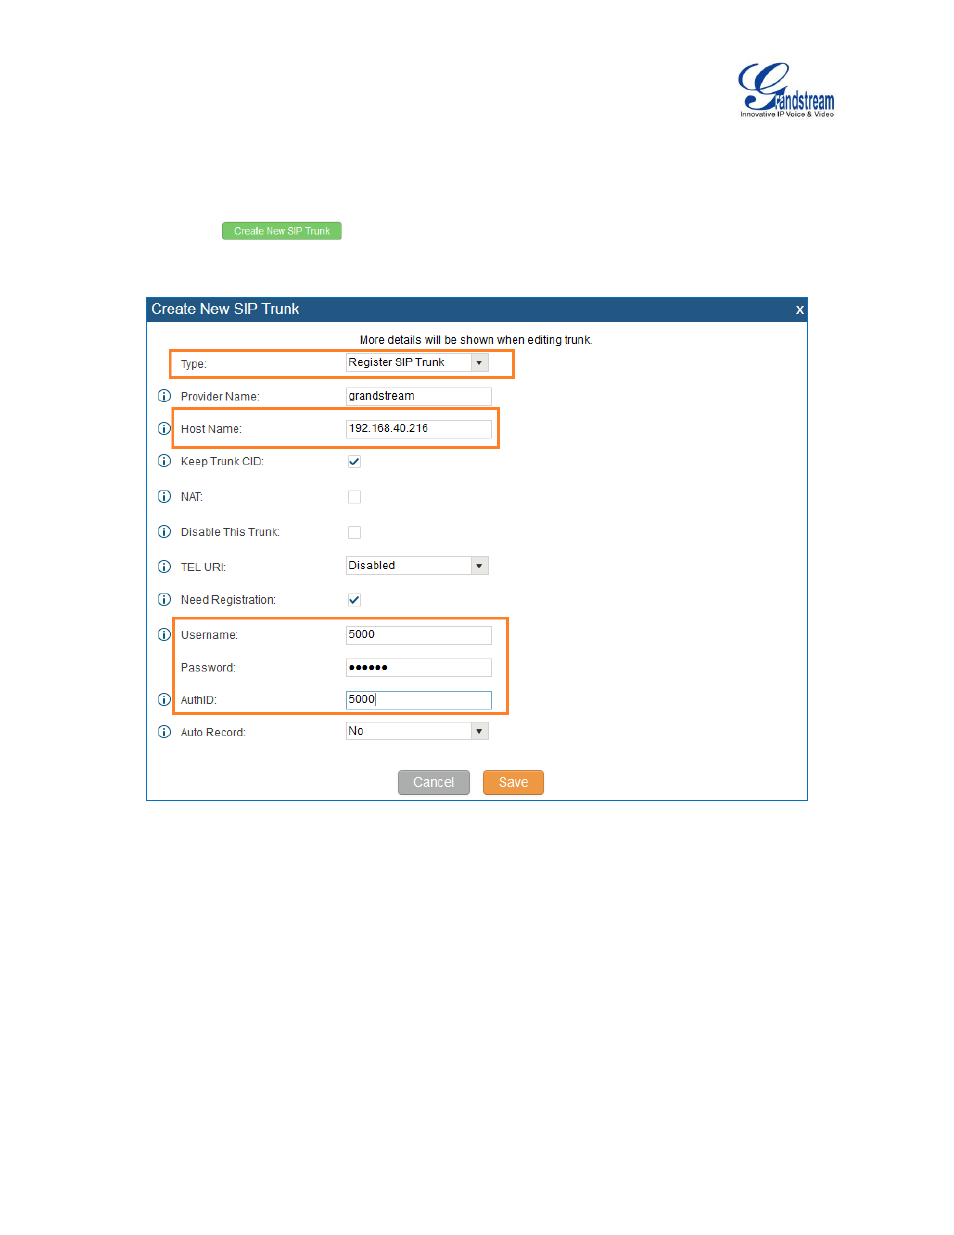
4. On UCM1, create a SIP register trunk and register to the extension 5000 on UCM2. This can be done
by clicking
on web GUI->PBX->Basic/Call Routes->VoIP Trunks. The following
figure shows the configuration for new SIP trunk on UCM1.
Figure 4: Create SIP Register Trunk
Type: Select
“Register SIP Trunk”
Host Name: Enter the IP address of the UCM to register to
Username: The extension number on the UCM to register to
AuthID: Same as Username
Password: The password of the extension number on the UCM to register to
5. Similar to step 4, on UCM2, create a SIP register trunk and register to the extension 1000 on UCM1.
6. Check the registration status of the trunks on web GUI->Status->PBX Status. If configured
successfully, the status for the trunk should show as
“Registered”.
- GXV3240 Quick User Guide (1 page)
- GXV3240 Administration Guide (119 pages)
- GXV3240 GMI Web Service Guide (45 pages)
- GXV3275 Microsoft Lync Setup Guide (13 pages)
- GXV3275 User Guide (189 pages)
- GXV3275 Wi-Fi Guide (21 pages)
- GXV3275 Bluetooth Guide (17 pages)
- GXV3240 XML Phonebook Guide (22 pages)
- GXV3275 LDAP Book Guide (23 pages)
- GXV3275 BroadWorks Xsi Directories and Call Logs Guide (18 pages)
- GXV3275 Quick Installation Guide (26 pages)
- Action URL Guide (10 pages)
- Door Phone Guide (22 pages)
- GXV3240 Microsoft Lync Setup Guide (15 pages)
- GXV3240 Wi-Fi Guide (19 pages)
- GXV3240 Bluetooth Guide (15 pages)
- GXV3240 Quick Installation Guide (34 pages)
- GXV3240 LDAP Book Guide (22 pages)
- GXV3140 Quick User Guide (1 page)
- GXV3240 User Guide (179 pages)
- GXV3140 GUI Customization Guide (11 pages)
- GXV3140 Quick Start Guide (17 pages)
- 2N Helios with Grandstream Configuration Guide (15 pages)
- LinkCom IP Door System with Grandstream Configuration Guide (13 pages)
- GXV3140 GMI Guide (43 pages)
- Robin SmartView with Grandstream Configuration Guide (17 pages)
- GXV3140 User Manual (151 pages)
- GXV3175 Quick User Guide (1 page)
- GXV3175 User Manual (139 pages)
- GXV3175 GUI Customization Guide (14 pages)
- GXW42xx Quick Installation Guide (23 pages)
- GXW400x Quick User Guides (1 page)
- GXW410x Quick Installation Guide (10 pages)
- GXW42xx User Manual (64 pages)
- GXW410x User Manual (32 pages)
- GXW400x Quick Installation Guides (12 pages)
- GXW400x User Manual (62 pages)
- UCM6100 User Manual for 1.0.9.25 (306 pages)
- UCM6102 Quick Installation Guide (16 pages)
- UCM6104 Quick Installation Guide (16 pages)
- UCM6108 Quick Installation Guide (16 pages)
- UCM6116 Quick Installation Guide (16 pages)
- UCM6100 series IP PBX Buyer's Guide (15 pages)
- UCM6100 Asterisk Manager Interface (AMI) Guide (15 pages)