Owner’s manual, Installation, Installation clearances – Desa FBPS User Manual
Page 7
7
105163
OWNER’S MANUAL
INSTALLATION
CLEARANCES
WARNING: Maintain the mini-
mum clearances. If you can, pro-
vide greater clearances from
floor, ceiling, and adjoining wall.
Carefully follow the instructions below. This
will ensure safe installation.
Minimum Wall and Ceiling
Clearances (see Figures 5 and 6)
A. Clearances from the edge of brick liner
to any combustible wall should not be
less than 8 inches (see Figure 5).
B. Clearances from the top of the firebox
hoods to the ceiling should not be less
than 42 inches.
C. When the firebox is installed on car-
peting or other combustible material,
INSTALLATION
CAUTION: Log heaters in-
stalled in this firebox create warm
air currents. These currents move
heat to wall surfaces next to fire-
box. Installing firebox next to vi-
nyl or cloth wall coverings or
operating firebox where impuri-
ties (such as tobacco smoke, aro-
matic candles, cleaning fluids,
oil or kerosene lamps, etc.) in the
air exist, may discolor walls.
IMPORTANT:
Vent-free gas log heaters add
moisture to the air. Although this is beneficial,
installing firebox in rooms without enough
ventilation air may cause mildew to form from
too much moisture. See Air for Combustion
and Ventilation, pages 4 through 6.
IMPORTANT:
Make sure the firebox is
level. If firebox is not level, log set will not
work properly.
Note:
Your Vanguard firebox is designed to be
used in zero clearance installations. Wall or
framing material can be placed against any
CAUTION: Do not install the
firebox directly on carpet or vinyl.
WARNING: A qualified ser-
vice person must install firebox.
Follow all local codes.
WARNING: Never install the
firebox
• in a bedroom or bathroom
• in a recreational vehicle
• where curtains, furniture, cloth-
ing, or other flammable objects
are less than 42 inches from the
front, top, or sides of the firebox
• in high traffic areas
• in windy or drafty areas
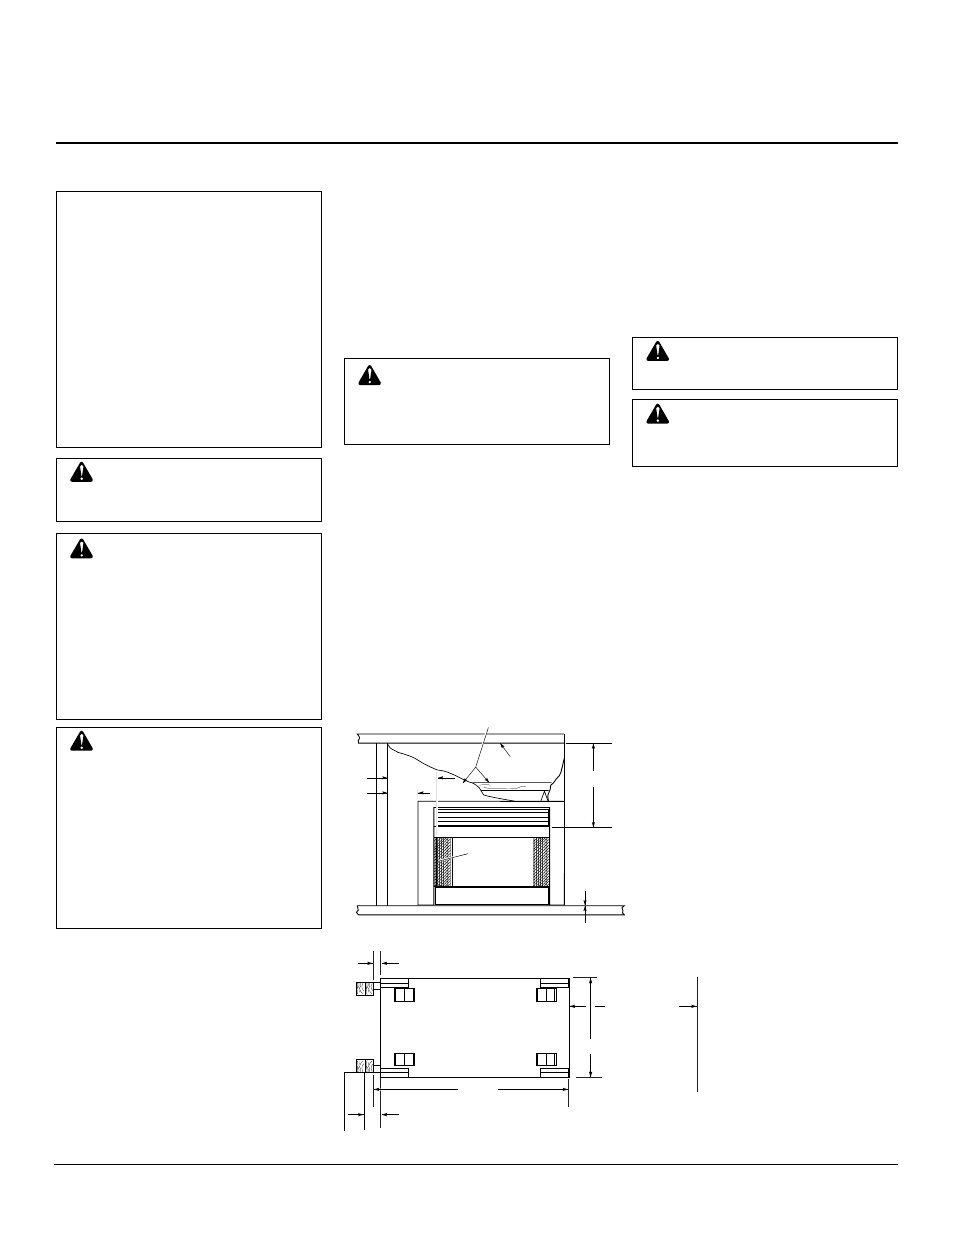
Figure 5 - Minimum Clearance - Front View
other than wood flooring, the firebox
should be installed on a metal or wood
panel extending the full width and
depth of the enclosure.
D. Clearances from the bottom of firebox
to the floor is 0 inches.
E.
Clearances from the open end of the
firebox to the facing wall should not
be less than 36 inches.
Minimum clearances to combustibles are:
• Back of outer casing
0" min.
• Drywall to sides and
0" min.
top of front face
• Ceiling to opening
42" min.
• Floor (see Minimum
0" min.
Wall and Ceiling
Clearances, note C.)
• Perpendicular walls,
4" min.
Right and Left
• Distance to Facing
36" min.
Walls on Sides and
End of Firebox
42" Min.
0" to Wood Floor
8" Min.
4"
Min.
0" Min. Clearance to
Upper Frame/Wallboard
Ceiling
Edge of
Brick Liner
4" Min. from the Perpendicular
Side Wall to the Edge of Facia
1/2" Min. Clearance
to Combustibles
43
3
/
4
"
24"
36" Min. from
Edge of Facial
to Facing Wall
on Open End
of Firebox
Figure 6 - Minimum Clearance - Top View
Continued
CAUTION: Use only the clear-
ances specified in this manual or
on the firebox rating plate.
NOTICE: This firebox in combi-
nation with unvented logsets are
intended for use as supplemen-
tal heat. Use along with your pri-
mary heating system. Do not in-
stall them as your primary heat
source. If you have a central heat-
ing system, you may run system’s
circulating blower while using
heater. This will help circulate
the heat throughout the house. In
the event of a power outage, you
can use unvented logs as your
primary heat source.
exterior surface on the rear or top of your
firebox, except where standoff spacers are inte-
grally attached. If standoff spacers are attached
to your firebox, these spacers can be placed
directly against wall or framing materials.
Use dimensions shown for rough openings to
create the easiest installation (see Built-In or
Internal Wall Firebox Installation, page 8).