Flowserve G4 Sleeveline Plug Valves User Manual
Page 13
13
G4, G4ZHF AND G4R USER INSTRUCTIONS ENGLISH 5-14
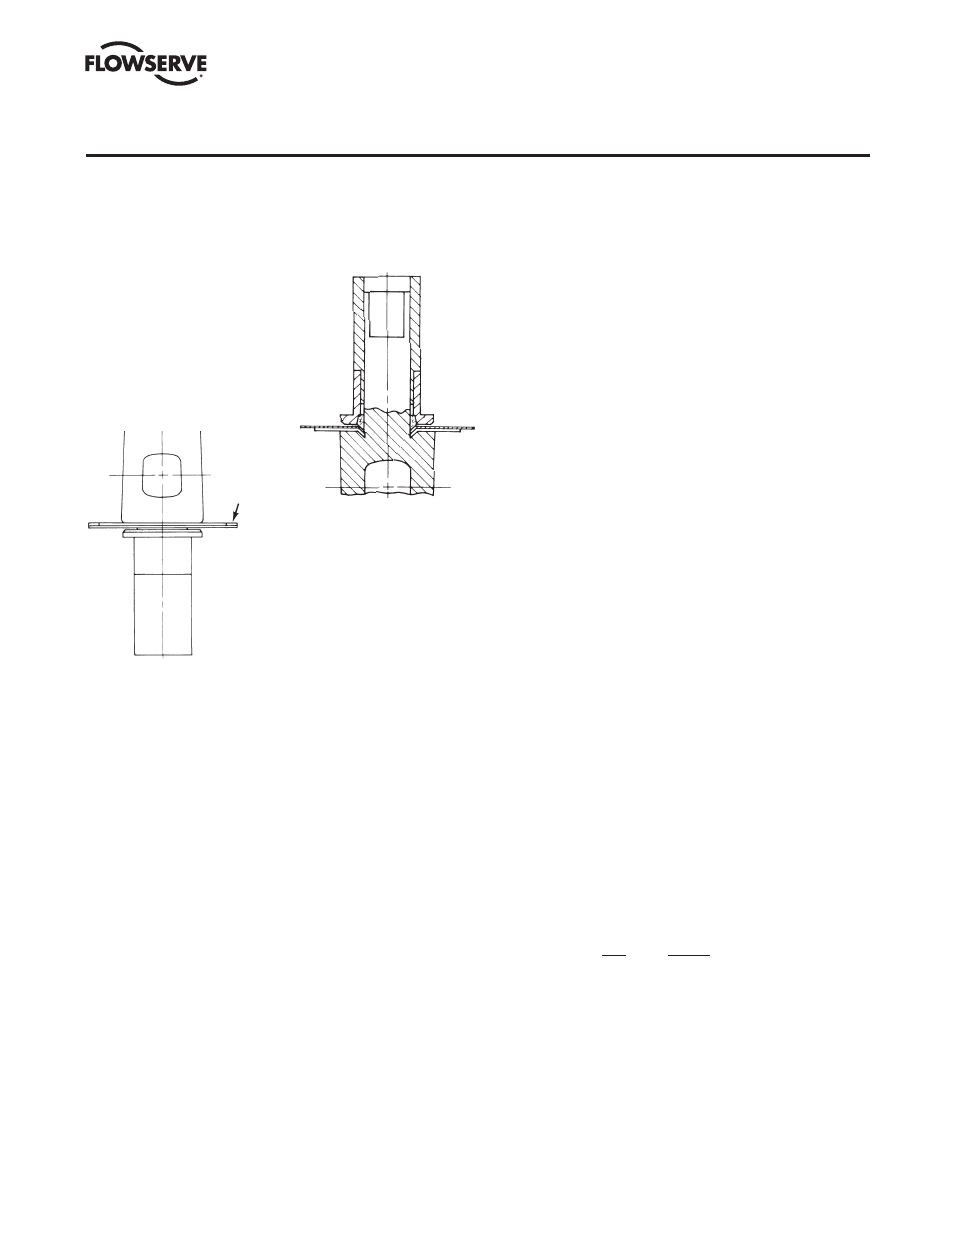
8. The thrust collar (Part 11)
is then assembled over the
plug stem and driven into
place through the use of the
thrust collar guide, part series
#BY77545A, and arbor
press (Figure VI-6).
6. The metal diaphragm (Part 6A) is placed over the plug
stem and the hole enlarged just enough to slip down on
the stem (Figure VI-3).
7. A thin coat of silicone oil is applied to the down edge of
the metal diaphragm. The diaphragm is then placed over
the plug stem with the lip down (Figure VI-4).
8. The Grafoil packing ring (Part 20) is placed over the stem
(Figure VI-5).
9. The thrust collar (Part 11) is then assembled over the
plug stem and driven into place through the use of the
thrust collar guide and arbor press (Figure VI-6). Place
the plug (Part 2) into the body in the open position.
10. The Grafoil top cap gasket (Part 21) is to be installed
with the tapered or small edge diameter down or placed
against the valve counterbore. The plug is pushed down
until it is flush with the bottom of the body port in order
to check the diaphragm fit inside the Grafoil gasket for
clearance. The PFA diaphragm must not ride on the
Grafoil gasket but should fit just inside the Grafoil.
11. The top cap (bonnet) (Part 3) and adjuster assembly is
installed and the plug is pushed down in the open posi-
tion again until the bottom of the port is flush with the
body part and the top cap bottoms firmly on body coun-
terbore. The top cap must be checked before installation
to ensure there is no chamfer on outside edge of the cap.
The inside edges are to have a break corner chamfer only.
12. The top cap is visually located to be evenly spaced inside
the body counterbore. The side of the top cap compres-
sion flange is equally spaced with the side wall of the
body counterbore. Fasteners should be installed and
tightened to 5 ft-lb torque to prevent movement of the
cap during initial torquing.
13. While continuing to hold the open plug in a flush condi-
tion with the body, the top cap fasteners (Part 3A) are
torqued in 50 ft-lb increments. Tighten in a crisscross
method to the following values using a calibrated torque
wrench. The adjuster fasteners (Part 12A) are completely
loosened for this step.
Size
Torque
6"
125 ft-lb
8"
115 ft-lb
14. The top cap (Part 3) is then relieved from compression
and removed. The Grafoil gasket (Part 21), PFA
diaphragm (Part 6), metal diaphragm (Part 6A) and
Grafoil packing ring (Part 20) are visually checked for
misalignment.
SECTION VI
ASSEMBLY SPECIFICATIONS – FIRESAFE VALVES G4Z, G4ZHF, G4ZR
FIGURE VI-6
Packing and thrust collar driven
into place.
GASKET
FIGURE VI-7
Grafoil gasket placed on metal dia-
phragm using a bonding material.
9. The entire assembly
is turned over and the
Grafoil gasket placed on
the metal diaphragm
(Figure VI-7). A small
amount of rubber cement
is placed on the Grafoil
in several places to cause
it to ad here to the metal
diaphragm.
10. Continue to assemble the valve per Step 8 of Section V A
for the
1
/
2
"–
3
/
4
" size valves or Section V B for the 1"–4".
6"– 8"
Due to the tooling and associated equipment required
(presses, fixtures, etc.) to handle 10"–14" size valves, it is
highly recommended they be returned to the factory for repair
and rebuild.
1. Normal procedures for field replacement of one-piece
sleeves are to be followed for inserting the sleeve Section
V B, steps 1–4.
2. The firesafe top seal assembly differs from the stan dard G4
top seal and is completed per the following instructions.
3. The PFA diaphragm (Part 6) is to be flared on a tapered
bar just enough to slip over the plug stem (Figure VI-1).
4. The PFA diaphragm is placed over the plug stem with the
lip down (Figure VI-2). The plug stem should be checked
for nicks before installing the PFA diaphragm. Nicks on
this surface could result in scratches on the lip of the
diaphragm.
5. The thrust collar (Part 11) and thrust collar guide, part
series #BY77545A, are to be installed over the plug stem
and loaded by an arbor press to flatten the PFA firesafe
diaphragm. Remove the thrust collar and thrust collar
guide.