I n s ta l l at i o n – Fire Magic 33830-SW Electric Warming Drawer User Manual
Page 3
3
L-C2-197
REV 9 - 1007150950
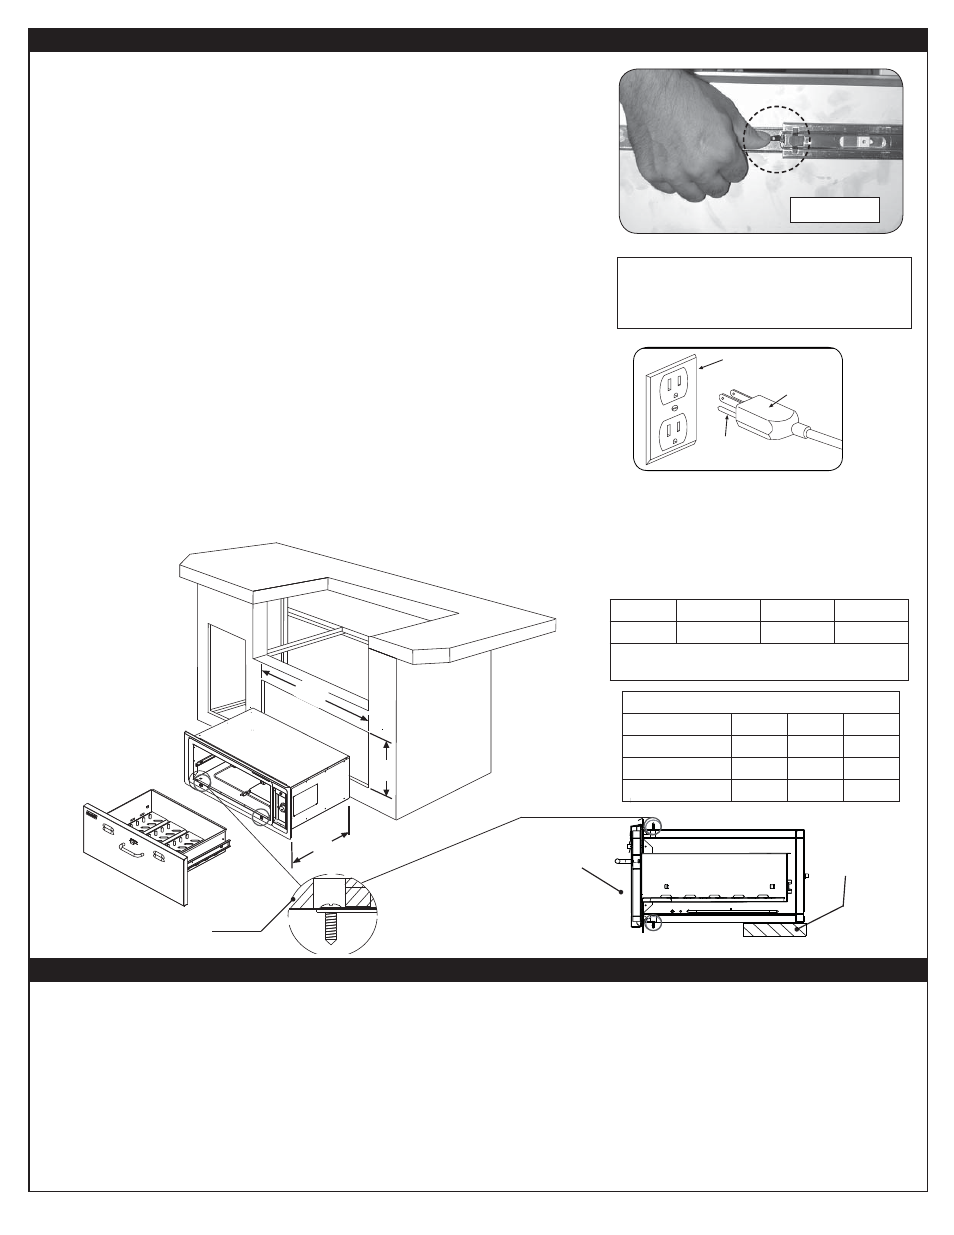
Fig. 3-2
Grounded
receptacle
Grounded plug
Ground pin
WARNING: Be sure to unplug unit before
servicing and allow heating
e l e m e n t s t o c o o l b e fo r e
removing the drawer.
Before installing your Fire Magic
®
warming drawer, remove the drawer by
completely pulling it out. Release the drawer from the drawer slides by pressing
the black lever down on the right side, and up on the left side (Fig 3-1). Then pull
outward on the drawer until it comes free of the runners.
For proper installation, be sure to use the correct cutout dimensions as
specifi ed for your specifi c model number (see table below).
1. In order to properly support the weight of your warming drawer, it is necessary
to provide a secure, level surface in the rear of the unit. (See SIDE VIEW
drawing below.) This may be accomplished by using bricks, 2 X 4’s, etc. Be
sure that the height of this rear support is 1/8" higher than that of the front
opening support, so that your drawer sits level.
Note: It is recommended that silicon caulking (not supplied) is applied around
the back of the warming drawer cabinet trim before sliding the cabinet
assembly into the opening.
2. Slide in and fasten the unit securely into the masonry using lag bolts (not
supplied) through the installation screw slots in the top and bottom of the unit
(see drawings below). Once all four bolts are fastened securely, be sure to
snap the supplied plugs fi rmly into place over the screw slot openings. This
will prevent heat loss and moisture from entering the unit.
3. To re-attach the drawer; extend the drawer slides completely and align the
drawer into the slides, pushing the drawer closed. Open the drawer to verify
that it has locked in place.
TEMPERATURE CONTROL
The temperature of your warming drawer can be set to a maximum of 230°F to accommodate any and all of your warming
needs. The low settings are perfect for plate and bread warming, while high settings are useful in keeping soups and
sauces piping hot.
HUMIDITY CONTROL
Your electric warming drawer is equipped with a sliding humidity control knob that allows you to regulate the humidity
inside the drawer. To make it more convenient, adjusting the moisture is done without opening the drawer and affecting the
interior temperature and/or humidity. Open the vents to keep foods crisp; close the vents to keep foods moist (add water
to the moisture cup to increase the interior humidity).
I N S TA L L AT I O N
I N S TA L L AT I O N
Important: This product is for use on a standard
120-volt AC circuit and has a grounded
plug like the plug in Fig. 3-2. If it
does not fit the receptacle, have a
proper outlet installed by a qualifi ed
electrician. DO NOT modify the plug
provided with this product.
VOLTS
WATTS
AMPS
HZ
120
475
3.96
60
Important:
Must be used with a GFI equipped
outlet or circuit.
O P E R AT I O N
O P E R AT I O N
Drawer
support
Side view
Prior to installing bolt, use the
screwdriver to clear a small
path through the insulation.
Insulation
Drawer front
Y
Z
X
33830-SW
shown
CUTOUT DIMENSION
Model #
X
Y
Z
33830-SW
31"
13"
20 1/2"
43830-SW
31"
13"
20 1/2"
53830-SW
32 1/4"
14 1/2"
22"
Fig. 3-1