DR Power Walk-Behind On Board Vacuum Hose (July 2010 and Prior) User Manual
Page 10
6 DR
®
WALK-BEHIND LEAF & LAWN VACUUM Optional Accessory
Attach the On-Board Vacuum Hose Accessory to your DR
WALK-BEHIND LEAF & LAWN VACUUM using the
following steps:
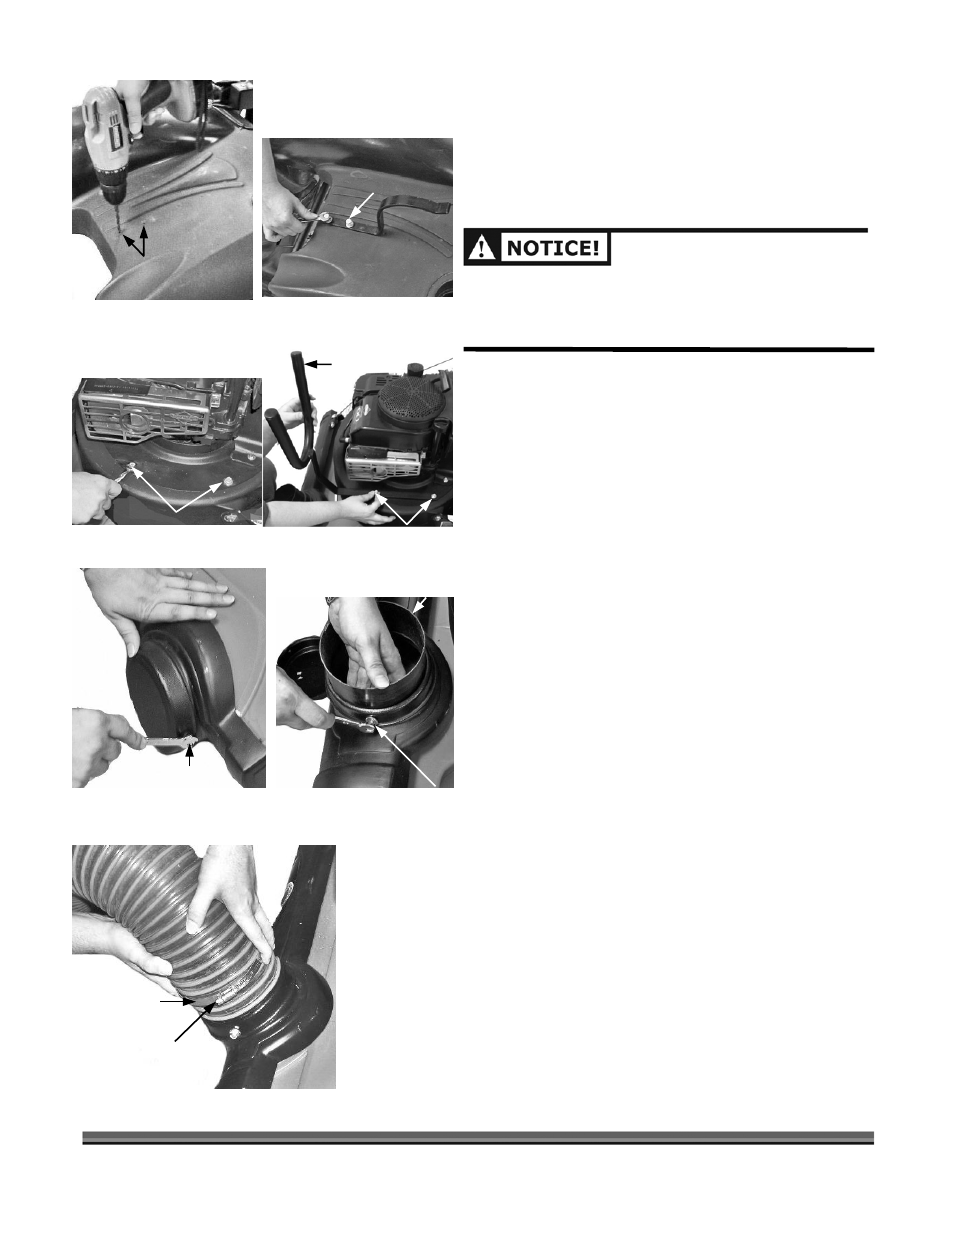
1. Remove the Debris Bag Assembly and then drill two
(2) 1/4" holes through Dimples in the Top Shield that
coincide with the holes in the Top Shield Hose Rest
Bracket (Figure 1a).
BE SURE TO DRILL THE TWO DIMPLES NEAREST THE
ENGINE. THE OTHER TWO DIMPLES ARE FOR
ANOTHER APPLICATION AND USING THEM WILL MAKE
THE NOZZLE DOOR DIFFICULT TO USE.
2. Using the 7/16"
Wrenches, install the Hose Rest
Bracket to the Top Shield using the two (2) 1/4" x 1"
Cap Screws, 1/4" Flat Washers, 1/4" Fender Washers
and 1/4" Lock Nuts provided (Figure 1b).
3. To install the Hose Rest U-Bracket to the Engine, first
remove the two (2) Self-Tapping Screws (Figure 2a).
Then attach the Bracket using two (2) new 1/4"-20 x
1" Self-Tapping Screws with 1/4" Flat Washers
provided, into the holes where the original screws
were removed (Figure 2b).
4. Remove the Cover from the front of the Nozzle Door by
removing the two (2) Self-Tapping Screws (Figure 3a)
and insert the Swivel Adapter, aligning the Bolt Holes in
the Adapter with the holes in Nozzle Door (Figure 3b).
5. Insert two (2) 10-24 x 3/4" Cap Screws with #10 Flat
Washers (from the inside) through the aligned holes
and install a #10 Flat Washer and 10-24 Lock Nut on
each screw (Figure 3b). Tighten the hardware.
6. Attach the Vacuum Hose to the Swivel Adapter by
slipping the 6" Hose Clamp over the end of the Hose
and then slipping the Hose over end of the Swivel
Adapter (Figure 4). Tighten the Hose Clamp.
Figure 1a
Figure 2a
Figure 3a
Figure 4
Dimples in Top Shield
closest to Engine.
Figure 1b
Bolt and Flat Washer on
top, Fender Washer and
Nut inside Top Shield.
Figure 2b
Remove
Hose Rest
U-Bracket
Replace
Figure 3b
Cover
Nozzle
Remove
(2 places)
Swivel Adapter
Bolt from inside
Hose Clamp
Tighten