DR Power Walk-Behind On Board Vacuum Hose User Manual
Page 2
7 5 M E I G S R O A D , P . O . B O X 2 5 , V E R G E N N E S , V E R M O N T 0 5 4 9 1
©2010 Country Home Products, Inc. All rights reserved
285921
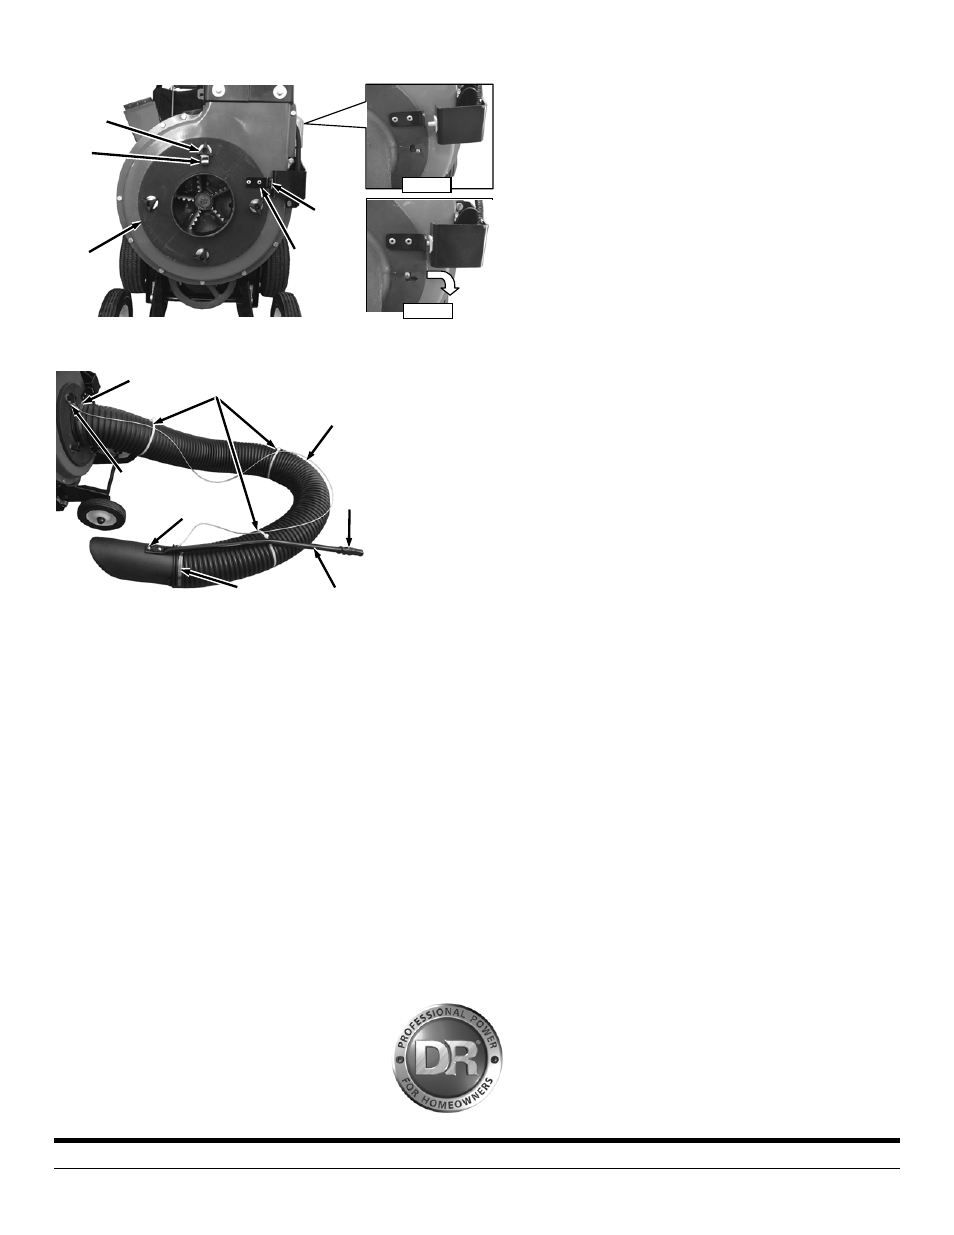
4. Place the Vacuum Adapter onto the front of the Housing
(Figure 4) so the studs are located in the right hand side
of the lower slots (Detail A). Slide the Adapter to the
right and down so the Plunger Bracket on the Adapter
pushes the Safety Switch in (Detail B).
5. Install four 5/16-18 Hand Knobs, with the Cable Guide
under the top Knob, onto the studs to secure the
Vacuum Adapter.
6. Secure one end of the Hose onto the Vacuum Adapter with a Hose Clamp
using a 5/16" Wrench (Figure 5).
7. Secure the other end of the Hose onto the Pick-up Snout with a Hose Clamp
using a 5/16" Wrench.
8. Attach the Handle and the Pick-up Snout loosely together with a Screw
(inside snout) and Locknut at the hole at the end of the Handle. Only tighten
hand tight for now.
9. As you install the next Screw and Locknut, insert the larger loop end of the
Wire Tether between the Handle and Pick-up Snout.
10. Tighten the two Screws (inside snout) and Locknuts using a Short Flat Head
Screwdriver and 7/16" Wrench.
11. Hook the small loop end of the Wire Tether onto the Cable Guide.
12. Install the three Cable Ties to hold the Wire Tether to the Hose and cut the
protruding ends with Wire Cutters.
13. Slide the Grip onto the end of the Handle.
NOTE: The Wire Tether will prevent the Hose from being over extended.
If you have any questions please contact us at www.DRpower.com or call 1-800-DR-
OWNER (376-9637) for assistance.
Hose
Figure 5
Cable
Tie
Handle
Grip
Screws and
Locknuts
Hose
Clamp
Cable
Guide
Hose
Clamp
Wire
Tether
Pick-up
Snout
Plunger
Bracket
Figure 4
Detail A
Safety
Switch
Detail B
Vacuum
adapter
Hand
Knobs
Cable
Guide