Owner’s manual, Operating heater, Inspecting burners – Desa CGG3630P User Manual
Page 17: Continued
17
103425
OWNER’S MANUAL
4.
Wait five (5) minutes to clear out any
gas. Then smell for gas, including
near the floor. If you smell gas,
STOP! Follow “B” in the safety in-
formation, page 16. If you don’t smell
gas, go to the next step.
5.
Press in control knob and turn counter-
clockwise
C-clockwise
to the PILOT posi-
tion. Keep control knob pressed in for
five (5) seconds (see Figure 23, page 16).
• If control knob does not pop out when
released, contact a qualified service
person or gas supplier for repairs.
Note:
You may be running this
heater for the first time after hook-
ing up to gas supply. If so, the con-
trol knob may need to be pressed in
for 30 seconds. This will allow air to
bleed from the gas system.
6.
With control knob pressed in, press and
release ignitor button. This will light
pilot. The pilot is attached to the front
burner. If needed, keep pressing igni-
tor button until pilot lights.
Note:
If pilot does not light, contact
a qualified service person or gas sup-
plier for repairs. Until repairs are
made, light pilot with match. To light
pilot with match, see Manual
Lighting Procedure.
7.
Keep control knob pressed in for 30
seconds after lighting pilot. After 30
seconds, release control knob.
Note:
If pilot goes out, repeat steps
3 through 7.
8.
Push in and turn control knob coun-
terclockwise
C-clockwise
to the HIGH
position. Both burners should light.
Set control knob to desired setting.
OPERATING
HEATER
Continued
TO TURN OFF GAS
TO APPLIANCE
Shutting Off Heater
1.
Press in and turn control knob clock-
wise
Clockwise
to the HIGH position.
2.
Turn the control knob clockwise
Clockwise
to the PILOT position.
3.
Press in control knob and turn clock-
wise
Clockwise
to the OFF Position.
Shutting Off Burners Only (pilot
stays lit)
1.
Turn the control knob clockwise
Clockwise
to the HIGH position.
2.
Press in and turn control knob clock-
wise
Clockwise
to the pilot position.
MANUAL LIGHTING
PROCEDURE
1.
Follow steps 1 through 5 under Light-
ing Instructions, page 16.
2.
Depress control knob and light pilot
with match.
3.
Keep control knob pressed in for 30
seconds after lighting pilot. After 30
seconds, release control knob. Now
follow step 8, column 1.
WARNING: Do not operate
heater between pilot and high.
CAUTION: Do not try to adjust
heating levels by using the
manual shutoff valve.
VARIABLE CONTROL
OPERATION
The variable control valve can be set to
any heat setting and flame height desired
between high and low by simply turning
the control knob until that setting is at-
tained. Even the lowest setting provides
realistic flames and glowing embers from
two burners. Selecting higher settings pro-
duces greater heat output. This results in
increased heating comfort.
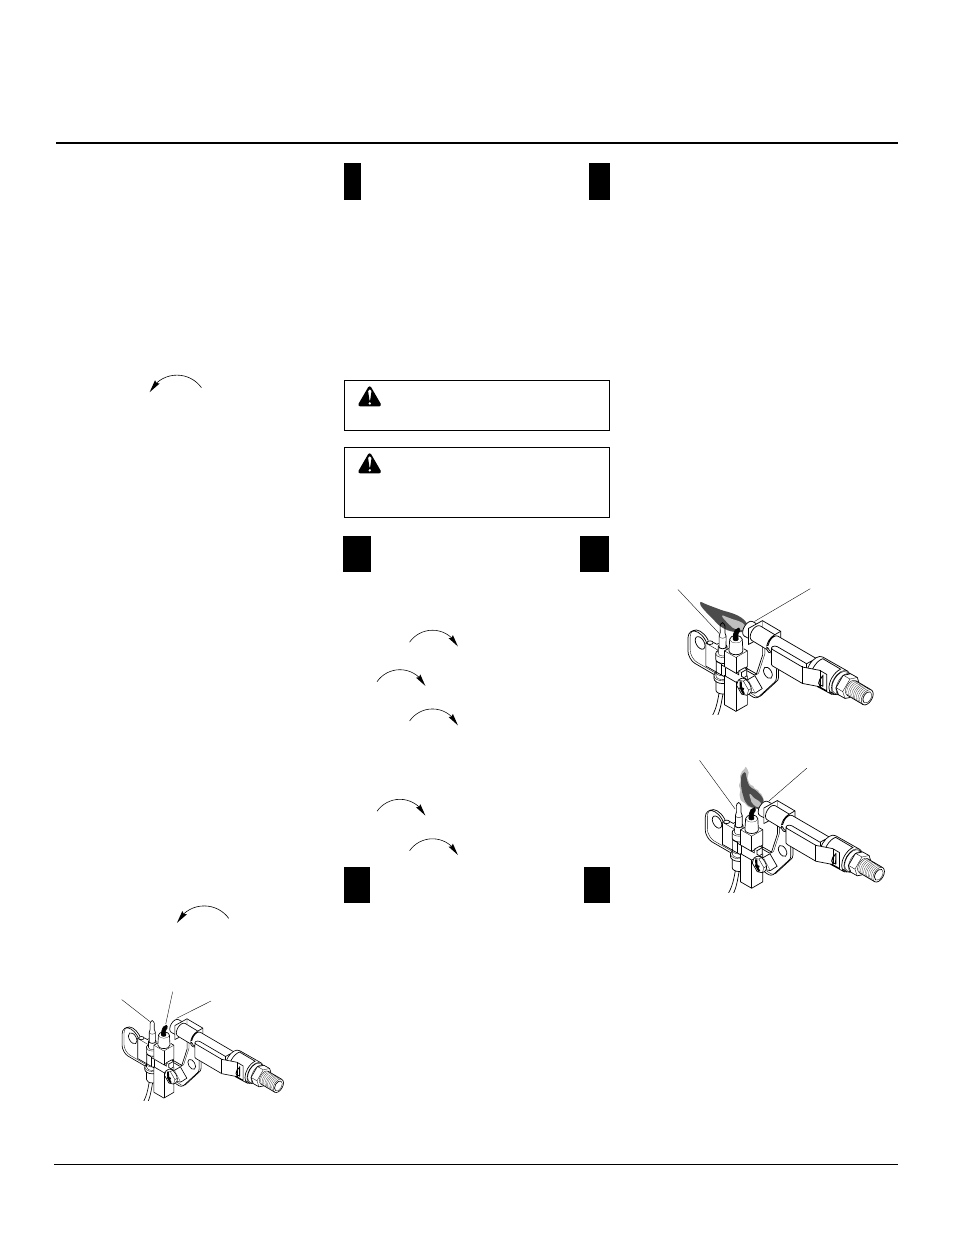
Figure 24 - Pilot
Thermocouple
Ignitor Electrode
Pilot Burner
INSPECTING
BURNERS
Check pilot flame pattern and burner flame
patterns often.
PILOT FLAME PATTERN
Figure 25 shows a correct pilot flame pattern.
Figure 26 shows an incorrect pilot flame
pattern. The incorrect pilot flame is not touch-
ing the thermocouple. This will cause the
thermocouple to cool. When the thermo-
couple cools, the heater will shut down.
If pilot flame pattern is incorrect, as shown
in Figure 26
• turn heater off (see To Turn Off Gas to
Appliance, page 16 [Thermostat-Con-
trolled Models] or page 17 or [Variable
Manually-Controlled Models])
• see Troubleshooting, pages 19 through 21
Thermocouple
Figure 25 - Correct Pilot Flame Pattern
Pilot Burner
Thermocouple
Figure 26 - Incorrect Pilot Flame Pattern
Pilot Burner
Continued