Hook up – DCM Speakers TFE100 / TFE200 User Manual
Page 3
RIGHT
FRONT
LEFT
FRONT
CENTER
CHANNEL
LEFT
REAR
RIGHT
REAR
LISTENING AREA
45
RIGHT
FRONT
LEFT
FRONT
CENTER
CHANNEL
LEFT
REAR
RIGHT
REAR
LISTENING AREA
LEFT
REAR
RIGHT
REAR
LISTENING AREA
LEFT
FRONT
RIGHT
FRONT
CENTER
FRONT
SUBWOOFER
(OPTIONAL)
RIGHT
FRONT
LEFT
FRONT
LISTENING AREA
45
HOOK UP
Use 16 gauge or heavier speaker wire for connecting to your amplifier or receiver. Cut wire lengths leav-
ing an extra 12” to 24” at each end to allow for moving the speaker or receiver.
Using a wire cutter or a sharp knife, strip 1/2” of insulation off each end of the wire to expose the conduc-
tor. Twist wire ends to prevent from fraying. Connect the conductors to the binding posts on the bottom
or back of the speaker by unscrewing the post enough to expose the hole in the terminal post. Slip the
exposed conductor in the hole and tighten the post. Repeat this step for connecting to your amplifier or
receiver. Refer to the owner’s manual supplied with your electronics to assist with proper hook up.
Note: To ensure proper performance, make sure that the wire from the red (+) terminal on
the speaker is connected to the red (+) terminal on your amplifier or receiver. Likewise, make
sure the wire from the black (-) terminal on the speaker is connected to the black (-) terminal
on the amplifier or receiver. (Figure 5)
POWER AMPLIFIER
FRONT
R
L
-
-
+
+
+
+
+
Once your speakers are hooked up, turn on your electronics and test to make sure they are functioning
properly. If your speakers sound “thin” with little bass and have a poor center image, one of the speaker
wires is probably hooked up backwards. Double check all connections for proper polarity.
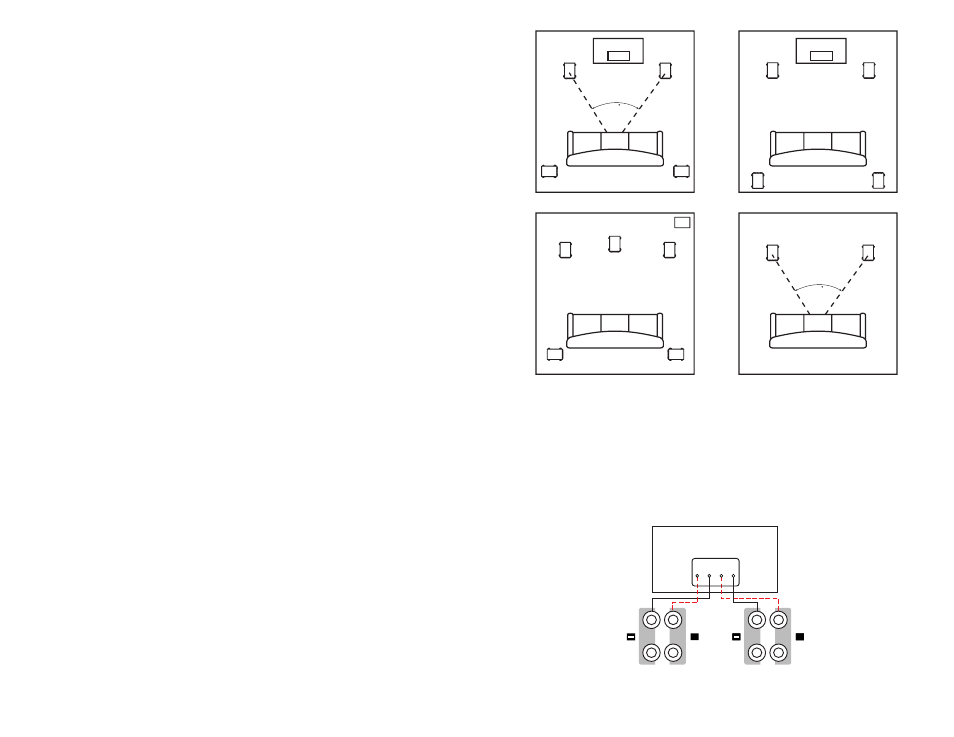
Figure 1- Typical Home Theater Loudspeaker Placement
Figure 2- Alternate Home Theater Loudspeaker Placement
Figure 3- Typical Multi-Channel Audio Loudspeaker Placement
Figure 4- Typical 2 channel Stereo Loudspeaker Placement
Figure 5
NOTES