Dixi XWA11V User Manual
Page 5
dIXEL
Operating Instructions XWA11V
1598003200
Weiss Instruments, Inc. 905 Waverly Ave. Holtsville, NY 11742 631-207-1200 www.weissinstruments.com
5
instrument requirements. Separate the probe cables from the power supply cables, from the outputs and the
power connections. Do not exceed the maximum current allowed on each relay and in case of heavier loads
use a suitable external relay.
N.B. Maximum current allowed for all the loads is 15A.
8.1 PROBE CONNECTIONS
The probe shall be mounted with the bulb upwards to prevent damages due to casual liquid infiltration. It is
recommended to place the thermostat probe away from air streams to correctly measure the average room
temperature. The probe can be extended up to 300 ft. Check calibration when running long lengths over
100ft.
9. USE OF THE PROGRAMMING “HOT KEY “
9.1 HOW TO PROGRAM A HOT KEY FROM THE INSTRUMENT (UPLOAD)
1. Program one controller with the front keypad.
2. When the controller is ON, insert the “Hot key” and push UP key; the "uPL" message appears followed a
by flashing “End”
3. Push “SET” key and the End will stop flashing.
4. Turn OFF the instrument remove the “Hot Key”, then turn it ON again.
NOTE: the “Err” message is displayed for failed programming. In this case push again o key if you want to restart
the upload again or remove the “Hot key” to abort the operation.
9.2 HOW TO PROGRAM AN INSTRUMENT USING A HOT KEY (DOWNLOAD)
1. Turn OFF the instrument.
2. Insert a programmed “Hot Key” into the 5 PIN receptacle and then turn the Controller ON.
3. Automatically the parameter list of the “Hot Key” is downloaded into the Controller memory, the “doL”
message is blinking followed a by flashing “End”.
4. After 10 seconds the instrument will restart working with the new parameters.
5. Remove the “Hot Key”..
NOTE the message “Err” is displayed for failed programming. In this case turn the unit off and then on if you want
to restart the download again or remove the “Hot key” to abort the operation.
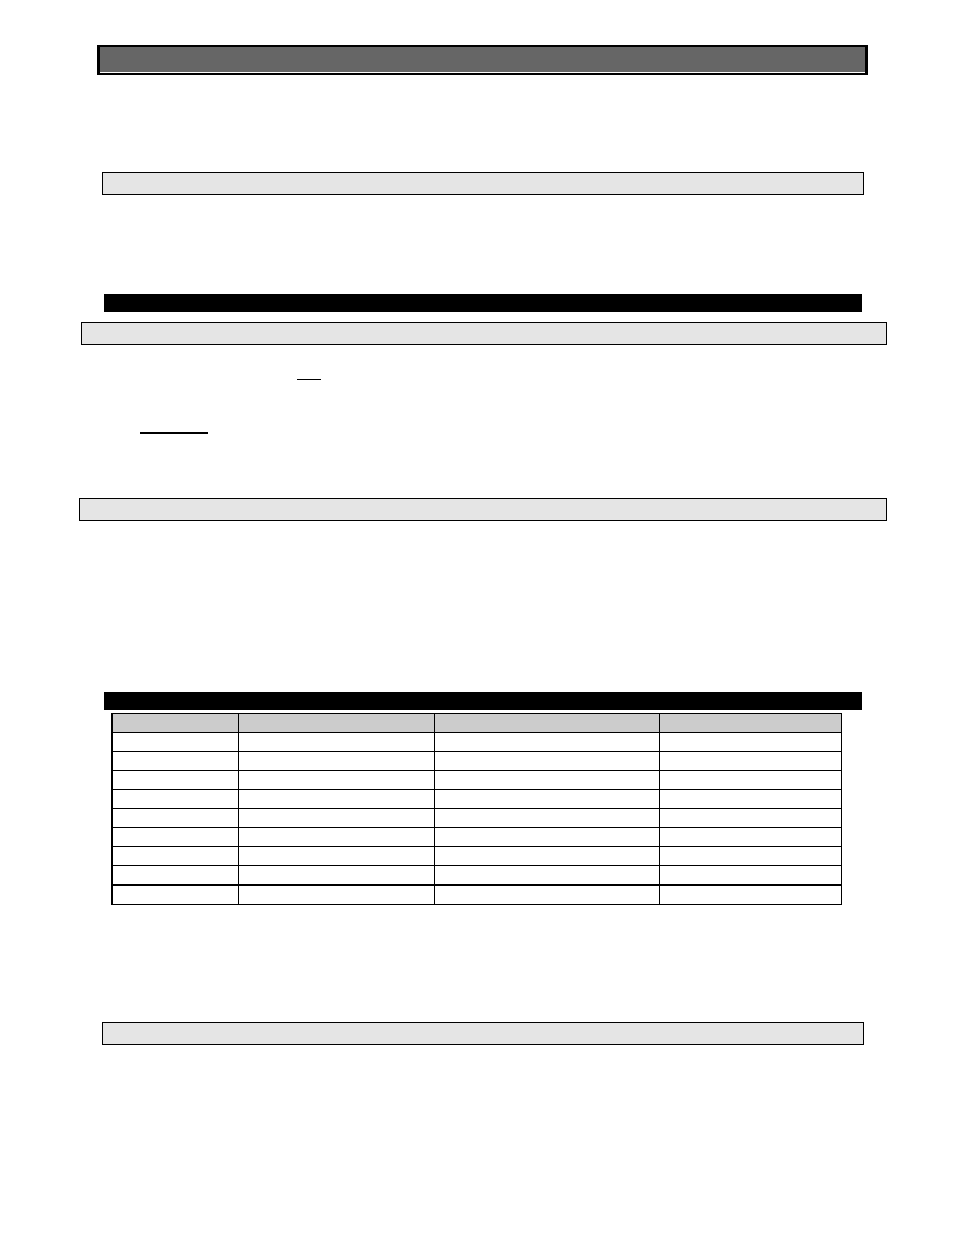
10. ALARM SIGNALS
Message
Mode
Cause
Outputs
“P1”
Flashing
Probe failure
Alarm output ON
“PoF”
Flashing (3s)
Keyboard locked
Not changed
“Pon”
Flashing (3s)
Keyboard un-locked
Not changed
“HA”
Alternated with temp
Maximum T° alarm
Alarm output ON;
“LA”
Alternated with temp
Minimum T° alarm
Alarm output ON;
“dA”
Alternated with temp
Door switch alarm
Alarm output ON;
“EA”
Alternated with temp
External alarm
Alarm output ON;
“PAn”
Alternated with temp
Serious external alarm
Alarm output ON;
dEF
Alternated with temp
Defrost is running
Not changed
The alarm message is displayed until the alarm condition is reset.
Silencing buzzer
Once the alarm signal is detected the buzzer can be silenced by pressing the UP key.
10.1 ALARM RECOVERY
Probe alarms : “P1” (probe1 faulty), “P2” ; they automatically stop 10s after the probe restarts normal
operation. Check connections before replacing the probe.
T° alarms “HA” and “LA” automatically stop as soon as the thermostat T° returns to normal values or when
the defrost starts.
Door switch alarm “dA” stops as soon as the door is closed.
External alarms “EAL”, “BAL” stops as soon as the external digital input is disabled.