Nds quick start guide english, 1 installing and connecting – Naim Audio NDS User Manual
Page 2
NDS Quick Start Guide
English
1 Installing and Connecting
• The four transit screws located on the underside of the NDS must be carefully removed
before use. Do not invert the NDS to remove the transit screws but work from the underside
by positioning it at the edge of a table. The transit screws must be replaced if the NDS is to
be re-packed or shipped.
Do not invert the NDS during or following transit screw removal.
• Following transit screw removal, stand the NDS on an appropriate, level and stable surface.
Make sure it is adequately ventilated.
• The NDS requires an external XP5 XS, XPS or 555PS power supply connected to one (XP5
XS, XPS) or both (555PS) of its power supply input sockets. Use only the Burndy cable or
cables supplied with the power supply. If an XP5 XS or XPS power supply is used it should
be connected to NDS Power Supply Input 1. If a 555PS power supply is used it should be
connected to both NDS Power Supply Inputs 1 and 2. The link plug must remain fitted to
Power Supply Input 2 unless a 555PS power supply is used. Do not switch on the external
power supply until all required NDS connections are made.
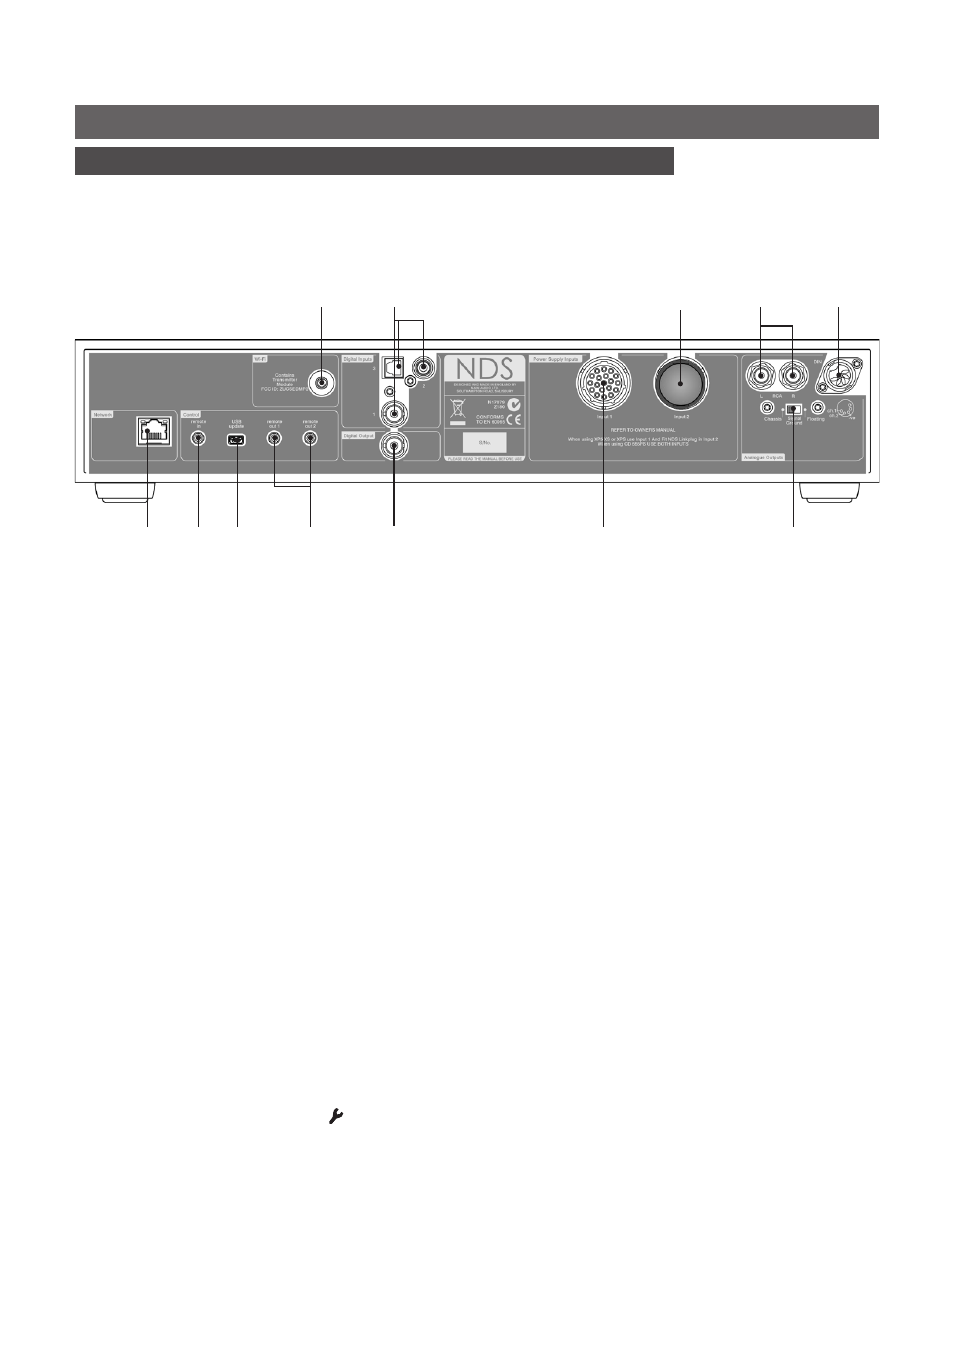
• Identify the
Signal Ground Switch
and select the “chassis” option unless the NDS is
connected in a hi-fi system incorporating another earthed source component (all Naim CD
players, for example), or mains “hum” is audible through the loudspeakers when the NDS is
switched on.
• To play audio from a
UPnP
™ server or from internet radio stations, the NDS
network socket
must be connected to a router using an Ethernet cable, or its
Wi-Fi Antenna
must be fitted.
Internet radio also requires a high-speed internet connection.
• If the NDS is to play audio files stored on a
USB
device, connect it using an appropriate
cable, if necessary, to the front panel USB socket.
• If any external S/PDIF digital audio sources are to be used with the NDS, connect them,
using the appropriate BNC coaxial, phono coaxial or optical cables, to the
digital
inputs.
• Connect one of the NDS outputs to an appropriate preamplifier or external DAC input. The
NDS DIN output is the default active analogue output. To select an alternative analogue
output, press the handset setup key ( ) once the NDS is switched on and select
Analogue
Outputs
. Select
Digital Output
to activate the digital output.
• NDS control can be linked using
System Automation
to the control of some Naim
preamplifiers, CD players and the Naim DAC. System Automation enables for example,
preamplifier inputs to be selected via the NDS, or for n-Stream transport functions to control
a CD player. To take advantage of System Automation, connect one of the NDS
Remote
Full NDS installation and operational information can be found in the Reference Manual
available on line at www.naimaudio.com
Important:
XPS power supplies
with serial numbers below
188015 are not compatible
with the NDS and should not
be used. Contact your local
retailer or distributor for more
information.
network
socket
signal ground
switch
digital
output
wireless network
(Wi-Fi) antenna
socket
power supply
socket 2
(link plug fitted)
power supply
socket 1
USB
upgrade
interface
remote
in
remote
out 1 & 2
digital inputs
1, 2 & 3
analogue
output
(phono)
analogue
output
(DIN)
Note:
NDS System Automation
is switched off by default.
A full description of its use
can be found in the NDS
Reference Manual.