Stopwatch, Temperature scale & emissivity – TrakPower Temperature Gauge with Stopwatch User Manual
Page 2
2
Helpful Hint:
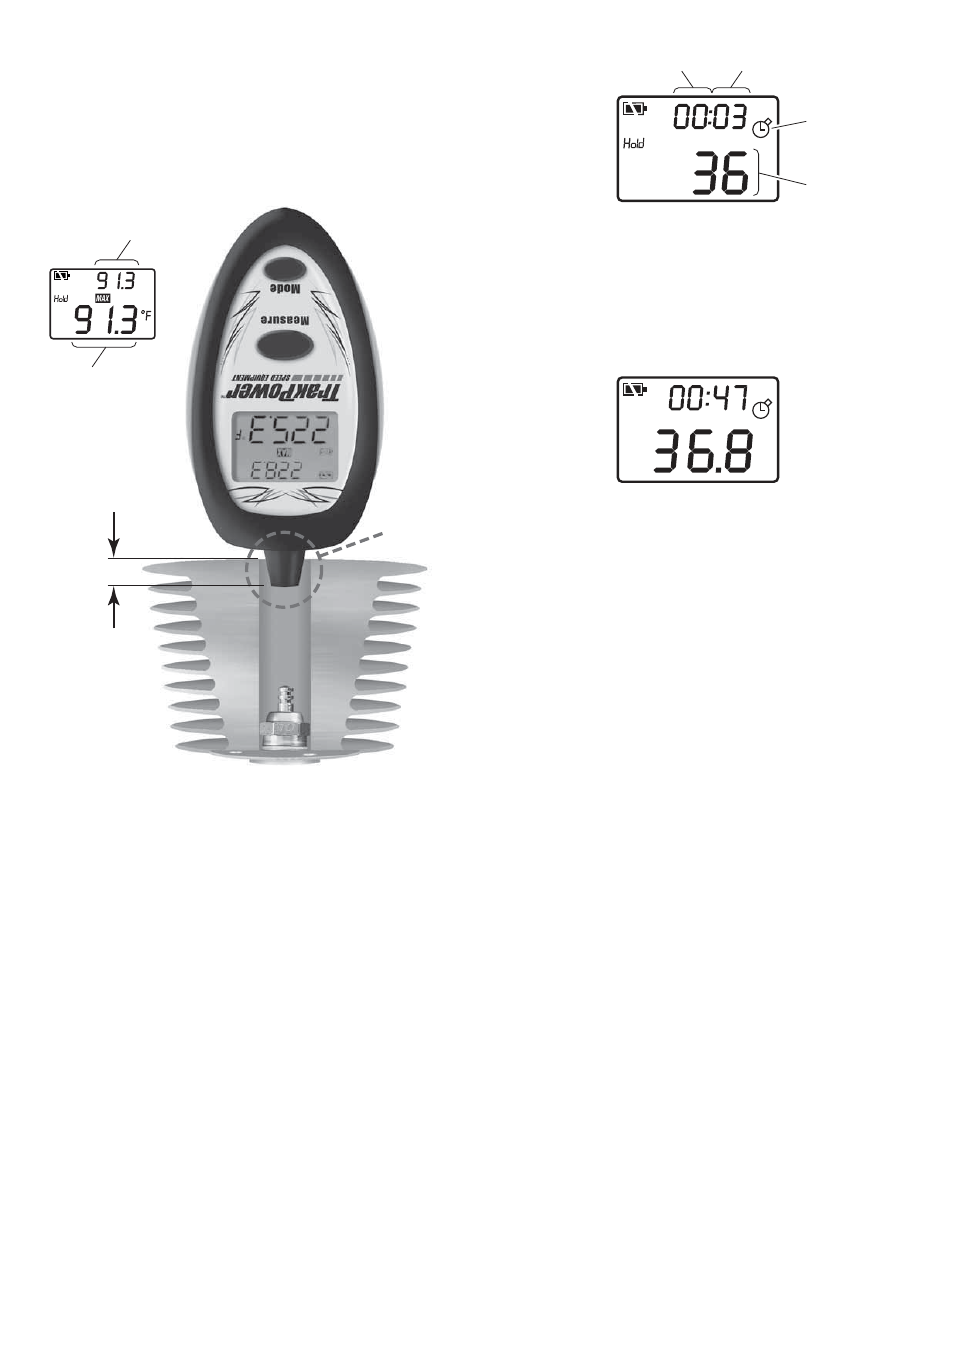
As shown in the diagram, for the most accurate
temperature readings, always insert the sensor into the engine
head cavity 3mm to 8mm, making sure not to allow the ITG
case to come into contact with the head. Aim the ITG directly
at the tip of the glow plug, because this is the hottest area of
the engine, and then press and hold the MEASURE button
for three to fi ve seconds.
Maximum
Reading
Do Not
Allow ITG
to Contact
the Engine
Head
Insert
Sensor
3 mm to
8 mm
Last
Reading
Stopwatch
1.
Press the MEASURE button to turn on the ITG.
2.
Press the MODE button once and the stopwatch icon
will start to fl ash.
3.
Press the MEASURE button to start the stopwatch
counting up from 0:00:00.
4.
Press the MEASURE button to pause the stopwatch.
5.
Press the MEASURE button to re-start the stopwatch
from where it was paused.
6.
Pressing the MODE button will reset the timer to 00:00
whether the stopwatch is running or paused.
7.
Pressing the MODE button while the stopwatch is paused
will return you to the main (thermometer) screen.
Notes:
● Backlight does not illuminate while in stopwatch mode, to
extend battery life.
● Stopwatch will run continuously if it is not stopped manually.
● Minutes and whole seconds are displayed in small digits
at the top of the screen. Fractions (1/100) of a second are
displayed in large digits at the bottom of the screen.
Minutes
Seconds
Stopwatch
Icon
Hundredths
of Seconds
This screen shows
3 and 36 one-hundredth seconds.
This changes when the stopwatch reaches 30 minutes at
which time the small digits at the top show hours and minutes,
and the large digits at the bottom of the screen show seconds
and 1/10 of a second.
This screen shows
47 minutes, 36 and 8 tenths seconds.
Temperature Scale & Emissivity
Press MEASURE button to turn on unit.
Temperature Scale - °F or °C
Press the MODE button twice. The °F icon will fl ash. Press
the MEASURE button once to change the setting. The setting
will change from °F to °C or °C to °F and immediately return
to the main screen. This setting will be retained for future use
until changed manually.
Emissivity
The emissivity can be adjusted to allow the ITG to be used for
a variety of other uses other than taking temperature readings
of nitro engines. The emissivity must be set correctly for the
material being measured or the temperature reading may
not be accurate.
A search of the internet will show many links for ‘emissivity
tables’. Keep in mind these tables are for different types of
materials in general, and are not geared directly for R/C
products. In most cases, only minor adjustments to the
emissivity setting might be needed for different types of engine
heads. If unsure what emissivity setting to use, the default
setting of 1.00 (100E) typically provides the most accurate
temperature reading for nitro engines when used as shown in
the illustration at left. The emissivity of the temperature gauge
can be changed from 0.05 (5E) to 1.00 (100E). To change
the emissivity setting, press the MODE button 3 times. Then
press the MEASURE button once to advance the setting
one at a time. Holding down the MEASURE button will scroll
through the entire range of settings. Once the unit reaches
100E, it will start over at 5E and go through the entire range
again. Once the desired emissivity setting is reached, press
the MODE button once to lock in the setting and immediately
return you to the main screen. This setting will be retained for
future use or until it is changed manually.