Starrett 2000-24 Altissimo Electronic Height Gage User Manual
Page 10

Measuring - Diameter
Starrett Altissimo Operation Manual
Page 9
CAT 2000-24
Diameter Measuring Mode : The Diameter Mode can be used to measure a Diameter of a Shaft or Bore or the
Height of a Slot or Rib. Press the DIA Key to the right of the Display to enter this mode. After scanning the upper
and lower surface of the part, the Altissimo automatically calculates the Diameter.
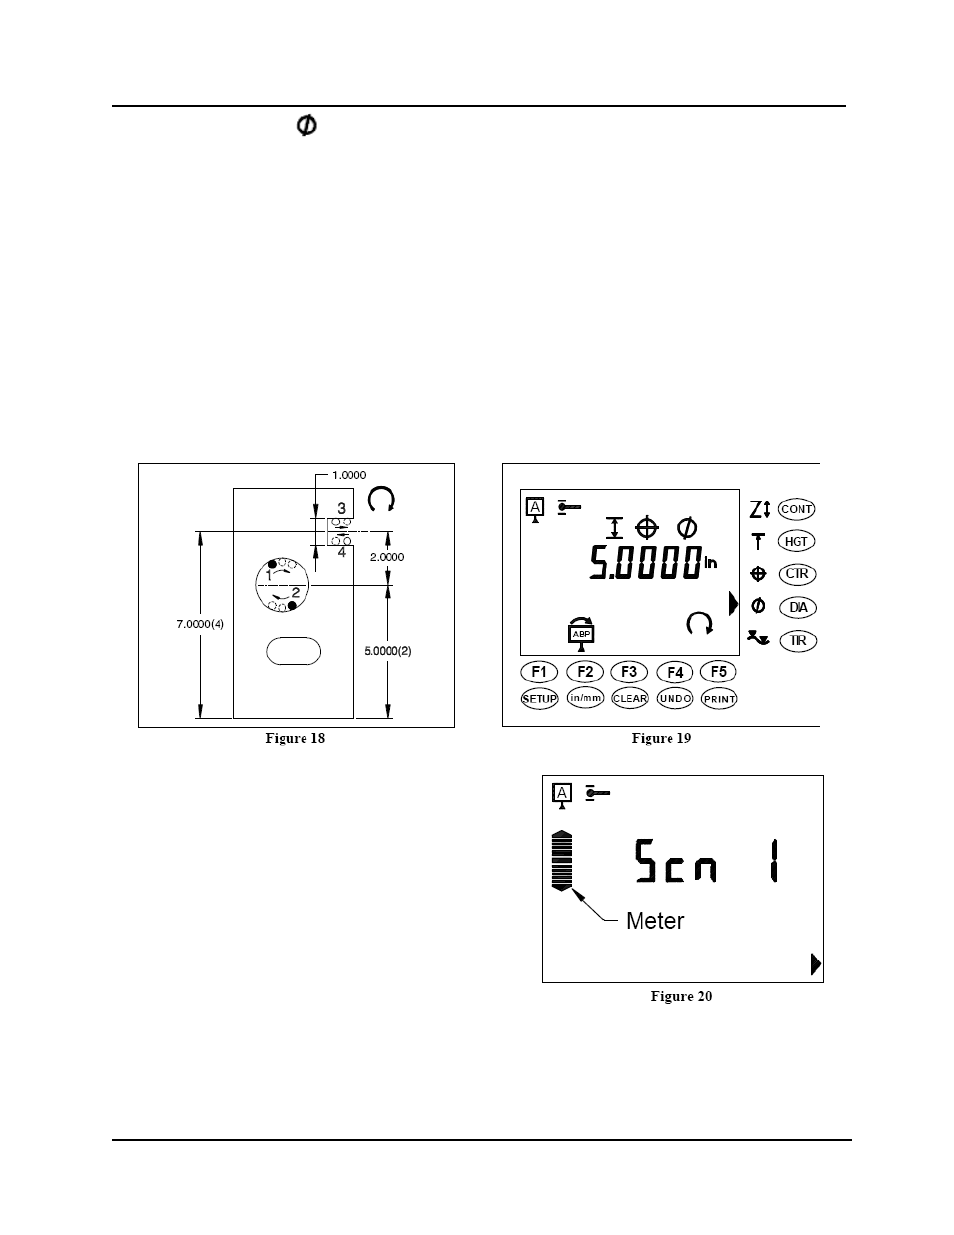
The Display will request Scan 1 (Scn 1). Locate the probe to one side of the center of the Hole or Boss to be
measured. Using the Coarse Adjuster Knob, bring the Probe close to either the lower or upper surface of the Hole to
be measured. Pull out the Adjusting Knob to engage the Fine Adjust mechanism and move the probe onto the
surface until the tool beeps. Slide the probe across the High or Low point of the Hole. (See Figure 18) Move the
Probe clear of the surface; the tool will beep twice as the probe is retracted. The Display will request a second Scan
(Scn 2).
Bring the Probe into contact with the opposite surface of the hole or slot until the tool beeps. Slide the probe across
the High or Low point of the Hole. (See Figure 18) Move the Probe clear of the surface; the tool will beep twice as
the probe is retracted.
The display will show the Diameter of the Hole or Boss. (See Figure 19) Press the Hot Key on the Base or the F5
Key on the Display to switch the measured value between Diameter and Center of the Hole. If you have measured
more than one feature the Display will show a third Icon, Distance to Last Feature.
Note: When using the Diameter Mode to measure very small
diameters where the probe cannot be swept very far past the top
or bottom of a hole or boss, or to measure a slot width, it is best
to end the scan by pressing the Hot Key rather than retracting the
probe from the surface. This will provide the most accurate
measurements.
Note: If the tool beeps three times before you end the Scan you
have exceeded the High or Low Limit of the Scanning Range.
(See Figure 20) Press CLEAR Key to clear the last data point and
remeasure the surface. You can monitor your position within the
Scanning Range by observing the Scanning Meter on the Left
Side of the Display Screen.
Tip: When Measuring Diameters it is helpful to set the Belt Locking Knob to drag a little on the belt. This will
prevent the probe from moving while scanning and eliminate the need to engage the Fine Adjust Knob. Tightening
the Belt Locking Knob too much will prevent the probe from moving.
Tip: For quick measurements, the probe can be brought into contact with the surface to be measured by using the
Coarse Adjuster Knob. Try not to move the Knob while scanning the surface. After scanning the surface use the
Knob to retract the probe. This will provide slightly reduced accuracy but greatly speed up measurements.
