Mounting toggle wing models – Star Headlight & Lantern 400A-LED User Manual
Page 2
-1-
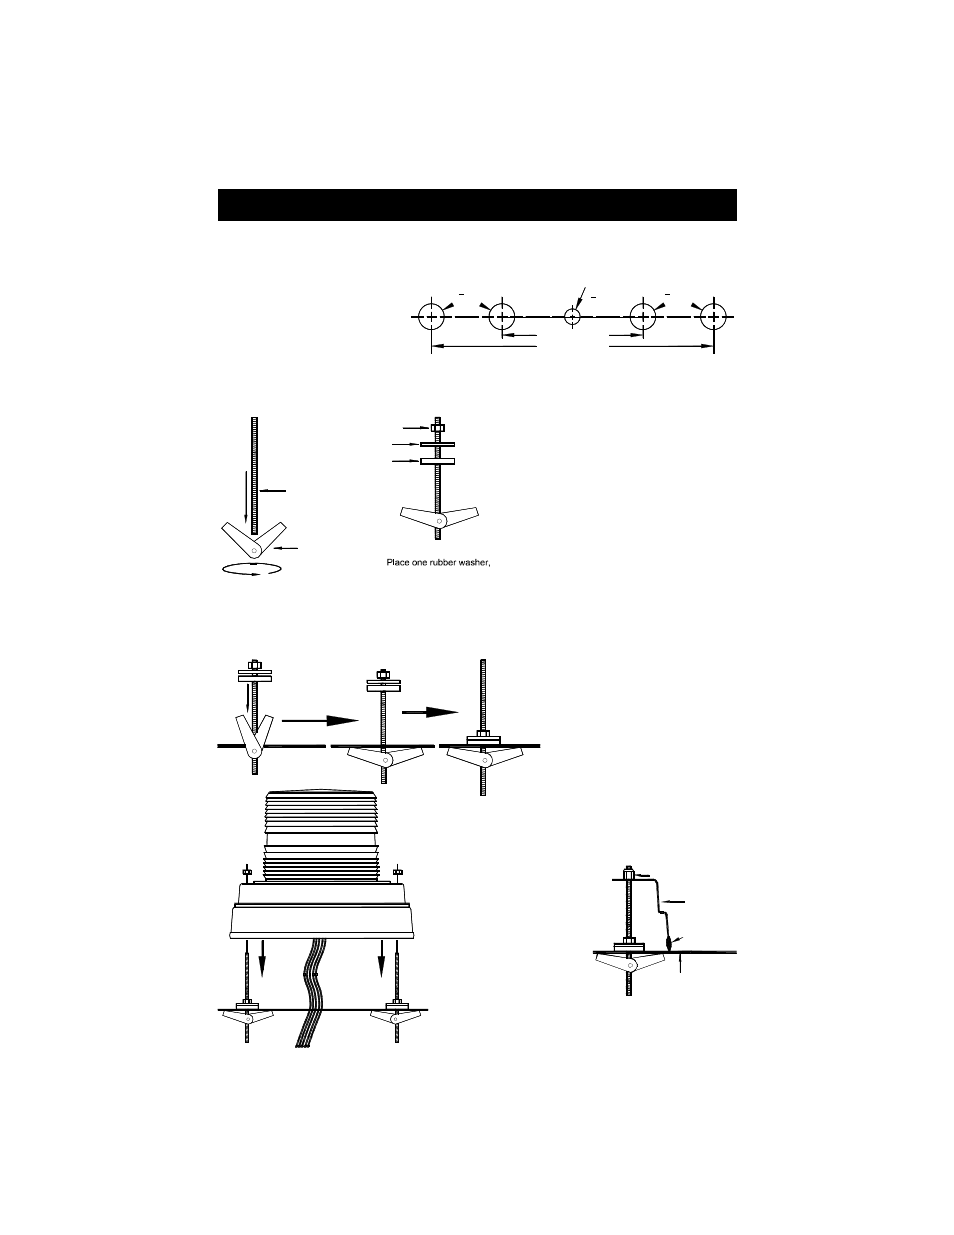
WIRE HOLE
3
8
" DIA.
7" CENTERS
5
8
" DIA.
5
8
" DIA.
3½" CENTERS
Mounting Toggle Wing Models
Screw toggle wing
and threaded rod
together
THREADED ROD
NUT
STEEL WASHER
TOGGLE WING
RUBBER WASHER
one steel washer, and
one nut on each rod
10. Route the wires through the center hole, align
the outer holes in the base with the threaded
rods and slide the base onto the rods.
MOUNTING SURFACE
Insert the threaded rod
and toggle wing
through the mounting
surface
Tighten the nut,
securing the rod in
place
8. Then push the toggle wing through the top of one of the outer holes in the mounting
surface until it opens under the mounting surface.
9. Tighten the nut down such
that it seats the steel washer
firmly against the rubber
washer, and the mounting
surface, holding the rod in
place. Repeat this for each
threaded rod.
Route wires through center hole, slide
light over rods, and secure with nuts
1. Your new warning light comes complete with a rubber mounting gasket, 2 toggle wings,
2 threaded rods, 2 neoprene washers, 2 steel washers, 2 nuts, and 2 self-locking nuts.
2. Mark two mounting holes on
7” centers for the 400A, and
450A Series or 3½” centers
for the 200C or 200E series
and mark a spot for the wire
hole centered directly
between them.
3. Drill a 5/8" hole in the outer two marked locations. Then drill a 3/8" hole in the center
marked location for your wires to run through. CAUTION: Take care not to drill through
the headliner of the vehicle.
4. Attach the rubber mounting gasket
around the base of the light.
5. Carefully remove the lens by
removing the three screws at the base
of the lens. Lift off the lens and
remove it taking care to ensure you do
not lose or destroy the lens gasket.
6. Attach a toggle wing to one end of one
of each of the threaded rods.
7. Place the rubber and steel washers
around each of the threaded rods
according to the diagram to the left.
MOUNTING
GASKET
MOUNTING
SURFACE
SELF-LO CKING N UT
BASE
12. Once all of the nuts are tight and the base is
secure, reattach the outer lens(es).
11. Fasten one of the
self-locking nuts to
each of the threaded
rods and tighten
until snug.