Flying tips and repairs, First flight preparation, Maintenance after flying – ParkZone PKZ5580 User Manual
Page 12
EN
Always
decrease throttle at
propeller strike.
Flying Tips and Repairs
Range Check your Radio System
After fi nal assembly, range check the radio system with the RAF S.E.5a. Refer
to your specifi c transmitter instruction manual for range test information.
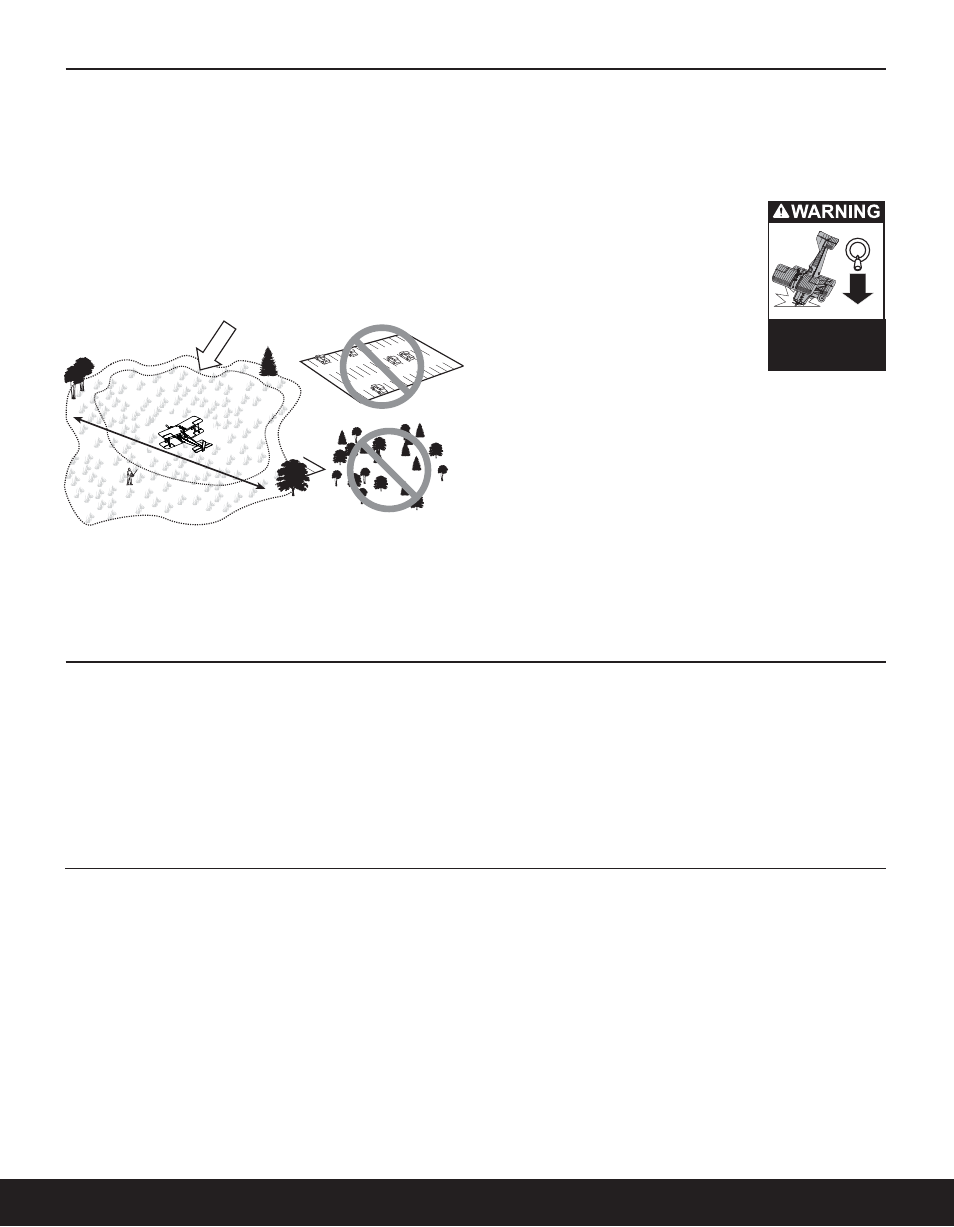
Flying
Always choose a wide-open space for fl ying your ParkZone RAF S.E.5a. It is
ideal for you to fl y at a sanctioned fl ying fi eld. If you are not fl ying at an ap-
proved site, always avoid fl ying near houses, trees, wires and buildings. You
should also be careful to avoid fl ying in areas where there are many people,
such as busy parks, schoolyards, or soccer fi elds. Consult local laws and
ordinances before choosing a location to fl y your aircraft.
Landing
Land the model when you hear the motor pulsing (LVC) or if you notice a
reduction in power. If using a transmitter with a timer, set the timer so you
have enough fl ight time to make several landing approaches.
Due to the scale landing gear and characteristics of
the RAF S.E.5a, throughout fl ight and when landing
keep the wings level, even when taxiing. An optional
tail wheel has been included to help with ground
handling.
You should land the RAF S.E.5a using a wheel landing
(two point).
If the power is pulled all the way back when landing,
the propeller acts like an air brake, which can lead
to the elevator being less effective. Therefore, it is
advisable to land with some amount of power on as it
allows more time to fl are the airplane for a
smooth landing.
When setting up for landing, fl y the airplane down to the ground using
1/4 - 1/3 throttle to allow for enough energy for a proper fl are.
NOTICE: When fi nished fl ying, never keep the airplane in the sun. Do not store
the aircraft in a hot, enclosed area such as a car. Doing so can damage
the foam.
Repairs
Thanks to the Z-Foam™ construction of the RAF S.E.5a, repairs to the foam
can be made using virtually any adhesive (hot glue, regular CA, epoxy, etc).
When parts are not repairable, see the Replacement Parts List for ordering by
item number.
NOTICE: Use of foam-compatible CA accelerant on your model can damage
paint. DO NOT handle model until accelerant fully dries.
First Flight Preparation
1. Remove and inspect contents.
2. Charge fl ight battery.
3. Read this instruction manual thoroughly.
4. Fully assemble model.
5. Install the fl ight battery in the aircraft (once it has been fully charged).
6. Bind aircraft to your transmitter.
7. Make sure linkages move freely.
8. Perform the Control Direction Test with the transmitter.
9. Adjust fl ight controls and transmitter.
10. Perform a radio system Range Check.
11. Find a safe and open area.
12. Plan fl ight for fl ying fi eld conditions.
Maintenance After Flying
1. Disconnect fl ight battery from ESC (Required for Safety and battery life).
2. Power off transmitter.
3. Remove fl ight battery from aircraft.
4. Recharge fl ight battery.
5. Repair or replace all damaged parts.
6. Store fl ight battery apart from aircraft and monitor the battery charge.
7. Make note of fl ight conditions and fl ight plan results,
planning for future fl ights.
Fly in this area
(upwind of pilot)
Stand here
600
feet (182.8 m)
12