Service of power components, Control surface throws, High rate low rate – ParkZone PKZ5580 User Manual
Page 11
EN
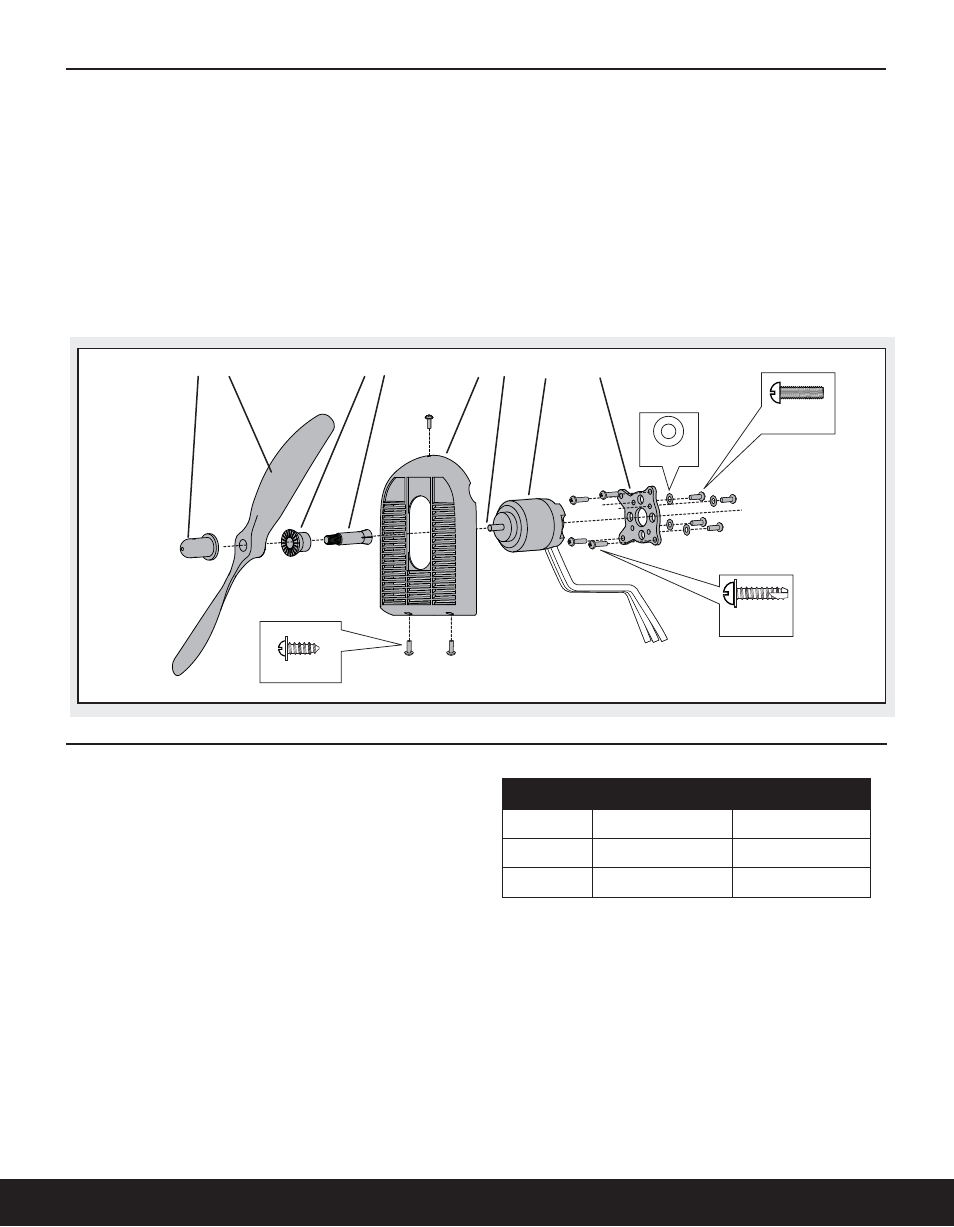
Disassembly
1. Remove spinner nut (A), propeller (B), backplate (C) and collet (D) from the
motor shaft (E). You will need a tool to turn the spinner nut.
2. Remove three screws from cowling (F).
3. Carefully remove cowling from fuselage. Paint may keep cowling attached
to the fuselage.
4. Remove four screws from motor mount and fuselage.
5. Disconnect motor wires from ESC wires.
6. Remove four screws and motor (G) from motor mount (H). Keep rubber
washers attached to the motor mount when removing screws and motor
from motor mount.
Assembly
1. Attach motor to motor mount using four rubber washers and four screws.
2. Correctly align wire colors and connect motor to ESC.
3. Attach motor mount to fuselage using four screws.
4. Attach cowling to fuselage using three screws.
5. Attach collet, backplate and propeller to motor shaft using spinner nut. The
propeller side with the numbers for diameter and pitch (for example,
10 X 8) should face rearward, toward the motor. The grips on the propeller
will face the back plate ‘C’ when installed. You will need a tool to tighten
spinner nut on collet.
Service of Power Components
Not all wiring shown.
Control Surface Throws
A
B
E
High Rate
Low Rate
Aileron
22mm up/17 down
17mm up/14 down
Elevator
13mm up/down
10mm up/down
Rudder
20mm left/right
15mm left/right
Your DSM2/DSMX full range transmitter features dual rates to help you select
the amount of travel that you want from the control surfaces.
C D
F
G
H
2 X 5mm (3)
3 X 15mm (4)
3 X 8mm (4)
M3 (4)
The ailerons are factory pre-set to allow for more up travel than
down (differential).
11