Operation examples, Setup of pv input range type, Setup of event operation type – Nor-Cal SDC15 Controller User Manual
Page 3: Execution of auto tuning (at), Setup of sp value, Green letters, Blue letters
5
4
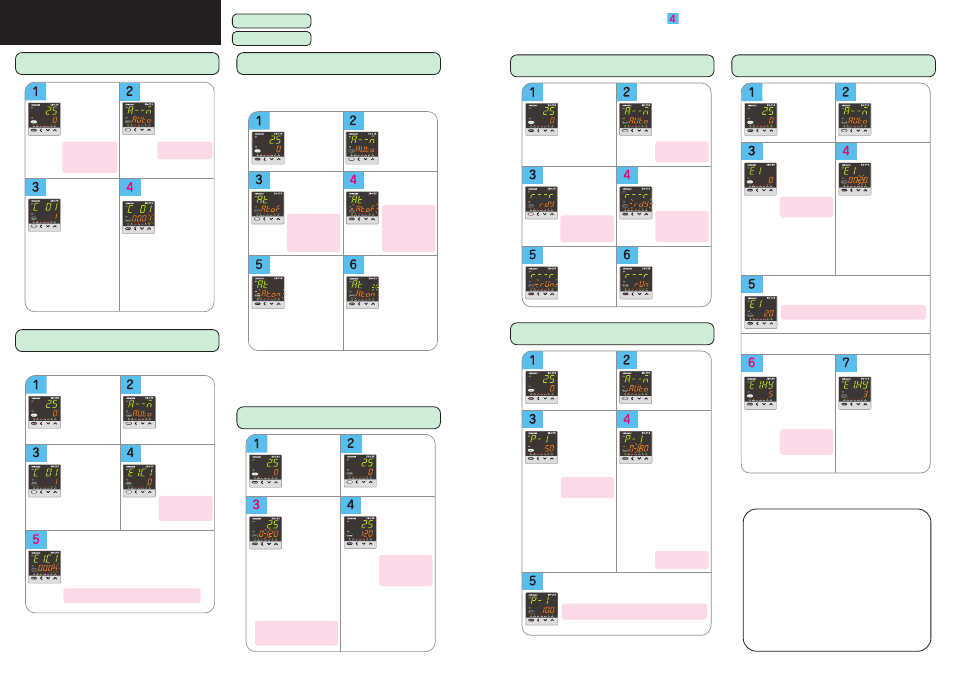
Operation examples
Setup of
PV input range type
Start from the
operation display
(if necessary
press [mode] once
to get the opera-
tion display).
Press and hold
[para] for more
than 2s to get the
parameter setup
display.
a--M
is
shown on the
upper display.
Press and hold
[para] for more
than 2s again to
get the setup
setting display.
The current set
value for
C0 1
(PV input range
type) is displayed.
When the [<], [ ]
or [ ] key is
pressed, the right-
most digit on the
lower display
flashes. If no key
is pressed for
more than 2s after
changing to the
desired value in
the PV input range
list, the display
changes from
flashing to conti-
nuously lit, and
the displayed
value is now set.
<
<
If no sensor is connected,
an alarm for abnormal
PV input (any one from
AL0 1
to
AL 1 1
) may
appear on the upper
display.
In case of ON/OFF
control,
r--r
appears
on the upper display.
Setup of
event operation type
Start from the
operation display
(if necessary
press [mode]
once to get the
operation display).
Press and hold
[para] for more
than 2s to get the
parameter setup
display.
a--M
is
shown on the
upper display.
Press and hold
[para] for more
than 2s again to
get the setup
setting display.
The current set
value for
C0 1
(PV input range
type) is displayed.
Press [para]
repeatedly to get
e 1.c 1
on the upper
display.
0
is
displayed on the
lower display.
In this example, the event 1 operation type is set to
deviation high limit.
Similarly, use e2.C 1 to set the event 2 operation type, and
use e3.C 1 for event 3.
When the [ ] or [ ] key is pressed, the rightmost
digit on the lower display flashes. Change the
flashing digit to
4
by pressing [ ] or [ ].
If no key is pressed for more than 2s, the
displayed value is set and the display changes
from flashing to continuously lit.
<
<
<
<
4
on the lower display indicates that the event operation type is
set for deviation high limit.
0
on the lower display
indicates that the event
operation type is set to
"none."
Execution of
auto tuning
(AT)
Start from the
operation display
(if necessary
press [mode]
once to get the
operation display).
Press and hold
[para] for more
than 2s to get the
parameter setup
display.
a--M
is
shown on the
upper display.
Press [para] twice.
The upper display
says
at
and the
lower display says
at.Of
.
When [ ] or [ ] is
pressed,
at.Of
flashes.
If no key is pressed
for more than 2s,
at.ON
remains steadi-
ly lit and AT begins.
During AT, the right-
most decimal point
flashes twice re-
peatedly. (When AT
is done, the light
goes off and the
new PID values go
into effect.)
Press [ ] once.
The lower display
starts to flash
at.On
.
AT forces ON/OFF of the MV a number of times (a limit
cycle) to calculate PID values.
Check that this operation does not create any problems
for the associated equipment before executing AT.
During the AT process, if the mode is changed to
READY or MANUAL, if PV input is faulty, or if a power
failure occurs, AT stops automatically without changing
the PID values.
AT can also be stopped by changing the setting from
At.ON
to
At.OF
(return to step 3 above).
<
<
<
If the control method is
ON/OFF control and if
Bit 3 (AT stop/start
display) of the mode
display setting (C73) is
set to "disabled: 0,"
nothing is displayed.
Flashing occurs only in
RUN and AUTO modes,
if there is no PV input
abnormality.
Also, if "AT stop/start" is
selected for DI assign-
ment, the display does
not blink and no change
can be made.
Setup of
SP value
Start from the
operation display
(if necessary
press [mode] once
to get the opera-
tion display).
Check that the
operation display
is displaying the
SP.
(If not, press [para]
repeatedly until the
SP is displayed.)
When the [<], [ ]
or [ ] key is press-
ed, the rightmost
digit on the lower
display flashes and
the SP can be
changed to the
desired value.
In this case, the
flashing of the
numerical value
implies that it is not
yet set. A numerical
setting that is being
changed flashes
the same way.
If no key is pressed
for more than 2s,
the displayed value
is set and the
display changes
from flashing to
continuously lit.
<
<
If the [mode] key is
pressed when the
display is flashing, the
status returns to that of
step 1.
If an SP limit is in effect, the numerical
value cannot be changed to a value
above the limit. The SP limit must be
changed first.
Green letters
: Items before operation
Blue letters
: Items during operation
Start from the
operation display
(if necessary press
[mode] once to get
the operation
display).
Press and hold
[para] for more
than 2s to get the
parameter setup
display.
a--M
is
shown on the
upper display.
Press the [para]
key once. The
upper display says
r--r
and the lower
display says
rdy
(or
run
).
When [ ] or [ ] is
pressed, the lower
display flashes.
If no key is pressed
for more than 2s,
the displayed value
is set and the
display changes
from flashing to
continuously lit.
When [ ] or [ ] is
pressed,
run
(or
rdy
) on the lower
display flashes.
>
>
>
>
The current mode is
indicated by
run
for
RUN mode or
rdy
for
READY mode.
In case of ON/OFF
control,
r--r
appears
on the upper display.
If the DI assignment is
set to "RUN/READY
selection," the display
does not flash and no
change can be made.
RUN/READY
mode selection
Setup of
PID value
Setup of
event value
Start from the
operation display
(if necessary press
[mode] once to
get the operation
display).
Press and hold
[para] for more
than 2s to get the
parameter setup
display.
a--M
is
shown on the
upper display.
Press [para]
repeatedly to get
p-1
(for propor-
tional band) on
the upper display.
The value set for
p-1
is displayed on
the lower display.
When [<], [ ] or
[ ] is pressed, the
rightmost digit on
the lower display
flashes, and can
be changed to the
desired value for
the proportional
band.
In this case, the
flashing of the
numerical value
implies that it is
not yet set. A
numerical setting
that is being
changed flashes
the same way.
Similarly, use
i-1
to set the integral time (0 to 9999s),
and
d-1
to set the derivative time (0 to 9999s).
>
>
If the control method is
"ON/OFF control,"
nothing is displayed.
The proportional band
can be set in a range
from 0.1 to 999.9%.
If no key is pressed for more than 2s, the
displayed value is set and the display changes
from flashing to continuously lit.
If the [mode] key is pressed when the display is flashing, the status
returns to that of step 1.
Start from the
operation display
(if necessary press
[mode] once to get
the operation
display).
Press and hold
[para] for more
than 2s to get the
parameter setup
display.
a--M
is
shown on the
upper display.
Press [para]
repeatedly to get
e 1
on the upper
display. The lower
display says
0
.
When [<], [ ] or
[ ] is pressed, the
rightmost digit on
the lower display
flashes, and can
be changed to the
desired value for
the event.
In this case, the
flashing of the
numerical value
implies that it is
not yet set.
A numerical set-
ting that is being
changed flashes
the same way.
To set hysteresis
as well, press
[para] once (or
twice, depending
on the settings) to
display
e 1.hy
on
the upper display.
The lower display
says
5
.
When [<], [ ] or
[ ] is pressed, the
rightmost digit on
the lower display
flashes, and can
be changed to the
desired value for
hysteresis.
If no key is pressed
for more than 2s,
the displayed value
is set and the
display changes
from flashing to
continuously lit.
Similarly, use
e2
to set a value for event 2, and
e3
to set
a value for event 3.
Similarly, use
e2 hy
to set a hysteresis value for event 2,
and
e3 hy
to set a hysteresis value for event 3.
>
>
<
<
0
on the lower display
indicates that the event
main set value is "zero."
5
on the lower display
indicates that the current
set value for event
hysteresis is 5.
If no key is pressed for more than 2s, the displayed
value is set and the display changes from flashing
to continuously lit.
If the [mode] key is pressed when the display is flashing, the status
returns to that of step 1.
Memo
• For step numbers indicated in red like
, the following precaution applies:
If the key lock is set, the numerical value does not flash, and the value cannot be changed.
To change a numerical value, cancel the key lock first.